Better, topic (Veneers)

Status
Not open for further replies.
Eric,

I just received a picture of the veneers fairly close up on a Spain blank Balabushka. It's pretty easy to see that they are stacked. Not only that, they are all stacked the same direction! It's way too big to post and if I make it smaller. it's harder to see.

So, I totally agree with you. If they are done right or not is what counts. I have seen cues where they were done so well it was hard to tell. I'm also not sure recuts would change the hit much either. Again, provided everything was glued and machined properly.

Hello Royce, I have a copy of Burtons "The recollections of Burton Spain" Making Point Blanks.

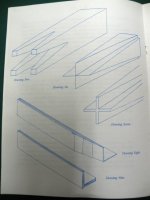
According to Burton he made them both ways depending if he was making full length blanks or short balnks, below is some pages out of Burton's book.

1.jpg

3.jpg

2.jpg

If anyone would like some fullsize photo's that cover how Burton Built Geogre Balabushka's blanks I will send them to your email address, Burton go's into a great deal of detail.

Hope this helps
 
I've seen tad copy's what about buska copy's

Great topic Mr. Webb !! thanks to all cue makers for there comments. I would like to have a cue maker replicate a buska butt, attached like George did on full splice cues. white ring, blk ,white, ebony sleeve. maple ring,red,maple,blk,maple,red,maple- etc photo 7, page 36,1st addition blue bk. I saw a cue Paul Rubino made with a letter authenticating it(the butt) was attached like George did it. Anyone here able to tell me what was special ? To me this is desirability and value, to collectors. Or is the world going to call foul or fraud-because I want a cue constructed and looking like a bushka?? thanks Mark
 
Hello Royce, I have a copy of Burtons "The recollections of Burton Spain" Making Point Blanks.

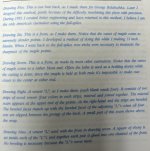
According to Burton he made them both ways depending if he was making full length blanks or short balnks, below is some pages out of Burton's book.
View attachment 145267

View attachment 145268

View attachment 145269

If anyone would like some fullsize photo's that cover how Burton Built Geogre Balabushka's blanks I will send them to your email address, Burton go's into a great deal of detail.

Hope this helps
how do I get a copy of that book?
I like to collect notes just to collect.
 
Great topic Mr. Webb !! thanks to all cue makers for there comments. I would like to have a cue maker replicate a buska butt, attached like George did on full splice cues. white ring, blk ,white, ebony sleeve. maple ring,red,maple,blk,maple,red,maple- etc photo 7, page 36,1st addition blue bk. I saw a cue Paul Rubino made with a letter authenticating it(the butt) was attached like George did it. Anyone here able to tell me what was special ? To me this is desirability and value, to collectors. Or is the world going to call foul or fraud-because I want a cue constructed and looking like a bushka?? thanks Mark

Thank you Mark,
You may get some serious offers is you start a thread and provide pictures of exactly what you are looking for. Besides the open forum replies you may get some pm's. You might also want to consider adding your email address to your signature and get some unexpected replies that way too.
Someone may yell foul but you know that going in.
Hope this helps.
 
Hello Royce, I have a copy of Burtons "The recollections of Burton Spain" Making Point Blanks.

According to Burton he made them both ways depending if he was making full length blanks or short balnks, below is some pages out of Burton's book.

View attachment 145267

View attachment 145268

View attachment 145269

If anyone would like some fullsize photo's that cover how Burton Built Geogre Balabushka's blanks I will send them to your email address, Burton go's into a great deal of detail.

Hope this helps
Wow please email me at hoskencues@att.net
appreciate this generosity!
thanks!:thumbup:
 
Great thread mike!!!

Very informative and I'm learning a lot. Demistifying myths:D

In Burtons, blank - how do you cut the grooves on the front?
I have cut grooves on a lathe and with his blank, where the points meet up at the bottom, how do you clamp it down or what kinda jig or fixture is needed for that?
 
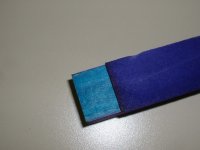
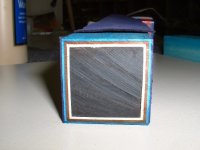
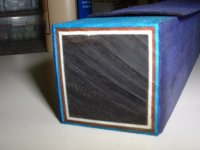
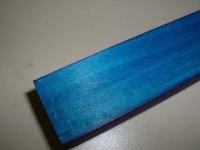
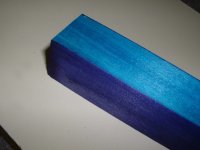
stacked veneers in process

Here is one I have in process right now. Its hard to see because it is purple on turq but I think you can get the idea.

DSCF0013.JPG

DSCF0014.JPG

DSCF0015.JPG

DSCF0016.JPG

DSCF0017.JPG
 
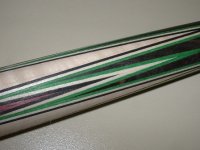
I took pics of another that is already turned to show what they look like. The seams will hide better once I spray finish on it.

DSCF0018.JPG

DSCF0020.JPG
 
Last edited:
Royce,

You might be right about Burton stacking veneers but there may be another explanation. If the blank is offset enough to even up the points, it can throw off the miter enough to make it look like it is stacked. If the veneer looks like it is all stacked on one side that may be a better explanation. Uneven pressure can cause the same thing, shifting off to one direction or the other. But that usually happens on one point not all.

Mark

Mark,

Thanks for your replies, but I think I have to disagree a little bit.

If you have a miter, and the bottom of that miter goes against the bottom of the point groove, then they can't separate from each other. I don't think offsetting to correct the points would move the miter joint away from the point end, which is the bottom of the point groove. No matter how much you offset it, the groove and the miter would still stay one on top of the other.

No offense intended, I just don't see that it could happen as you described.
 
i dont think theres a right or wrong.

but i do prefer mitred.... for several reasons....and fast or easy never are part of it.

most people that claim something is better ... because its easier for them.

just like they say about a steel joint.... truth be told its alot more work.

mitres have been used almost 200 yrs.

burt did it gus did it, i think people are misunderstanding things.

ive seen 100 plus year old cues that i dont think anyone can do the quality of today.

many times the mitres are so bad people think its lapped.

all i know is im just impressed with good clean work..... unlike some of the jack asses that post up look what i did ... and i think what kind of wood chuck did that..... are you friggin blind.


Hi John:
Thank you for posting. Excellent..
 
Veneer

Hi Steve
Thank you for posting, Excellent work as always. Have you ever done overlapped or do you miter right down to one veneer?[/QUOTE]

I've done both. 7 or 8 years ago, I did about 20 or 30 that way. I haven't done one or two veneers mitered. I would probably remachine a 1 layer, If I was doing a two with thin, I would probably overlap. I use a router table with a flush cut router bit to clean up the veneer when glued on. I start with a square big enough to get 4 points out of then glue two sides on at a time, clean up and glue on the other two sides. Have a jig with a couple of hold down clamps on to do the pressing. I haven't tried doing the paper veneers in the stacked method, but it would probably work. As a side note, I have done boxes stacked, but will not do them that way anymore. In boxes, I do believe the mitered looks better. But that's just me.
 
Mark,

Thanks for your replies, but I think I have to disagree a little bit.

If you have a miter, and the bottom of that miter goes against the bottom of the point groove, then they can't separate from each other. I don't think offsetting to correct the points would move the miter joint away from the point end, which is the bottom of the point groove. No matter how much you offset it, the groove and the miter would still stay one on top of the other.

No offense intended, I just don't see that it could happen as you described.

not really offsetting...in reality you are changing the center of the cue slightly...ultimately the v-bottoms are not truly concentric to the original center.
 
Take a look at these.

Are they mitered, or stacked?
 

Attachments

  • bushka-spain-points.jpg
    bushka-spain-points.jpg
    27.3 KB · Views: 320
not really offsetting...in reality you are changing the center of the cue slightly...ultimately the v-bottoms are not truly concentric to the original center.

You're right that the center of the point bottom moves, but the center of the miter must move with it. After all, they are glued together one right into the other.

Right?
 
You're right that the center of the point bottom moves, but the center of the miter must move with it. After all, they are glued together one right into the other.

Right?

Right, but i think that if you glue up square, then cheat...the once perpendicular veneer center line is thrown to an angle. "i think" you probably have a much better grasp on geomety than most people so this is just my guess. i just know that i have seen alot of what Mark was describing, mostly in older blanks. I could have sworn that they were stacked but when you look at the other points it becomes obvious they were not.
 
Hi Steve
Thank you for posting, Excellent work as always. Have you ever done overlapped or do you miter right down to one veneer?

I've done both. 7 or 8 years ago, I did about 20 or 30 that way. I haven't done one or two veneers mitered. I would probably remachine a 1 layer, If I was doing a two with thin, I would probably overlap. I use a router table with a flush cut router bit to clean up the veneer when glued on. I start with a square big enough to get 4 points out of then glue two sides on at a time, clean up and glue on the other two sides. Have a jig with a couple of hold down clamps on to do the pressing. I haven't tried doing the paper veneers in the stacked method, but it would probably work. As a side note, I have done boxes stacked, but will not do them that way anymore. In boxes, I do believe the mitered looks better. But that's just me.[/QUOTE]


Thank you very much.
 
Status
Not open for further replies.
Back
Top