This is a method some traditional aimers may find beneficial, particularly if they encounter issues with aligning perfectly through Center Cue Ball (CCB).
Let's start with the example of a center ball shot, no squirt and say firmish follow to reduce the effects of throw changing the OB angle significantly.
If we seek straight CB cueing, then our alignment, via bridge V placement, needs to align the cue, CCB and the target point on the OB. As our tip moves onto the line to the target point, our bridge needs to sweep across such that this line intersects CCB. This can be quite a challenge as we're moving 2 things at once. i.e. The cue line and the bridge.
The Bridge Step-Adjust Alignment method separates this method into the two parts, and narrows in toward the final bridge positioning via 1 or 2 or more steps if one's initial alignment was way out.
First Step:
Place bridge approximately where you think it needs to be. Set it statically in place.
With bridge still, rotate the cue, preferably in a way where eye-cue position remains the same. Keeping the cue against a particular part of one's chest or chin will assist a consistent perspective.
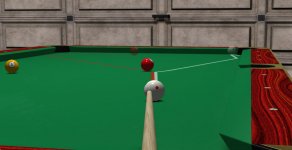
Rotate until the cue tip points to where you think the pot angle is. In this stage, you're not looking at the CB, but imagining a CB that is perfectly aligned with the tip. Feathering the cue may aid in perceiving the line to the OB target point.
When you feel satisfied with the tip direction toward to OB target, hold still with the cue. Without moving bridge or back hand or head, shift your focus to the CB and note where the tip is aligned relative to CCB.
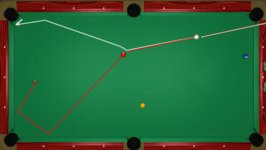
In this attached exaggerated image, my tip is way left of CCB. If there were a CB directly in front of the tip, it would be aligned properly to the OB target.
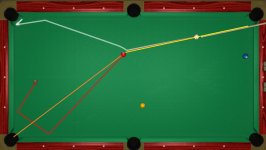
Second Step:
Parallel shift the cue and bridge to CCB. Technically speaking we'd be rotating about a radius from OB contact point to cue line, but unless the CB and OB are very close, a parallel shift is almost indistinguishable.
I'll attach the first image, then continue with the explanation with further accompanying images.
Let's start with the example of a center ball shot, no squirt and say firmish follow to reduce the effects of throw changing the OB angle significantly.
If we seek straight CB cueing, then our alignment, via bridge V placement, needs to align the cue, CCB and the target point on the OB. As our tip moves onto the line to the target point, our bridge needs to sweep across such that this line intersects CCB. This can be quite a challenge as we're moving 2 things at once. i.e. The cue line and the bridge.
The Bridge Step-Adjust Alignment method separates this method into the two parts, and narrows in toward the final bridge positioning via 1 or 2 or more steps if one's initial alignment was way out.
First Step:
Place bridge approximately where you think it needs to be. Set it statically in place.
With bridge still, rotate the cue, preferably in a way where eye-cue position remains the same. Keeping the cue against a particular part of one's chest or chin will assist a consistent perspective.
Rotate until the cue tip points to where you think the pot angle is. In this stage, you're not looking at the CB, but imagining a CB that is perfectly aligned with the tip. Feathering the cue may aid in perceiving the line to the OB target point.
When you feel satisfied with the tip direction toward to OB target, hold still with the cue. Without moving bridge or back hand or head, shift your focus to the CB and note where the tip is aligned relative to CCB.
In this attached exaggerated image, my tip is way left of CCB. If there were a CB directly in front of the tip, it would be aligned properly to the OB target.
Second Step:
Parallel shift the cue and bridge to CCB. Technically speaking we'd be rotating about a radius from OB contact point to cue line, but unless the CB and OB are very close, a parallel shift is almost indistinguishable.
I'll attach the first image, then continue with the explanation with further accompanying images.