Please Note that in the following diagrams any letter with a ‘ (prime) is a length and any with out is a angle and capital letters are points. Also the green ball is the “ghost ball”.
Variables defined:
P = pivot point
E = edge of object ball
m’ = Distance from center of object ball to desired pocket
mx’ = x component of m’
my’ = y component of m’
x’ = radius of cue ball (indicated by all red lines)
b’ = bridge length (green line)
l’ = length from the pivot point (P) to the edge of the object ball (E) (purple line)
n’ = length from the center of the cue ball to the x’ the runs from the center of the object
ball to E
d’ = distance at the edge of the cue ball between b’ and l’
a = angle between m’ and my’ (vertical)
b = angle between the line from the center of the ghost ball to desired pocket and n’
c = angle between n’ and my’ (vertical)
d = angle between l’ and vertical
e = angle between n’/b’ and l’
CTE for Various Shots:
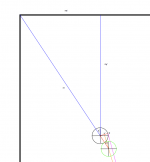
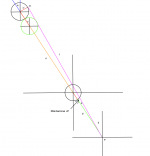
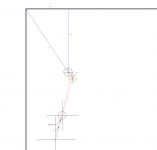
Shot #1: Low angle shot ( b < 30 degrees)
Image #1 is a full table view of this shot.
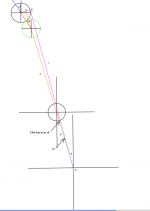
Image #2 shows the angles created upon cue ball impact with object ball.
Image #3 include from point P to object ball.
In this shot the desired angle that we wish to generate in order to make the shot is angle a. This is difficult because angle b is hard to measure as there are no physical reference points for it’s measurement.
Therefore we can use physical reference points to generate d and e which in turn will create angle b.
First how a is dependent on b, d and e by using similar angle laws. Z rule and opposite angle rule (high school math).
a = b + c [1]
c = e + d [2]
rearranging and solving for a gives:
a = b + (e+d)
= b + e + d [3]
Using CTE you initially set up distance d’ off the center of the q ball creating a straight line between P and E. This takes the measurement of angle d.
You then pivot distance d’ about point P to the center of the cue ball (inline with n’). This generates angle e.
The collision of the object ball and the cue ball produces angle b.
You now have the 3 pieces of information needed to generate angle a.
The other variable that you need to know is distance d’. The correct d’ is proportional to b’. As your bridge length increases so must your d’. This is why you must practice with CTE to figure out what d‘ correlates to your comfortable bridge length.
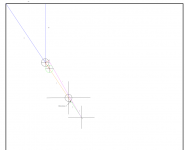
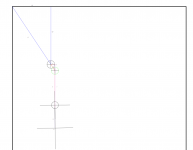
Shot # 2 No angle shot (DEAD straight)
Image #4 is a full table view of this shot.
Image #5 shows the angles created upon cue ball impact with object ball.
Image #6 include from point P to object ball.
As you can see in the this shot angle b goes to zero. That is why this is much easier to picture.
Therefore equations #1, #2 and #3 become
c = e + d
c = a
a = e + d
Measure d pivot distance d’ about P to measure e. This then gives you angle c which in turn generates angle upon impact.
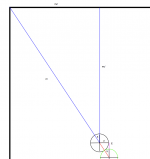
Shot #3 Half ball Hit ( b = 30 degrees)
Image #7 is a full table view of this shot.
Image #8 shows the angles created upon cue ball impact with object ball.
Image #9 include from point P to object ball.
In this shot angle c has gone to zero.
Therefore equations #1, #2 and #3 become
a = b
0 = e + d
a = b
In this shot no measurements of e and d are not required as they both equal 0. Therefore you can line the center of the ball at the edge to generate b which in turn generates a upon impact.
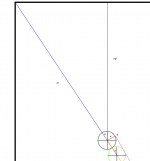
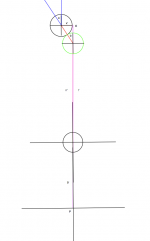
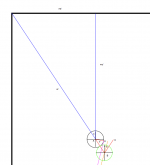
Shot #4 acute angle cut (b > 30 degrees)
Image #10 is a full table view of this shot.
Image #11 shows the angles created upon cue ball impact with object ball.
Image #12 include from point P to object ball.
Also not that I have added 3 Points:
A: Center of object ball
B: Center of ghost ball
C: End of red (length = 2 x’) segment
Line AB is equal in length to BC
Line BC is the projection of AB across the vertical axis of the ghost ball such that the angle ABC is 90 degrees. This is important so that the angle laws still work. It also shows why on shots when b > 30 degrees you l’ is on the opposite side of n’ then in shots when b < 30 degrees.
In this case everything works the same. Angles d and b’ are also projected across P’s vertical axis.
Equations 1 and 2 remain the same:
a = b + c
c = d + e
measure d using by lining up P to E. Pivot d’ to center of cue ball to generate e. b is generated by the collision between object and cue balls. The results is angle a.
Pretty sure that should cover every shot on the table while using CTE. Of course spin and throw and all of that fun stuff are not taken into account.
Enjoy!
Variables defined:
P = pivot point
E = edge of object ball
m’ = Distance from center of object ball to desired pocket
mx’ = x component of m’
my’ = y component of m’
x’ = radius of cue ball (indicated by all red lines)
b’ = bridge length (green line)
l’ = length from the pivot point (P) to the edge of the object ball (E) (purple line)
n’ = length from the center of the cue ball to the x’ the runs from the center of the object
ball to E
d’ = distance at the edge of the cue ball between b’ and l’
a = angle between m’ and my’ (vertical)
b = angle between the line from the center of the ghost ball to desired pocket and n’
c = angle between n’ and my’ (vertical)
d = angle between l’ and vertical
e = angle between n’/b’ and l’
CTE for Various Shots:
Shot #1: Low angle shot ( b < 30 degrees)
Image #1 is a full table view of this shot.
Image #2 shows the angles created upon cue ball impact with object ball.
Image #3 include from point P to object ball.
In this shot the desired angle that we wish to generate in order to make the shot is angle a. This is difficult because angle b is hard to measure as there are no physical reference points for it’s measurement.
Therefore we can use physical reference points to generate d and e which in turn will create angle b.
First how a is dependent on b, d and e by using similar angle laws. Z rule and opposite angle rule (high school math).
a = b + c [1]
c = e + d [2]
rearranging and solving for a gives:
a = b + (e+d)
= b + e + d [3]
Using CTE you initially set up distance d’ off the center of the q ball creating a straight line between P and E. This takes the measurement of angle d.
You then pivot distance d’ about point P to the center of the cue ball (inline with n’). This generates angle e.
The collision of the object ball and the cue ball produces angle b.
You now have the 3 pieces of information needed to generate angle a.
The other variable that you need to know is distance d’. The correct d’ is proportional to b’. As your bridge length increases so must your d’. This is why you must practice with CTE to figure out what d‘ correlates to your comfortable bridge length.
Shot # 2 No angle shot (DEAD straight)
Image #4 is a full table view of this shot.
Image #5 shows the angles created upon cue ball impact with object ball.
Image #6 include from point P to object ball.
As you can see in the this shot angle b goes to zero. That is why this is much easier to picture.
Therefore equations #1, #2 and #3 become
c = e + d
c = a
a = e + d
Measure d pivot distance d’ about P to measure e. This then gives you angle c which in turn generates angle upon impact.
Shot #3 Half ball Hit ( b = 30 degrees)
Image #7 is a full table view of this shot.
Image #8 shows the angles created upon cue ball impact with object ball.
Image #9 include from point P to object ball.
In this shot angle c has gone to zero.
Therefore equations #1, #2 and #3 become
a = b
0 = e + d
a = b
In this shot no measurements of e and d are not required as they both equal 0. Therefore you can line the center of the ball at the edge to generate b which in turn generates a upon impact.
Shot #4 acute angle cut (b > 30 degrees)
Image #10 is a full table view of this shot.
Image #11 shows the angles created upon cue ball impact with object ball.
Image #12 include from point P to object ball.
Also not that I have added 3 Points:
A: Center of object ball
B: Center of ghost ball
C: End of red (length = 2 x’) segment
Line AB is equal in length to BC
Line BC is the projection of AB across the vertical axis of the ghost ball such that the angle ABC is 90 degrees. This is important so that the angle laws still work. It also shows why on shots when b > 30 degrees you l’ is on the opposite side of n’ then in shots when b < 30 degrees.
In this case everything works the same. Angles d and b’ are also projected across P’s vertical axis.
Equations 1 and 2 remain the same:
a = b + c
c = d + e
measure d using by lining up P to E. Pivot d’ to center of cue ball to generate e. b is generated by the collision between object and cue balls. The results is angle a.
Pretty sure that should cover every shot on the table while using CTE. Of course spin and throw and all of that fun stuff are not taken into account.
Enjoy!


")
 What I'm hoping for is a step by step process for aiming, at a very minimum, cuts over 30 degrees (which are the ones we're gonna have trouble with). Within each step would be an explanation of how you determine where to position the bridge, how you determine the amount of pivot for your given bridge length, etc.