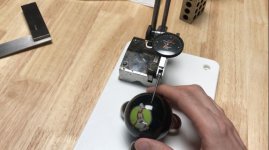
Designing and building ball roundness tester

Ssonerai

AzB Silver Member
Silver Member
Don't make the resolution of your inspection tools too fine. :wink:

smt_electrolimit3.jpg


If you wanna drive yourself nuts, this unit indicates to 10 millionths.
I use it for things like comparing dowels for inspection set ups, piston pins for roundness, etc. Can certainly do ball bearings.

Assume your 3 posts will be ball bearings? They are incredibly close tolerance.
Though if careful not to rotate/move them between inspections, it wouldn't matter.

smt
 

Geosnooker

AzB Silver Member
Silver Member
I test ball sets in our lab.

If you have a university nearby, visit the physics department. Someone may have the means to help you calibrate any tester that you make. Or...engineering. They’ll see this as a fun project.

Today we can test a sphere to the ‘millionths’ using lasers.
 

MitchAlsup

AzB Silver Member
Silver Member
About 5 years ago when I bought a new set of Duramith balls, I took out the micrometer and measured them.

Diameter were all within 0.002,5" ball j to ball k
Multiple diameter measurements on a single ball were all within 0.000,7" axis 1 ball j to axis 2 ball j to axis 3 ball j

Have not measured them since.
 

iusedtoberich

AzB Silver Member
Silver Member
Don't make the resolution of your inspection tools too fine. :wink:

smt_electrolimit3.jpg


If you wanna drive yourself nuts, this unit indicates to 10 millionths.
I use it for things like comparing dowels for inspection set ups, piston pins for roundness, etc. Can certainly do ball bearings.

Assume your 3 posts will be ball bearings? They are incredibly close tolerance.
Though if careful not to rotate/move them between inspections, it wouldn't matter.

smt

That's impressive! I worked in a machine shop for 2 years when I was 20, probably the best job I ever had. That's where I got all my machinist tools. A guy retired and I bought all his tools for 1k. Just the micrometers alone would probably cost double that new. I got the whole 0-6" set of Starretts, plus some doubles, and a bunch of other goodies.
 

iusedtoberich

AzB Silver Member
Silver Member
The owner of Sequoia Billiards had a ball gauge with an indicator. I believe the three resting points were some kind of bearing so they rotated easily rather than slid on the ball. I wasn't paying enough attention to notice how precise the feeler gauge was. It was really quick to tell how good a ball was.

About 1975 I got the Student Union maintenance guy to make me a go/no go two-hole round gauge. You're right that it can't measure diameters directly, but it can find significant non-sphericity. At the 1976 World Open, the balls were rolling funny and it turned out that many of the eyes of the 3s, 5s, and 7s were bulging enough to hang up on the 2.255 hole :yikes:. (+- 0.005 is the actual spec, but most balls these days seem to be close to +-0.001.)

The indicator-based gauge is a lot more flexible, but a piece of steel with two holes drilled through it (or EDMed?) is a lot more rugged if you're dragging it to tournaments.

Do you need a known good ball to zero the feeler each time?

Here is a set of round gauges for pool balls from Ebay for $13 from seller joebuyer -- he has one set left on the current auction. The five sizes relative to 2.250 are +0.005, 0.000, -0.005, -0.010 and -some_more. They're made of 1/16" fiberglass. The undersized holes are to see just how badly worn the balls are.

View attachment 556966

For those who think the diameters of a sphere tell the whole story, check out this video about a constant-diameter "sphere" that is clearly not round: https://www.youtube.com/watch?v=fOojOfpcPZM


I think if the 3 steel balls the billiard ball rested on spun, there wouldn't be enough friction between the billiard ball and the steel balls to actually spin them anyway. In a machine shop, one way to measure out of roundness for a cylinder is to put it in a precision V block, put an indicator on the top of the cylinder, and spin it by hand. This is what Ssonerai is showing in his picture, to a super high accuracy. The cylinder "rubs" on the V-Block. So for a sphere, I'd imagine 3 precision ground steel balls would work great.

The go/no-go gauge is definitely a good idea, especially to take to a tournament. I think what I'm doing is just for the hell of it, and wouldn't have any commercial viability.

Zeroing the fixture to get an absolute diameter is tricky. Now that I remember more, that was also one reason I bought the 2.250" steel reference ball. (assuming its on the money, I believe it was supposed to be within -.0005/+.0005") I could put that in the fixture, zero the indicator, then remove it and put in the pool balls. I could then see the deviation between the steel reference ball and the pool ball. A few problems with this:
1) Its not a true diameter measurement, because the 3 steel balls that support the pool ball are grabbing it on the pool ball's "side". So if the pool ball was for example .001" smaller than the steel ball, it would not "sink" .001" downward. Its like a cosine error, I suppose.

2) The second issue I foresee is getting the ball in and out of the fixture without disturbing the zero. If I go with a plunger style indicator with a long travel of 1", I could lift up the indicator plunger, and take the balls in and out fairly easily. But those indicators that have 1" of travel generally read to .001", and the graduations are pretty close together. It might not be enough resolution to see which ball set is made better. The other type of indicator, the dial test indicator where the test point comes out as a lever arm, I have with .0005" resolution and travel of .030", and also I have one with .0001" resolution and travel of .008". These would work better for picking out differences in the balls, but you couldn't get the ball in or out of the fixture unless the indicator was on some sort of arm that swung out of the way. Getting that arm to repeat between different balls (to a very tight tolerance) would be difficult I think.

This is why I built the first prototype so big, to try different ways to mount the indicator, different types of indicators, how easy/hard it is to load the balls, and could the system be used for an absolute diameter measurement, or only a surface variation relative measurement.
 

justnum

Billiards Improvement Research Projects Associate
Silver Member
Will these roundness test be used by players to declare faulty equipment at matches?

Or by Sanctioning bodies to implement strict regulations on tournament quality billiard ball sets?

The answers to the above will decide how much participation I can volunteer.
 

hang-the-9

AzB Silver Member
Silver Member
I'm working on a ball sphericity (roundness) tester for fun. Below are a couple of pictures, and a YouTube video link describing the process. I'll update as I go.

My motivation is to see how different ball sets and brands compare both when new, and when worn. Also because I like making things.

View attachment 556942

View attachment 556943

Youtube video with a lot more detail. Part 1:
https://youtu.be/fHgEgi62nO0

This what happens when people retire (I'm assuming LOL) and get really bored.
 

Geosnooker

AzB Silver Member
Silver Member
How do you do sphericity? (as opposed to diameter)

Take a measure with a mirror at the focus of the interferometer diverger lens and subtract from a measurement of the sphere at its center of curvature.

At one time this would have taken a day doing calculations on the slide rule. Now it’s literally ‘now’...done. One can never achieve a perfect sphere because of quantum mechanics but can get as close to perfect for any physics experiment. Figures can then be transferred to mechanical engineering applications, (which is outside of my knowledge).It can also be applied to 3D printing to construct an object ( like a sphere) and then measure the final product for some ‘x degree of desired accuracy.
 

Bob Jewett

AZB Osmium Member
Staff member
Gold Member
Silver Member
Take a measure with a mirror at the focus of the interferometer diverger lens and subtract from a measurement of the sphere at its center of curvature. ...
Does this process result in a topo map of the surface?

I assume the surface of the object must be uniformly reflective (with a constant phase shift).

Is the physical setup something like this?

CropperCapture[61].jpg
 
Last edited:

justnum

Billiards Improvement Research Projects Associate
Silver Member
Take a measure with a mirror at the focus of the interferometer diverger lens and subtract from a measurement of the sphere at its center of curvature.

At one time this would have taken a day doing calculations on the slide rule. Now it’s literally ‘now’...done. One can never achieve a perfect sphere because of quantum mechanics but can get as close to perfect for any physics experiment. Figures can then be transferred to mechanical engineering applications, (which is outside of my knowledge).It can also be applied to 3D printing to construct an object ( like a sphere) and then measure the final product for some ‘x degree of desired accuracy.

I know this is a forum,

but sharing a solution to a problem as stated can result in many unintended consequences. Its nice to help and discuss on the forum.

I am speaking cautiously because maybe the OP already has a problem and needs a solution. Instead of this being a fun project, it could be a tool with other specific purposes. Certain types of people are like that, they boil down complicated problems into simple things other people can solve.

It might not be a simple round ball tester. It could be something more nefarious and to be used in even more nefarious ways.
 

iusedtoberich

AzB Silver Member
Silver Member
Part 2 of series, showing the 3D printed proof of concept. What say you? Worth going further? I think it might show all balls are universally pretty round. I would probably need a .0001" reading indicator to show any real differences...

Video Part 2:
https://youtu.be/TEhTyugpev0


Picture:
Screen Shot 2020-09-12 at 8.08.02 PM.jpg
 

Bob Jewett

AZB Osmium Member
Staff member
Gold Member
Silver Member
... Here is a set of round gauges for pool balls from Ebay for $13 from seller joebuyer -- he has one set left on the current auction. The five sizes relative to 2.250 are +0.005, 0.000, -0.005, -0.010 and -some_more. They're made of 1/16" fiberglass. The undersized holes are to see just how badly worn the balls are.

View attachment 556966 ...
The two other sizes turn out to be 2.242" and 2.240". The set comes with a nice manual that is informative, humorous, and printed in color. Under the chapter titled, "Does Size Really Matter?" we see a picture of Robert Wadlow.
 

boogieman

It don't mean a thing if it ain't got that ping.
I think the indicator in part 2 is a good with a few caveats. Chatter from rotating the ball could be factoring in. I doubt it's much, but it's something to at least consider and be aware of. I don't see any other way to do it that could be done "at home" so to speak. A solid base is important, 3d print might not be solid enough for super precise work, but again, probably good enough for home work. Granite is the de facto surface when inspecting things, in most shops it's precision ground slab from 6" to 3' thick, maybe a piece of countertop would be a solid base without flexing and such as would metal. Just hot glue the bearings onto that, but try to make sure the metal is actually touching the granite so yo don't have flexing happen... or use epoxy. Honestly with a sphere I don't think the 3 bearings being slightly different would have much effect, you're only touching 3 pinpoints on them anyway and essentially checking runout. How much deviation from a perfect sphere is noticeable? I bet if the balls are in manufacturer specs, humans would not notice, especially factoring in cloth, humidity, etc, so maybe a size gauge like posted earlier would be more important, making sure the balls are the same size.

Is it overkill? Probably, but it's a fun project and eliminates some unknowns.

I have access to a cmm at work, but there is a strict policy about not using it on your own projects, even if you're off the clock. Huge money in the machines so I understand it. They make me nervous to use even though it's my everyday job. With the cmm, you could scan the surface with a probe, taking tens of thousands of "points." I think the thing is accurate out to .0005mm or something, just stupidly precise and there are some that go even further. It lives in a climate controlled room. You have to leave the parts in the room for like 10+ hours to get them "quenched" to the room temp so expansion and contraction don't factor in. There are optical scanning heads and such, but if you're trying for the most accuracy, contact probes are still considered the best. I forget the resolution, but non touch optical probes just cant get the accuracy of touch probes. We're talking stupid precision though, well beyond the realm needed for most applications. If you had an extra person in the room, just their body heat can throw things off. It's pretty amazing and most cmm labs are designed with a maximum number of people, heat from electronics and monitors figured in, the works. All of this is software controlled, so if for some reason say the temp went up half a degree, the software can compensate for this kind of thing.

It's above my pay grade to figure this stuff out, but I've heard of testing where they could tell if a different brand of wipes were used in cleaning since they were picking up tiny fragments from the wipes. Some of this stuff just blows my mind. Imagine testing jet turbines and such, they do it, but damn would that be a tedious process! That's one reason why high tech stuff like used on space shuttles is so expensive, they have testing equipment worth millions upon millions of dollars. I'd hate to see what they charge per hour on an inspection that precise!

Anyway, keep up the good work, pretty interesting stuff going on!
 

paul j

New member
In my observation of an older (15yrs) set of centennial balls , the area within the black circle and # is proud of the rest of the surface.
Seems that thru polishing on my machine that the # core is harder than the white area . You can feel the difference, has any one else noticed this condition?
 

Travis Niklich

AzB Silver Member
Silver Member
The go/no-go gauge is more for diameter tolerance. This device won't be able to measure diameter. I'd have to do that separately with the micrometers. What it would easily measure is deviations from true roundness at different parts of the ball. Also it would be able to measure any defects such as sunken-in numbers.

The deviation I expect per ball is in the range of .001" to .002", or even less.
You could measure diameter if you had a test standard ball, say a ground steel ball bearing that is 2.250 then you could measure plus or minus on your test indicator. You could also use this to test how well your fixture works

Or just put them in a CMM machine
 

justnum

Billiards Improvement Research Projects Associate
Silver Member
measuring the projected shadow is another way to measure roundness.
 

middleofnowhere

Registered
Easy enough to make a little template on a lathe just take a piece of material and drill a hole in it and turn it to the exact dimensions and that's it. You can provide a few 10,000th of clearance then just passed and rotate the ball within it.

For balance you could just float the ball on Mercury.
 
Top