Homemade Ball Cleaner is the nuts

btoneill

Keeper of the Cheese
Silver Member
Even if your theory is correct, how could someone claim that this is a great idea and give directions on how to build such a piece.

Because it's fun?

For the same reason I made a cue lathe out of Legos and an 18v drill? (See http://www.youtube.com/watch?v=Mt0jBn1yMfI for the Lego lathe)

Ingenuity is the mother of invention. I've so far seen multiple versions of the ball polisher with people continually making improvements. I have a few ideas in my head to improve on it (have made two so far, 2nd one quieter and less vibrations then the first) as well. At some point enough of us will have shared our experiences with what makes it better and what didn't that we'll have a perfectly working, cheap, fairly quiet ball polisher (as long as we stick with an orbital polisher it will never be quiet).


There is a quote from Thomas Edison that I love:
I have not failed 700 times. I have not failed once. I have succeeded in proving that those 700 ways will not work. When I have eliminated the ways that will not work, I will find the way that will work.

The power of the internet will let us spread out those "failures" to many people to get to the solution much quicker.

Brian
 

NewStroke

Screamin Monkey
Silver Member
. Do I like having the sawzall? Hell yeah! :)

A sawzall is the best overall tool hands down. I think I will make a ball cleaner out of mine.

I figure I'll take one of my socks and put it over the blade, apply cleaner to the sock, hold the ball in one hand and clean away with the other. :)
 

btoneill

Keeper of the Cheese
Silver Member
I figure I'll take one of my socks and put it over the blade, apply cleaner to the sock, hold the ball in one hand and clean away with the other. :)

Make sure you have someone video tape this process... We want to make sure that the video is able to be put on-line if you have an "accident" while attempting this one :) Also, you should make sure they are proficient at dialing nine-one-one :)

Brian
 

Medalist

AzB Silver Member
Silver Member
I too had the same problems with my first try, then I went to the two bucket method described in the previous post. Also use the pad the buffer came with instead of making a heavier carpet pad. This keeps the vibration down. Basically your sawing off another bucket, cutting a hole in the bottom to set the buffer in tight and dropping the now supported buffer in a new bucket. Works perfect and vibration free. I use pledge spray for my polishing. $35 spent
 

Mantool

AzB Silver Member
Silver Member
Because it's fun?

For the same reason I made a cue lathe out of Legos and an 18v drill? (See http://www.youtube.com/watch?v=Mt0jBn1yMfI for the Lego lathe)

Ingenuity is the mother of invention. I've so far seen multiple versions of the ball polisher with people continually making improvements. I have a few ideas in my head to improve on it (have made two so far, 2nd one quieter and less vibrations then the first) as well. At some point enough of us will have shared our experiences with what makes it better and what didn't that we'll have a perfectly working, cheap, fairly quiet ball polisher (as long as we stick with an orbital polisher it will never be quiet).


There is a quote from Thomas Edison that I love:


The power of the internet will let us spread out those "failures" to many people to get to the solution much quicker.

Brian
I like your lego lathe. Looks like it works well.

I totally agree with you on the man and ingenuity. We wouldn't even be talking about this in a forum if it wasn't for man's ingenuity.

The question I am asking is this, how can someone build this thing and then recommend it to others as a GREAT product?

I see that some other posts have been created with improvements on the polisher. After the board has discussed the polisher and come up with the needed improvements, than we can tout this thing as a good polisher. As of right now, I am still searching for the needed improvements before recommending this to anyone.

Polisher improvements I feel that are needed.

1. A divider that separates every ball from touching.
2. The buffer must be mounted higher so as to not hit the sides when orbiting.
 

Mantool

AzB Silver Member
Silver Member
I too had the same problems with my first try, then I went to the two bucket method described in the previous post. Also use the pad the buffer came with instead of making a heavier carpet pad. This keeps the vibration down. Basically your sawing off another bucket, cutting a hole in the bottom to set the buffer in tight and dropping the now supported buffer in a new bucket. Works perfect and vibration free. I use pledge spray for my polishing. $35 spent

Thanks for the info. Could you post a link to this previous post you speak of?

Could you post a picture of the two bucket method?
 

Majic

With The Lights ON !!
Silver Member
I have to disagree. Hand cleaning all the way because I only have one set of balls. Plus the noise from using a homemade cleaner would drive me nuts.

I hand clean my balls too :sorry: And it takes all of ten minutes. I think an apparatus that would dispense the cleaner onto the balls would be something useful.
 

2_Fast_4_Fleas

AzB Silver Member
Silver Member
if you dont want the noise get a buffer that is not orbital. also to keep the balls from touching, making spots,lines as some say spent 2 bucks on felt from wal mart and a hour with a template and a jigsaw..the slots above the balls are what i learned after building my first one that looked like this with a washing machine motor, it was fast and quiet, but had to hold the bucket on slick floors cause it would spin it because of the torque :D anyways my friend wanted one so i built this one last night in about 2 hours, 100.00 is 100.00 :) Polisher.jpg
 
Last edited:

stuckart

Paint Dry Watching Champ
Silver Member
So I'm confused on your LOUD un-recommendable version of the buffer. You are only using ONE 5-Gallon bucket in your design?

I'll make a little video and photo's of mine when I get a chance and post it up here.

I'm using 2 buckets (1 inside the other). The hole I cut in the top bucket is snug in holding the Orbital Buffer.

The Buffer does not hit the sides at all. It's held in place and has 1/4-3/8" space around all sides. Do you have a 4 gallon bucket or something?

I had to experiment on buckets at first and ended up getting 2 pails from my local grocery store in the Bakery Section (Used Frosting Buckets that we cleaned out)

I run mine out in the garage and can make it run fairly quiet if I put something heavy (Myself) on top of the bucket. Have thought about mounting the bucket and a clamp lid to cut down the shaking (noise) of the bucket, but I'd rather spend the time at the Table shooting the nice clean shiny balls :smile:
 

2_Fast_4_Fleas

AzB Silver Member
Silver Member
the noise usually comes from the bucket resonating the sound like a speaker. the further down the polisher from the lid the louder the noise. from the design that i posted you can cut the top off about a inch from the ball holder and cut out 50% of the sound. dont you remember putting firecrackers in buckets and barrells when you were a kid because it made it louder?
 

2_Fast_4_Fleas

AzB Silver Member
Silver Member
and if you dont know how or dont have the time, too lazy , not mechanically inclined, not good with your hands, not crafty, or just dont plain feel like it i will take orders and ship $100.00 per unit :D plus shipping:D
 

center pocket

It's just a hobby, but a fun one.
Silver Member
Ok I bought my materials last night. I used my new Craftsman multi tool to make the cuts on the buckets. That thing is powerful! Anyways I am having issues with the sides of the buffer hitting the walls as well.The whole I made for the buffer in the top bucket is a bit to small I think. I am going to widden it a little to see if the buffer sits a little more flush and hopefully wont hit the sides. If it still does i guess I will have to make a bracket to mount the buffer securely.

I like the template design 2fast4fleas made and I am going to make my own tonight with some MDF board I purchased.

Here is a question though, I used gorilla glue last night to glue the carpet on the inner wall. Didnt work so well. I wonder if its because the plastic is smooth. Also once you glue it, how the heck can I clamp the carpet to the inside of the bucket till the glue dries? Any ideas would be apprecitiated.
 

Mantool

AzB Silver Member
Silver Member
Ok I bought my materials last night. I used my new Craftsman multi tool to make the cuts on the buckets. That thing is powerful! Anyways I am having issues with the sides of the buffer hitting the walls as well.The whole I made for the buffer in the top bucket is a bit to small I think. I am going to widden it a little to see if the buffer sits a little more flush and hopefully wont hit the sides. If it still does i guess I will have to make a bracket to mount the buffer securely.

I like the template design 2fast4fleas made and I am going to make my own tonight with some MDF board I purchased.

Here is a question though, I used gorilla glue last night to glue the carpet on the inner wall. Didnt work so well. I wonder if its because the plastic is smooth. Also once you glue it, how the heck can I clamp the carpet to the inside of the bucket till the glue dries? Any ideas would be apprecitiated.

I used contact cement to glue the carpet to the sides of my 5gal bucket. I would suggest using velcro strips on the carpet and bucket sides. Many have said it works well and is very easy to change out.

As far as the buffer hitting the sides, if you mounted the buffer at the same height I did, than it will hit because of the "orbit"

2fast4fleas' idea is great as long as you don't have an orbital buffer.

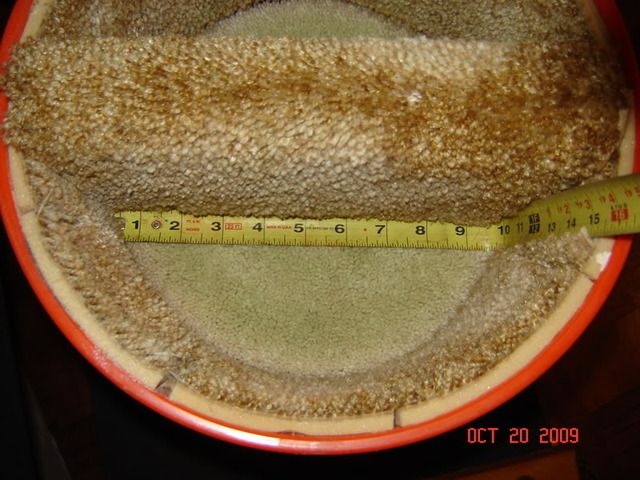
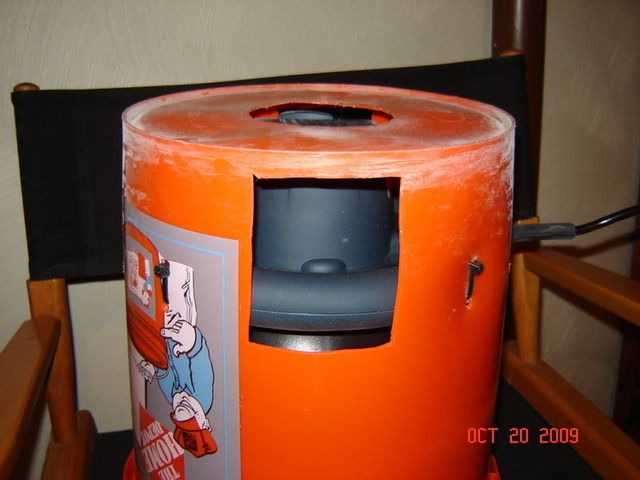
10-20-09008.jpg
10-20-09009.jpg
 

2_Fast_4_Fleas

AzB Silver Member
Silver Member
with the template i made you dont carpet on the felt walls the felt on your mdf board will do ok ...you can get felt that has adhesive backing that will stick to your bucket sides if you want like i did on the one i made....also raise your buffer since the bucket is larger at the opening just use blocks or another device to raise it ....maybe a couple of braces through the sides but if you use the 2 buckets it should be ok since the buffer is orbital it could contact it a little but should be ok unless you see it burning the sides.:D
 

Shaft

Hooked and Improving
Silver Member
Love mine

I made a 5 gallon bucket polisher (with an 8-section divider made from an old towel) and love it! No bumping or grinding problems. Relatively quite.

For less than about $30, it can't be beat.

I also like the divider made out of carpet scraps. I will try that next, but the towel divider can be washed in a washing machine.
 

arcticmonkey

AzB Silver Member
Silver Member
Rep to you Johnny

Johnny, rep to you for bumping this thread back towards the top. I just finished mine and it's great. It seems that the key is to use two buckets to keep the orbital polisher stable and to prevent it from touching the sides of the bucket.

The carpet dividers work great and huge rep to JimS for bringing Brillianize to my attention. That stuff is the nuts! Forget the Aramith cleaner, this stuff is for real. My balls feel like new.

On the downside, it's thrown my position off a ton and I can't throw the balls like I used to but I'll take that if I don't get one skid!

artcimonkey
 

8Ball48043

Addicted to the Sport
Silver Member
I just followed the directions from an old thread on AZ to make a ball cleaner/polisher in one hour and ten minutes at a cost of $43.00 (I had to buy everything). It does 9 balls in 4 minutes and the other 7 in the same amount of time. The balls look like new when they come out and play great. http://forums.azbilliards.com/showthread.php?t=71033&page=4

Above is a link to the directions I used. I used the two bucket instructions. Johnnyt

I have been very tempted to build one of those. Thanks for the positive feedback on their effectiveness.
 

center pocket

It's just a hobby, but a fun one.
Silver Member
Well instead of raising the buffer I trimmed about a half inch off of the buffer pad all the way around. It is made of foam anyways and was easy to do. Now the buffer doesnt hit the walls at all.
 
Top