How would you fix this?

str8nzem

Registered
I recently purchased my first table off craigslist. It's a furniture style Brunswick about 14 years old. (yea, I know I should have bought the GCIII- but I have to keep the wife happy). 3/4" slate. It's solid wood with a veneer on the outer and inner surface of the frame, it's a good looking table.

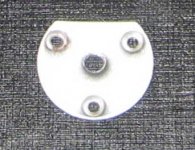
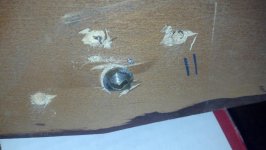
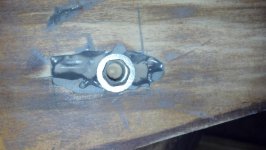
The first issue is with the brackets at the corners which connect the legs to the frame. There are threaded inserts into which the bolts holding the brackets attach. One of the threaded inserts is out, this was discovered when the installers were tightening the brackets. I assume that this happens when the bolts are over-tightened and the fix is to use wood epoxy to secure the threaded insert.
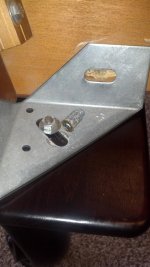
corner with insert gone.jpg


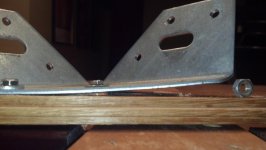
The bigger issue is with the brackets themselves. The wings are not flush with the frame.
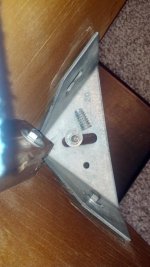
bracket from above.jpg

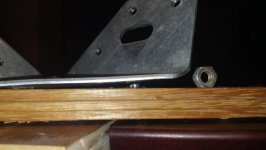
And the floor of the bracket is bowed up.
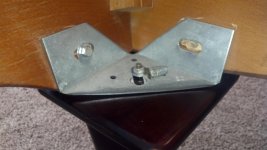
bracket bottom bow.jpg

The diagonal bracket from this one is also bowed at the bottom and not flush with the wood at the wings.

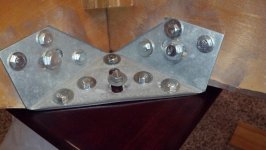
Here is what the other 2 corner brackets look like.
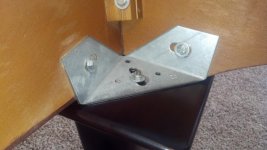
good corner.jpg


So my question is how would you correct this?

Thanks in advance, I've learned so much on this forum already.
 
fix

Is it a stud or a bolt broken. It looks like it is a bolt just replace it.
MMike
 
Last edited:
it's the insert that pulled out of the frame, it's sitting on the bracket in the photo.
 
Last edited:
That's some pretty shoddy construction.

If it were me I'd scrap the unsert bolts cuz they are prone to pulling out and get some good looking carriage bolts and just drill through the frame. Yes, you would see them but it's better than dropping a piece of slate on the floor.

You could even add decorative escutcheons.
mUELuQ2mXZoMwwZ9yjBxeZA.jpg


As for the bent bracket. Once you go for carriage bolts, get a nice thick fender washer and put it on there. That will solid up the frame nicely.

When you do that, you will have one heck of a sturdy table.
 
Last edited:
Those brackets really need to be taken off and straightened out. With the insert, either epoxy it in there, or get a larger one that will bite into the wood. If you epoxy, don't use the 5 minute stuff, get some jb weld. It is much stronger than the 5 minute epoxy. It would be a good time to go around and check the rest of the inserts too. Good luck with it.
 
What he said!!

Those brackets really need to be taken off and straightened out. With the insert, either epoxy it in there, or get a larger one that will bite into the wood. If you epoxy, don't use the 5 minute stuff, get some jb weld. It is much stronger than the 5 minute epoxy. It would be a good time to go around and check the rest of the inserts too. Good luck with it.

Actually, the 5 minute epoxy is probably ok... I usually like a thinner epoxy and I also recommend that you mix saw dust with the epoxy.
 
After you do what Reverend said, you see those three empty holes in the bottom of the leg bracket? Yes, there should be wood screws in ALL of them to help that one little leg bolt. It will really help strenghten the table.
 
I agree with using jb weld to resecure the insert and what i also do is drill 3 holes in the leg bracket 2 along top above the bolt and 1 on the outside corner and use wood screws making sure they are long enough to barely miss going out the finished side. And as John said you really need some screws in the leg along with that pocket bolt Brunswick uses in their legs.
 
Before you take any of the brackets off, try checking the frame to make sure it's square. I'm just firing a guess that may be what's causing the brackets not to match up in two opposing corners.
 
Man, I just don't know about you guys sometimes....LOL...just counter sink one of the Gandy style rail bolt nut plates where the insert pulled out, run the 3 screws into it to hold it in place, and bolt the leg to the frame...no need to try and fix what will break again with JB weld or any other glue...fix it right the first time...LOL the pulled out insert will give the bolt room to bolt into the frame past the nut plate...so, all fixed;)
 
Anybody have a picture of a Gandy style rail bolt nut plate? Where would I get these?

The frame is slightly out of square, but because the slate rests on top of the frame, this should not be an issue, right? As long as the rails and slate are true.
Does everyone agree that the brackets need to be straightened? I'm afraid that straightening the brackets will then put force on the frame which might separate the wood joints. My brother suggested straightening the brackets by squeezing them in a vise. How would you straighten them?

Anyone see a disadvantage to shimming the brackets with fender washers?
Great ideas, keep them coming.
 
The Gandy style rail bolt nut looks like this...?

gandy rail nut.jpg


Would everyone agree that the bracket should be straightened?
What would the disadvantage of using the fender washers to fill the gap?
Any ideas of how to straighten the bracket- my brother says to squeeze in a vise.
 
The Gandy style rail bolt nut looks like this...?

View attachment 255824


Would everyone agree that the bracket should be straightened?
What would the disadvantage of using the fender washers to fill the gap?
Any ideas of how to straighten the bracket- my brother says to squeeze in a vise.

yes, and the bracket will straighten out by it's self as its bolted up, it's just stamped out sheet metal as it is:grin:
 
I recently purchased my first table off craigslist. It's a furniture style Brunswick about 14 years old. (yea, I know I should have bought the GCIII- but I have to keep the wife happy). 3/4" slate. It's solid wood with a veneer on the outer and inner surface of the frame, it's a good looking table.

The first issue is with the brackets at the corners which connect the legs to the frame. There are threaded inserts into which the bolts holding the brackets attach. One of the threaded inserts is out, this was discovered when the installers were tightening the brackets. I assume that this happens when the bolts are over-tightened and the fix is to use wood epoxy to secure the threaded insert.

View attachment 255690


The bigger issue is with the brackets themselves. The wings are not flush with the frame.

View attachment 255692

And the floor of the bracket is bowed up.

View attachment 255694

The diagonal bracket from this one is also bowed at the bottom and not flush with the wood at the wings.

Here is what the other 2 corner brackets look like.


So my question is how would you correct this?

Thanks in advance, I've learned so much on this forum already.

But, I'd still do what Scruffy said, pre-drill 3 holes 3/16" by about 1 1/4" deep and bolt in 3 lag bolts 1/4" x 1 1/2" long with washers, they'll straighten out the sheet metal to the leg if you loosen the cabinet bolts first, then bolt tighten the cabinet bolts last. The damage to this table came from sliding the table on the floor, or tilting the body on the legs first before standing it up on the legs.

Glen
 
Thanks to all.
I did a prelim straighten by screwing the bracket into a scrap piece of hardwood. The bracket was flat on the bottom while screwed in. When I held the flattened bracket up to the cabinet: the sides were flush. It had less springback to bowed upon removal- almost flat. I did find out that I can break off the head of the lag by over tightening.

Both the messed up corners will need to have both inserts repaired. My plan is to epoxy new inserts with JB Weld. ( I will first trim any wood which has pulled above the face of the cabinet with a razor knife). I know the Gandy style brackets are probably better, but they aren't as readily available, and I don't have a router to counter sink them.

I drilled the extra holes in all the brackets, even the 'good' corners.

Glen, Thanks for the excellent detail on how to size and drill the lags.

I'll try to get some progress and finish photos.
 
Last edited:
Update on my fix:

The insert looked like this after removing the bracket. In the two opposing corners both inserts had pulled out like this.
insert tear.jpg

Before straightening the bracket.
I drilled two extra holes into the outside corners on the base side.
pre nut.jpg

After straightening, the bracket wasn't completely flat, but way better than before.
post nut.jpg

I got the new inserts. I thought I was ordering the same size, but when they came, they were larger in diameter. They snuggly fit into the exsisting holes. I added the JB Weld as recommeded. The epoxy was not as thick as I thought, so I sanded the epoxy that sagged after it dried.
clean and sanded.jpg

The reinstalled bracket looked like this. The table feels so much more stable now. The installers are coming back today with the re-covered rails with new super speeds. Simosis 860. First game tonight!:smile:
Thank you experts for all your help.
done.jpg
 
Last edited:
Back
Top