My Latest Creation!

Sounds good!

The last one was Delrin as well and it does sort of lend itself to looking like an old, classic cue.

The Ivory butt cap will probably look like a plastic 'simulated ivory" butt cap...

Plenty of time to decide; I just thought it might be nice to have an Ivory butt cap.

There is a weight penalty to using Ivory as well- it is (about) 30% heavier than Delrin...

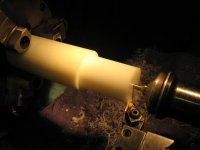
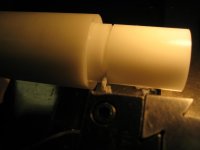
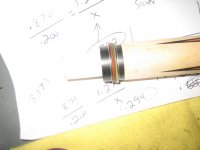
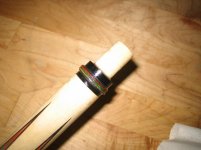
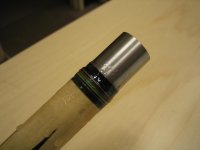
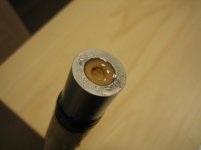
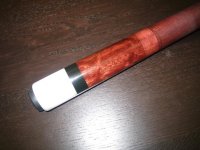
Pic of my other butt cap:
 

Attachments

  • IMG_3765.jpg
    IMG_3765.jpg
    99.6 KB · Views: 626
Last edited:
I would have to agree, with the style of the cue, delrin is a must. Keep it classic!
Good luck and be sure to share some pics as you go.
THanx for showing....
 
Sounds good!

Balance-wise, Delrin is the way to go.

Esthetically, I think Delrin is the way to go too.

Financially, Delrin is the way to go.

Delrin doesn't glue as well as Ivory.

Delrin doesn't crack like Ivory can.

Ivory is nice for bragging rights; however it doesn't add anything to the playability of the cue (unlike Ivory ferrules).


Seems like an easy decision!:wink:
 
So, by popular demand- a Delrin butt cap!

Here you go!

1) turning the OD
2) Rough drilling the bolt hole
3) Bumper Bore
4) Bolt head counterbore (side one done!)
5) BONUS: the drawing of my butt cap (if you care)
 

Attachments

  • butt cap drawing.PDF
    butt cap drawing.PDF
    12.8 KB · Views: 169
  • IMG_4119.jpg
    IMG_4119.jpg
    83.2 KB · Views: 591
  • IMG_4121.jpg
    IMG_4121.jpg
    85.1 KB · Views: 599
  • IMG_4123.jpg
    IMG_4123.jpg
    80.9 KB · Views: 584
  • IMG_4124.jpg
    IMG_4124.jpg
    77.9 KB · Views: 593
Last edited:
More detail from the flip side...

1) Parting off
2) truing up the face
3) Handle Mortise complete!

One Delrin butt cap!
 

Attachments

  • IMG_4125.jpg
    IMG_4125.jpg
    82.1 KB · Views: 590
  • IMG_4127.jpg
    IMG_4127.jpg
    84.3 KB · Views: 592
  • IMG_4128.jpg
    IMG_4128.jpg
    82.3 KB · Views: 588
Any way you slice it , It's going to be Beautiful. I like the dots. Could not help noticeing the lathe is a little higher tec than my Hightower, even tho it is the Delux. Great work.......Jim
 
Thanks Jim!

That lathe is a Hardinge Super Precision. WAY too nice for turning wood, but I have acess to it, so anthing I can fit on here goes on here.

It is shown with the 3-jaw chuck which is dialed in to +/- 0.001- good enough for a butt cap (that is oversize on the OD anyway) but when I do precise work I use the collets only.

The lkarger lathe I have acces to is not nearly as nice, however it has a Hardinge collet closer option that I use when I can.
 
OK! I did a bit more work last night...

First I cleaned up the but sleve area.

After that I spun it around and began the joint work. Like in the butt sleeve, I have silver, black, green, natural, orange, black silver rings. With only 1/2 inch to play with, it made the inner and outer phenolic rings quite small as you can see. I am not looking forward to doing this two more times!

I trued up the end of the cue at the final length (29.5" in this case) so I had a point of reference. It was only 50-60 thousandths off the end, so I retained the original center (which is important).

Then I took my caliper, opened to 1.5" and scribed a line on the OD of the cue. This is the point I turn the OD to to make the tenon. The ring work is 1/2 inch and the joint is 1". It doesn't need to be perfect, but set the hard stop to fall just a few thousandths short of the line so you can square up the face when you finish. It has to be perfectly square and perpendicular to the centerline! Note that I am using the collet closer (not a chuck!) to ensure I am running true.
 

Attachments

  • IMG_4129.jpg
    IMG_4129.jpg
    96.5 KB · Views: 509
  • IMG_4130.jpg
    IMG_4130.jpg
    87.8 KB · Views: 506
  • IMG_4131.jpg
    IMG_4131.jpg
    85.4 KB · Views: 503
  • IMG_4132.jpg
    IMG_4132.jpg
    96.5 KB · Views: 504
  • IMG_4133.jpg
    IMG_4133.jpg
    86.6 KB · Views: 497
The finished tenon... Face is square and clean.

Then I made the black phenolic rings on the Hardinge. (Veneer rings were already done)

Checking it all fits properly and faces are square and clean...

All the ring work is cleaned with Acetone to ensure there is no trace of oil or other contaminant that might interfere with the epoxy. I use West System almost exclusively with the slow hardener to ensure good penetration into the wood. Also note that I do not touch the freshly cut wood if at all possible to keep the grain open and avoid any contamination to the glue area.
 

Attachments

  • IMG_4133.jpg
    IMG_4133.jpg
    86.6 KB · Views: 647
  • IMG_4134.jpg
    IMG_4134.jpg
    88.3 KB · Views: 652
  • IMG_4135.jpg
    IMG_4135.jpg
    83.4 KB · Views: 644
  • IMG_4137.jpg
    IMG_4137.jpg
    95 KB · Views: 644
  • IMG_4138.jpg
    IMG_4138.jpg
    84.9 KB · Views: 643
More updates!

Today I cleaned up the epoxy and cut the joint collar thread.

Then I epoxied on the joint sleeve.

Enjoy!

1) Setting up. I use a pen in the tool holder to ensure I am cutting the thread correctly.

2) Checking the thread pitch (divide 1 by number of threads [11] - 0.0909 in this case- I went with 0.091 on the calipers for a check)

3) Dial indicator is critical to ensure the carriage is in exactly the same place every time

4) I run the lathe backwards, with the tool upside down, so I can cut away from the ring work- no risk of crashing that way!
 

Attachments

  • IMG_4153.jpg
    IMG_4153.jpg
    86.8 KB · Views: 614
  • IMG_4154.jpg
    IMG_4154.jpg
    90.1 KB · Views: 601
  • IMG_4155.jpg
    IMG_4155.jpg
    95 KB · Views: 603
  • IMG_4156.jpg
    IMG_4156.jpg
    88.7 KB · Views: 599
What I did not get a picture of was the root of the thread cut (at the base of the thread) to allow clearance. Also not shown is the fact that I left a .500 tenon at the end of the threads which mates to the inside of the collar. This ensures the collar is straight and square to the face as well as perpendicular to the centerline of the cue. All must be perfect or better at this stage!

Note care is taken to keep the center clean! We can't loose our center!
 

Attachments

  • IMG_4157.jpg
    IMG_4157.jpg
    83.3 KB · Views: 614
  • IMG_4158.jpg
    IMG_4158.jpg
    88.5 KB · Views: 607
Very nice, super cool! So this is the second cue you've made? Good job in the step by step, appreciate all the information shared. Thank you!
Tony
 
Thanks for the kind words, Tony.

Yes, this is my second one. I hope to continually improve as I progress...:smile:
 
Thank you sir!
I'm 'old-school' for two reasons.

1) I don't have access to a lot of fancy equipment, so I have to do things the old-fashioned way. A lot of great cue makers from the past made some damn nice cues before I was born...

2) I think old-school cues are a more timeless design. They are always in style in my opinion... Some of the heart-stoppers are VERY technically advanced and elevate cue making from craft to art for sure, but most of them are not to my taste (although I do appreciate the work that goes into them- even more so now!)
 
I know, I know I've been slacking for a while now, but I did a bit more work tonight finally!

I cut the butt tenon down to the needed length for my Delrin butt cap

I squared up the end

I test fit several times so I have intimate contact on the face, but also within 0.002 on the inner face so I don't rely on the epoxy to fill a huge gap.

The center is re-established and drilled for the 3/8-16 'weight' bolt (which I bore out to save weight). Note the stub drill to reduce drill bit flex...

The cap is epoxied on after all surfaces are cleaned with Acetone to ensure no oil is left behind.
 

Attachments

  • IMG_0105.jpg
    IMG_0105.jpg
    85.5 KB · Views: 503
  • IMG_0106 crop.jpg
    IMG_0106 crop.jpg
    91.9 KB · Views: 503
  • IMG_0107.jpg
    IMG_0107.jpg
    92.4 KB · Views: 502
  • IMG_0108.jpg
    IMG_0108.jpg
    91.9 KB · Views: 505
Back
Top