New small tool for my shop

Newton

AzB Silver Member
Silver Member
Finally my baby arrived:D

Not completely in place yet, but tomorrow would be the day.
So now it all about that 4th axis then:)

And yes, it's a Chinese machine JoeyIn..

N
 

Attachments

  • IMG_0992.JPG
    IMG_0992.JPG
    38.7 KB · Views: 1,012
  • IMG_1002.JPG
    IMG_1002.JPG
    64.9 KB · Views: 884
  • IMG_1003.JPG
    IMG_1003.JPG
    36.9 KB · Views: 820
  • IMG_1012.JPG
    IMG_1012.JPG
    41.5 KB · Views: 841
  • IMG_1019.JPG
    IMG_1019.JPG
    77.8 KB · Views: 899
One last shot from the side

Showing some dimensions..

N
 

Attachments

  • IMG_1028.JPG
    IMG_1028.JPG
    36.1 KB · Views: 1,312
He he, Joey, you had me laughing there :D

I can do doors, but then not to big ones. Must be for pool players shorter then
175 cm :)

I have been studying the topic for over a year and my conclusion was that custom Q machines where to expensive for what they can do - just Qs. So with this I can cut out loudspeakers and other fun stuff if I get bored of Qs. My wife could make molds and all the bells and whistles.

All flies in on bang.

PM if you are interested and I'll give you the details.

N
 
Finally managed to get it leveled - so now it's all about electrical stuff tomorrow :D

N
 
4th axis for tapering mounted

Just slaughtered a small wood lathe and finally got it mounted :D

Kent
 

Attachments

  • 4thax2_small.jpg
    4thax2_small.jpg
    75.2 KB · Views: 1,001
Keep it coming!!

Please keep the photos coming this is really neat to watch!!!! :smile:
 
Newton said:
PM if you are interested and I'll give you the details.

What a great post. Thanks for sharing.

I think a lot of us are interested in the specifications.

Thanks again and Good Cuemaking,
 
tsp&b said:
Please keep the photos coming this is really neat to watch!!!! :smile:

Here is another one. Note that the DC controller for the motor is not mounted but it's now placed to the right on the pic.

K
 

Attachments

  • 4thaxis.gif
    4thaxis.gif
    89.4 KB · Views: 884
Arnot Wadsworth said:
What a great post. Thanks for sharing.

I think a lot of us are interested in the specifications.

Thanks again and Good Cuemaking,

(Edit: Removed some questionmarks which arrived after formating.)
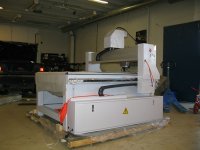
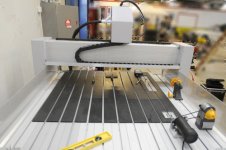
Here are some specs:

X,Y,Z Working Area: 1300x1200x200mm
Table Size:1440x1740mm
X,Y,Z Traveling Positioning Accuracy : 0.03/300mm
X,Y,Z repositioning Positioning Accuracy: 0.05mm
Lathe Structure: Welded Strucutre
X, Y Structure: GeAar Wheel Transmission, Shaft Linear Bearings
Z Structure: Ball Screw, Shaft Linear Bearings
Max.Consume power: 5.0Kw
Max.Speed: 0-32000mm/min
Max.Working Speed: 0-20000mm/min
Spindle Power Motor: 2.0Kw HSD Spindle
Spindle Speed: 0-18000RPM
Working Mode: Stepper
Working Voltage: AC220V/50/60Hz,1PH
Command: G Code, *uoo, *mmg, *plt
Operating System: DSP System (Option: Mach3 PC Software)
Interface: USB
Flash Memory: 128M
Collet: ER25
X,Y Working Delicacy : <0.01mm

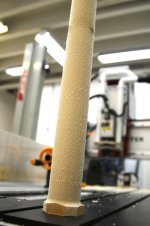
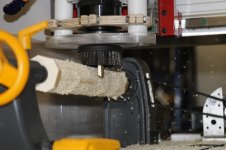
Have until now not made anything else then dust with it but I'll get there, I'll get there :smile:

For you who are in the US, here is a man who sells the machines and is spot on in respect of knowledge and help:
http://www.camaster.com/portal/

Hope it helped.

Kent
 
Last edited:
First test with some scrap wood..

Just some shots of my first test with some scrap wood I had lying.
The No_vibesX.jpg shoes a coin balancing on the tailstock while the lathe is turning and the machine is milling.

Kent
 

Attachments

  • DCmotor_contr.gif
    DCmotor_contr.gif
    81.3 KB · Views: 466
  • accurate.gif
    accurate.gif
    52.1 KB · Views: 467
  • mill.gif
    mill.gif
    85.1 KB · Views: 480
  • no_vibe2.gif
    no_vibe2.gif
    78.1 KB · Views: 473
Last edited:
More..

Trying to have the pic pop up without you guys have to click on it...
 

Attachments

  • no_vibes.gif
    no_vibes.gif
    89.1 KB · Views: 737
Result

The result show a fairly "hairy" pice of crap wood, but as a first try I'm happy.
Some minor adjustments need to be done and then KJ's "sawblade" setup would be tested. That would however Edit: BE in a couple of months time :o

Kent
 

Attachments

  • result.JPG
    result.JPG
    79.6 KB · Views: 717
Newton said:
The result show a fairly "hairy" pice of crap wood, but as a first try I'm happy.
Some minor adjustments need to be done and then KJ's "sawblade" setup would be tested. That would however Edit: BE in a couple of months time :o

Kent
you need the bit on the side of the dowel its up too high
use a 3/4" router bit and center it height wise (z axis)
you can get baby smooth finish
 
Thank's Lee.


I noticed that I had not set the Z axis at the correct height when I did this shot with flash. I was afraid to damage my dust shoe so I was a little careful at first run. A new dust shoe has been made only for lathe operation and hopefully it would work. It has been glued and has now cured over night. I'll drop a pic of it later, even though I would not be able to test it out today.

For those of you who knows you're CNC you will also notice another fault :) Well, maybe not to obvious but the spinning axis was a little of center at the tail stock which gave me a error in diameter of 0.7mm.
The accuracy picture show that the head and tail stock lines up but there is a minor play horizontally which I need to keep in mind when I lock the headstock.
The fix is simple, just lock the headstock when I have my hand pressing it to the right and it should be dead nuts next time.
 

Attachments

  • live_w_flash.JPG
    live_w_flash.JPG
    50.7 KB · Views: 390
Last edited:
New dust shoe

Well, not tested yet so it may need some iterations in design. Brushes would be mounted in the curved area to close the gap between the wood and the dust collector.. First try though :scratchhead:
 

Attachments

  • new_dust1.JPG
    new_dust1.JPG
    57.8 KB · Views: 382
Back
Top