Latest progress... (yes, there really has been some!)
Yesterday I took the walnut veneer and ovals to the nearby technical college where the instructor helped me with the tricky-sticky process of making those ovals look brand new. The 4' x 8' 10 mil backed veneer sheet cost $85 manufactured by Charter Industries. I'm sure there are other sources out there, but if anyone needs to do this, talk to Mike Porlier:
http://charterindustries.com/
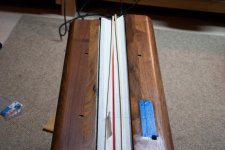
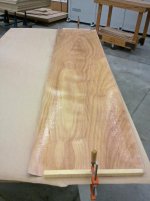
The first photo shows the veneer after it was sliced in half by some crazy looking saw that looked like a 10 ft long hydraulic sandwich. (I told the instructor that Stephen King could have a field day horrorizing this mechanical beast.) The saw blade moves along that 10 ft path at a slightly uncomfortable pace. Turn the thing on and back away! Intoxicating fumes can fill even a 12,000 sq ft wood shop, so if you try this at home, apply contact cement in a heated garage. Note, each piece was purposely cut to allow 1.5 in of overlap top and bottom which was later sliced off with a razor-utility knife.
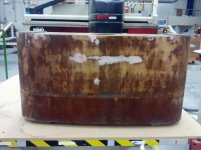
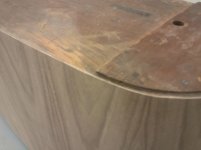
The next photo will show the bondo repairs done to the existing veneered surface, sanded first with 80 grit, then again with no more than 150 grit. While the contact cement was drying on the upside down veneer, the oval leg's surface was cleaned of its dust with a touch of lacquer thinner (there was a reason not to use mineral spirits to clean it with - might have impacted the curing of the contact cement???). Contact cement was then thoroughly applied to the oval leg with an appropriate roller, and allowed to nearly dry. Once it bubbles, it is very close to being ready.
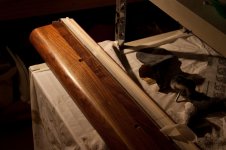
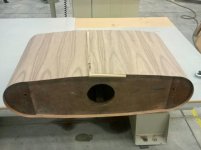
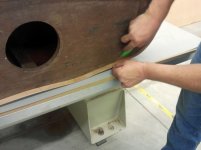
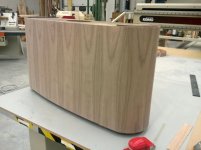
The next two images shows the oval wrapped in veneer. I wished I had captured the technique used to carefully attach it but it was just the two of us, so no one was available to take photos of us holding an 8 ft long piece. Once the two cemented wood pieces touch each other, there is no getting them apart without damage. The veneer was rolled back onto itself to a degree when transporting it from the table to the leg. We started at the front/center, lining up a contact point we marked with a pencil at the top front. A veneer roller was used to squish out any air bubbles as we carefully worked the walnut around the oval surface, level as she goes. You will notice paper was used, layered between the overlapping ends of the veneer. This is to prevent the veneer from sticking to the contact cement until confident alignment and trimming was done. A steel straight edge was used to cut thru one layer at a time, removing the paper as we went, and then we rolled the ends together. The meet point was where the stretcher attaches, and with the aluminum banding that will be attached on the bottom half, there is little concern for meet-point perfection. Mine turned out perfectly because I had the master there doing all the hard stuff.