Ring work - have a look at this

Newton

AzB Silver Member
Silver Member
I had a thread earlier where I discussed a "Mukki" ring transfer to a modern
shaft.
Me and Dick discussed the possibility of leaving the original ring in the shaft but then
turning a tenon on "shaft" side of the ring and glue the new shaft on top of this.

Well, I had a look at the original install and it was crap. Lots of air between the
wood and the ring which had me debating with my self what to do.

My conclusion was that I would turn the ring loose from the shaft so I could try
to correct this in the new install..

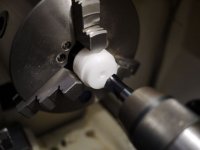
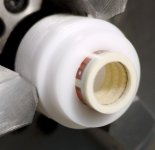
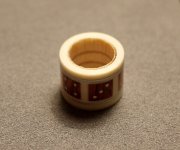
Now, cutting this loose showed that there was even space between the wood - plastic
even on the shaft end (first picture 1.jpg showing a black "ring" between the wood
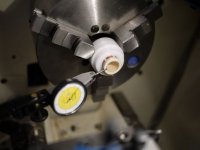
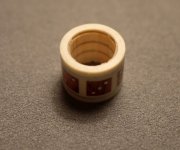
and the white collar). The idea was to leave a thin surface of wood on the inside
so the I could glue up on this and fill the original air gaps (on the insert side 2.jpg) with glue in the new install.
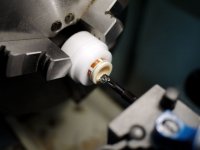
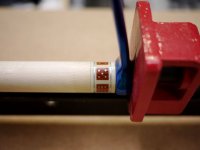
Well, now I have a problem on the "shaft" side of the ring (1 and 3.jpg).

In danger of "delaminate" the ring while turning all the way in to the material
Meucci use(d) in these rings - I'm not done debated with my self on what
to do.

Either I could chuck up - carefully on the ring and face it all off on the inside.

Or, I can just make sure that I use thin enough epoxy and soak the whole thing
in and hope the best.

Feel free to kick in with your take on this :)

Kent
 

Attachments

  • 1.jpg
    1.jpg
    30.2 KB · Views: 695
  • 2.jpg
    2.jpg
    45 KB · Views: 684
  • 3.jpg
    3.jpg
    46 KB · Views: 679
Last edited:
Kent I've had this issue several times....seems it always with a Moochie as well. I've always just chucked the collar up & cleaned the inside up with a sharp new boring bar. Haven't had one explode yet but it is a concern. I'd just go far enough to remove the loose wood...leaving some wood thats well attached won't hurt a thing....if possible. Just make sure your tool is sharp & take your time.
 
I agree with Kevin, you need to get the unbonded wood out of the equation. You can take it all out for that matter. What's the worst that can happen? Your ring comes apart and you install it one piece at a time. I do that anyway.
Chances are, your ring-stack will stay intact.
 
I would carefully bore out that little bit of wood until the rings are cleaned up on the inside.
 
This is why I have high blood pressure. More pictures please as you take the next step up the stair case of cue repair.
 
Use some clear packing tape on the outside of it to help hold things in place so if it wants to come apart it's not all over in pieces.
You need to get it cleaned out completely before re-gluing.
 
Thank you all for your thoughts.

The only concern I have chucking up on this and trim the last bit out is that
the surface on the ring (clear) is not even. I measured that while trying to
make the shaft dead nuts centered before starting the operation.

Just by moving my TIR meeter on the ring surface, the TIR varied from place
to place - which had me concluding bad clear work - which it was.

So at the end I might end facing this off in the center - and as KJ says -
it might delaminate - I glue it all up and I now have a ring which might cause
the new shaft to wobble.

On other rings I can turn a very light cut over it to bring things in place again,
but the clear is so thin (I can see cracks in some of the dices) that I in case
would cut in to the materials of the dices. And who knows how "good" these
inlayed dices might be w.r.t depth :confused:

I'll try to bore it out tonight and I'll bring the camera Dan :)

Thanks

Kent
 
How about making a custom collet out of delrin or teflon to full circle contain the ring and make as much contact as possible to reduce any chuck distortion. I also like using tape around the collar to hold the shrapnel together.
 
How about making a custom collet out of delrin or teflon to full circle contain the ring and make as much contact as possible to reduce any chuck distortion. I also like using tape around the collar to hold the shrapnel together.

Hmmm, that's a idea I might take up tonight :)
That would make it as dead nuts as possible if I do it without moving the
Delrin.

I'll see what I'll do ;)

Kent
 
Take it to your cnc router and mill the hole overnight.:thumbup:


He he, Well - "The Beast" is still in re-build and the boards is still not fully
hooked up... Heck - I even had a run on turning squares round on my lathe
after "chopping" my router setup ;)

Heading for the shop now and I think I'll try the Delrin. Have to make it dead
tight though.

Kent
 
How far off is it? A couple thou shouldn't make that big of a mess. I understand the concerns but sometimes we tend to over think a 2 minute project. The easiest way to get ahead is get started.
 
Using some scrap POM to chucked up

Found this and thought - why not try Olsons idea.
It was center bored - which of course did not line up now.
Just faced it off and used "the big hammer" to true up the hole.
Then boring out for the exact diameter .
 

Attachments

  • 1.jpg
    1.jpg
    27.2 KB · Views: 347
Ring mounted

Tight fit - but made the inner section of the hole a fraction tighter.
Checked TIR on the ring surface.
 

Attachments

  • 2.jpg
    2.jpg
    28.7 KB · Views: 342
TIR value

I'm not sure if you could read this but the scale is 0.0005"/div.
In this case 7 and a bit divisions - and I could not get it any better than
this. Or I did not spend any time improving it any more I guess I can say.

Edit: 7 was on the MM scale. It's 3 and a bit on the " scale.

This dial have me confused some times. That's the reason I use the MM scale..:embarrassed2:
 

Attachments

  • 3.jpg
    3.jpg
    24.6 KB · Views: 203
Last edited:
Tool used

Boring bare with interchangeable plates - and yes - it's those Alu things we
discussed earlier. Ultra sharp. Just love working with these.
 

Attachments

  • 4.jpg
    4.jpg
    27.3 KB · Views: 202
After a couple of cuts

I stopped at this point. The outer - loose portions - was removed and I
had at this time a thin surface of wood in the center which held the ring together.
Note that the ring would in this way would have a very small section in each
end which has no wood - but cleaned up at least.
I did at this point not want to take any further cuts and left what's left in place.

This would mean that the ring would have a small epoxy ring at the far far and
of the ring pointing down to the joint area. My judgement was that the ring is there
to prevent the radial expansion of the shaft and should in this case be sufficient
to work.
Wrong judgement my friends ?
 

Attachments

  • 1.jpg
    1.jpg
    33.5 KB · Views: 207
Highly custom made tool

He he, just made this to get the ring out of the POM. Since the inner portion of
the hole was a fraction tighter - it stopped the ring to go flush to the back.
In this way I could pull it out in stead of holding a fraction of the ring with my
fingers and pull it out - most likely damaging the ring (delaminate)..
 

Attachments

  • 6.jpg
    6.jpg
    55.7 KB · Views: 204
Last edited:
Glued up on a new shaft

It was wrong of me to say a "Modern" shaft previously :
This is a stock maple shaft. The owner was in no way favor of the "Dot-what-ever-color" shaft and wanted a old school "normal" shaft..
 

Attachments

  • 7.jpg
    7.jpg
    26.4 KB · Views: 202
Back
Top