You are using an out of date browser. It may not display this or other websites correctly.
You should upgrade or use an alternative browser.
You should upgrade or use an alternative browser.
This is going to be my next restoration project
- Thread starter SignManiac
- Start date
That is very impressive! Do you do this sort of work for a living? Is the metal pipe on the high part of the wall just deco?
Great job!
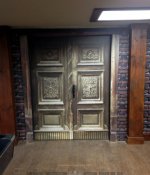
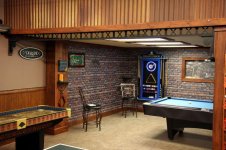
Thank you guys. Yes the stove pipe is just cosmetic. The bricks are a pattern i created an printed on my wide format printer. The material is a PhotoTex product that is like wallpaper. I designed the brackets that support the pipe and cut them from black PVC scraps laying around my shop on my CNC router table. The wall cue stick rack I made is also from scrap PVC.
I am a sign designer/maker by trade, but my design skills often extend beyond my work. I'm lucky to have an arsenal of tools (toys) to be able to fabricate almost anything I can imagine. I expect this project to take a year or two to finish. I'll post updates as I complete each new phase.
How about an update on the table and man cave...
During the late 70's I had a friend who owned a Viscount. And yes, it's pretty much a GC. He had a woodworking friend who fashioned a complete replica of the apron set out of 1" solid walnut and fitted it factory perfect. It was one of the most impressive feats of woodworking I've ever seen.
Minor Update
Nice to have Tuesday and Christmas day off to work on another one of my many man cave projects that are on my list. The doors now have a fitting character that ties in nicely with the rest of the steam punk theme! Before and after pics.
Nice to have Tuesday and Christmas day off to work on another one of my many man cave projects that are on my list. The doors now have a fitting character that ties in nicely with the rest of the steam punk theme! Before and after pics.
Attachments

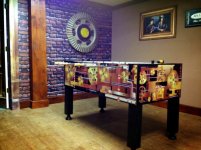
Man, you've got everything in there! Pool, ping pong, foosball, shuffleboard, the works. Only think missing is a Pool Sharks pinball machine. 
This goes beyond man cave. It's more like an antivaginal-gaming-den.
<---------- jealous as hell
<---------- jealous as hell
Man, you've got everything in there! Pool, ping pong, foosball, shuffleboard, the works. Only think missing is a Pool Sharks pinball machine.
This goes beyond man cave. It's more like an antivaginal-gaming-den.
<---------- jealous as hell
Yes and yes.
Man that sucks...I think he should be barred from posting pictures on here.
Ha ha guys. Trust me, it's an expensive vice when you add up the time and money! But it is fun to turn your imagination into finished pieces. At least two more years to finish everything. And I'm not normally patient...
Hope you guys enjoy seeing the progression pics, and maybe inspire some ideas of your own.
Hope you guys enjoy seeing the progression pics, and maybe inspire some ideas of your own.
Ha ha guys. Trust me, it's an expensive vice when you add up the time and money! But it is fun to turn your imagination into finished pieces. At least two more years to finish everything. And I'm not normally patient...
Hope you guys enjoy seeing the progression pics, and maybe inspire some ideas of your own.
Ahhh...finally... a real B and B... how much for a month? :thumbup:
Randy
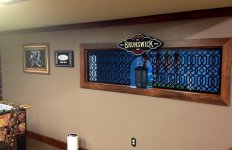
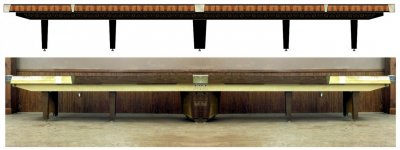
Just another update. Got the wainscoting and chair rail up last weekend and will finish base board this coming weekend. Here's my concept for the shuffleboard table restoration. I'll refinish all the wood and shoot with a Matthews satin black. Digital print the copper metal design. and applique the scroll work down the sides in routed 1/8" PVC. I'm going to plane down the surface of the maple board to bare wood and v-carve the scoring numbers and lines back into the surface. After that I'll seal it and wax it. There's an electronic score board that plan to redo and install as well.
It's all just smoke and mirrors cosmetic but from a distance it should look pretty cool.
It's all just smoke and mirrors cosmetic but from a distance it should look pretty cool.
Attachments
This reminds me of the country classic - https://www.youtube.com/watch?v=XD6jzn92cWU
I'd never leave!
I'd never leave!
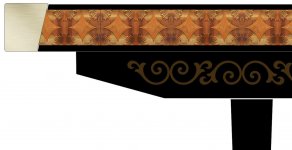
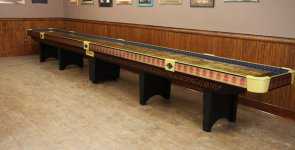
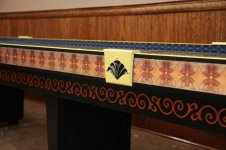
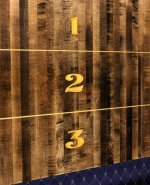
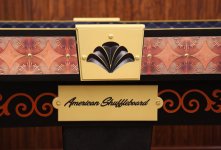
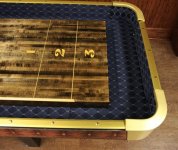
Okay, so I just finished my shuffleboard restoration project. Here are a couple of before and after photos along with my faux truss room dividers. I took the entire table apart, sanded and painted the tray and rails. The scrolls are Matthews metallic copper. The metal sides are UV flatbed printed tiles on brushed aluminum polymetal. I fabricated the shell design trapazoid pieces from 1/2" solid pvc and painted them in brilliant metallic gold, then caved the embellishments into the faces.
I made and upholstered padded tray liners for the inside play area. I resurfaced the solid wood playing surface on the router table then stained it a deep ebony. Sanded and clear coated the entire board after fill in the carved score lines and numbers. I used brass tacks along the side and top rails to give it some added dimensional details.
It was a fun project and really is the centerpiece of my man cave!
Attachments

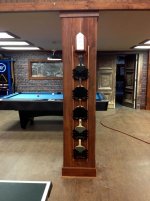
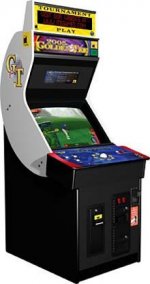
The rest of the photos along with a 2005 Golden Tee that I'm going to do a restoration on at a later date.
Attachments


Last edited:
Wow! That turned out really nice! good job man!
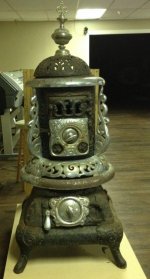
I forgot about this one. I picked up a 100 year old parlor stove that I'm going to sandblast down to bare metal, then refinish in either black and nickle or black and brass? Haven't decided yet. It's only going to be a decorative piece and not functional in any way.
Attachments
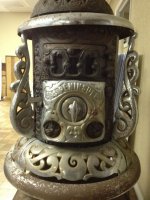
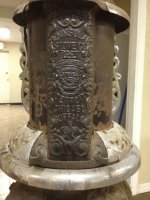
I'll be sure to once it's finished. Hard to believe the craftsmanship back in the 1800's and turn of the century!