Willard's Tipper-Trimmer machine has a GAUGE!

acousticsguru

player/instructor
Silver Member
Hello everyone!

Just bought myself one of these, and used it for the first time today. Thanks everyone for the reviews and tips I found here, and that helped me make a buying decision! Before anyone asks: got this new for a price at which I couldn't possibly buy a 220 VAC lathe.

First used the machine to trim the mushrooming off the tips on three "house cues" shafts, and of course ever so slightly trimmed into the ferrules of two of them, plus made a virtually unnoticeable dent into one, not sure if by under- or over-tightening the collet.

Also tried putting a yellow 3M Post-It around one shaft, with the collet chuck over it, but that'll only work with small diameter shafts (or larger collets - my machine came with two 13.5 mm ones). But it's really a matter of getting a feel for the positioning and tightening of the collets.

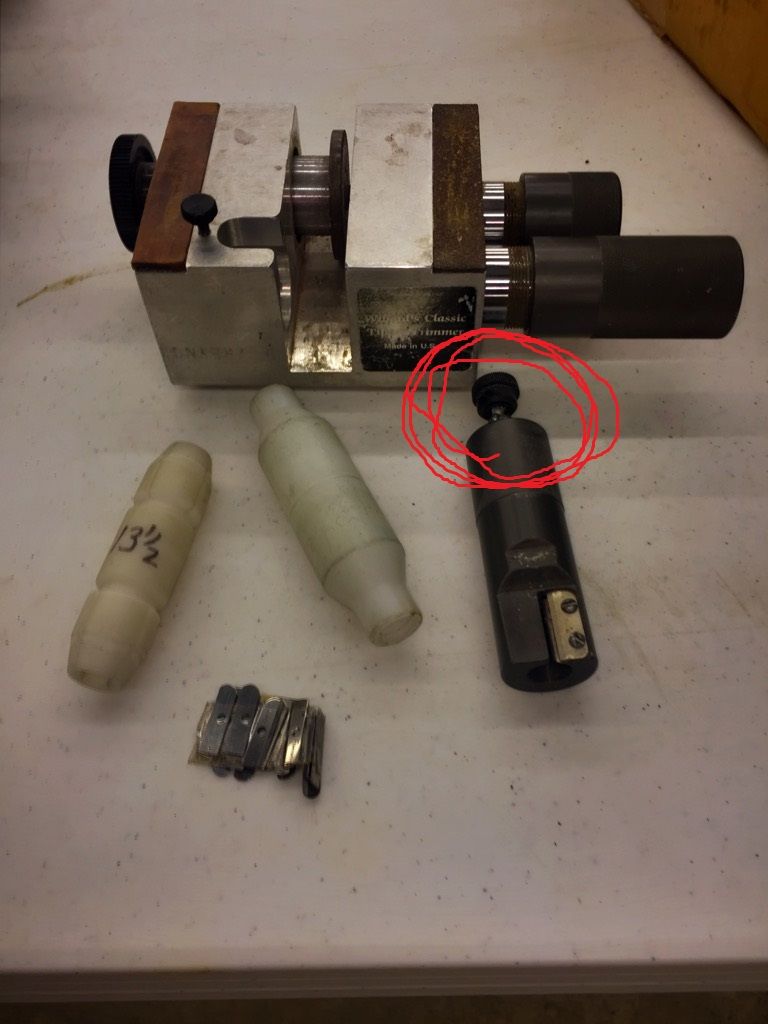
Then got adventurous and put a new tip on my favourite 20-year-old birdseye maple (softer than straight grain, demanding extra care!) shaft of my Southwest, admittedly after I noticed there's a GAUGE (a screw with a spring) built into the trimmer (the grey pencil-sharpener-like part), which the manufacturer simply forgets to mention on the DVD, or that scrap of paper of a "user manual" (LOL!) the machine comes with.

Makes me wonder, do all owners/users realize there's a gauge? It's technically impossible to trim into the ferrule if one uses it!

Especially if one's favourite tip comes with a flat top and at a consistent height (as e.g. my choice of Kamui Black S), one only needs to set the gauge correctly once, and could then use the trimmer blind-folded.

In a nutshell, I find machine well thought-out and -built, working perfectly, but the DVD is pretty useless (in other words, don't bother getting one if you find a used machine without manual, DVD or VHS cassette).

Greetings from Switzerland, David.
_________________

„J'ai gâché vingt ans de mes plus belles années au billard. Si c'était à refaire, je recommencerais.“ – Roger Conti
 
Can someone explain the process for setting the gauge depth? I picked up a used one with no instructions.

Thanks,
 
Can someone explain the process for setting the gauge depth? I picked up a used one with no instructions.

Thanks,


Shave a couple of ivory ferrules and you'll figure it out :-)

Just a bit more seriously, you have to play with it. DO NOT under any circumstances, start out with your favorite shaft. But after awhile it becomes pretty easy.

Just this weekend I installed a new G2 M and trimmed it this morning. Like butar.

Lou Figueroa
 
Last edited:
Can someone explain the process for setting the gauge depth? I picked up a used one with no instructions.

Thanks,

The best way to do it is.... Tighten the screw gauge all the way in.... Then with new tip installed and you are ready to trim, slowly turn shaft to trim new tip. (You may have to back the screw out a few turns before tip starts getting cut). Then unscrew the gauge screw a little at a time and then turn shaft to trim tip more. Continue this until tip trims flush with ferrule.... I actually removed the screw on mine and welded a screw with a knob on it so I could turn it easily without having to use a screw driver.... Seen in picture below.... It is also listed for sale in the for sale section...
 
One of the worst mistakes I ever made was selling my Willard tip machine. It's a great device!
 
Just a basic question, can this device - if you do your job - give a professional looking job when it's all said and done?
 
Just a basic question, can this device - if you do your job - give a professional looking job when it's all said and done?


Very close. You just can't get as super a high gloss finish on the sides of the tip as with a lathe but very close.

Two things no one has mentioned: one is that you can't finish the top of an ivory ferrule with the Williards. The finishing wheel is way too rough a grit and if you do it, eventually you'll just end up with a cracked ferrule. So what I do is have the shaft retipped every few years by a mechanic with a lathe and have them install a pad. Then, when I want to install a new tip myself, I carefully razor down to the pad and lightly sand the pad with the wheel. You can get by for several years of retipping with the Williards if you're careful.

The other thing is that I'm not so sure it'd be a great idea to use super glue with the Willards because you can't use it to remove excess glue that might squeeze out onto the ferrule. So I use Tweeten's. The only trick with that is to totally disregard the claim on the tube that says you can finish the cue after a 10 minute wait. My personal experience is that you need to wait 48 hours -- 72 is even better -- then you can finish the cue and it will hold as well as super glue.

Overall though I think the Williards is great for retipping and taking care of mushrooming. I've had mine for probably 15 years.

Lou Figueroa
 
Last edited:
The one I bought back in 09 did not have that gauge, I'll have to check if it has something inside the slot where the blade is.

Sent from my SM-N920P using Tapatalk
 
Just a basic question, can this device - if you do your job - give a professional looking job when it's all said and done?

When I get through putting a tip on and trimming, I have a drill clamped in a vise that I use to spin the shaft to burnish tip. Also for shaft cleaning. Just get the right maintenance pin for the shaft you are needing to spin.... I did it this way for 15 years before getting my lathe.... And you can make good money doing it this way..
 
Lou, thank you, I just checked, my older one, it does have a screw in the end of the "pencil sharpener". I never knew what it was for :-) Thanks
I think they do as good a job as a lathe, maybe better since little if any heat generated. And there is no temptation to "clean" the shaft and change the taper.
Check out the Kamui youtube for putting on tips by hand.
 
<resurrecting an old thread here>

I am looking at one of these for sale and it is nice to hear that there is some kind of (not very well documented) gauge on the edge cutter. Unfortunately, it also looks like the standard cutter diameter is only adjustable from 12.75mm to 13.5mm which is probably the one that the seller got (still waiting to hear back from him). I play with a 12.5mm on all my maple shafts except for my breaker which is a 13mm, so unfortunately, I would have to purchase the smaller one from Mueller's for $70 plus tax and shipping.

Thanks for another informative thread AZB!
 
Another thing I learned yesterday about the Willard tip replacement and maintenance products shown in the video above is the final tip shaper (nickel or dime circumference tool that is shown as being sold separately) never made it out of the prototype stage. I called Mueller's yesterday and they said only one was made / prototyped for the video. It sounded like they were not quite sure why, but I did not ask directly. My guess it was too expensive (parts and / or labor costs) to make and sell at a reasonable price? It looked like it did such a nice and even job as the final step to get the tip circumference done.

What are people using instead (whether they own a Willard tool or not) to get the same correct and even dime or nickel final shape besides the obvious various "by hand and eye" basic shaping tools? This one looks interesting but it is only for shaping to a nickel shape:


I wonder who has the original Willard prototype shaper?
 
Luckily, I bought mine when they were under $300 new. Some of the things I figured out is patience, the correct size collets and sharp blades are a must, and as previously mentioned, practice first on lesser important cues. Patience and clear vision up close are essential so you don't gouge ferrules. Be careful when changing blades. The blade can be aligned straight or at a slight angle that would give the top of the tip a slight inward taper. I try to keep mine straight. Make sure cutter is screwed down tight in the block as is can become loose and slightly rotate. I started out using the gauge. Eventually, I learned to patiently push in the tip while cutting and frequently removing to visually inspect the evenness of the cut around the tip and closeness to the ferrule. My personal experiences may not work for everybody but I will say that since I couldn't afford a lathe, the Willards machine was one of the best investments I made since I do most of our local tips. Good Luck and have patience.
 
One thing I do is wrap my ferrule just below the new tip with 3 turns of blue or green painter's tape. Then when I'm trimming and a bit of blue or green painter's tape starts showing, then I know I'm just about done and haven't cut into the ferrule yet.
 
Back
Top