Cut Aiming Template

oldschool1478

AzB Silver Member
Silver Member
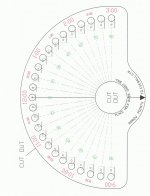
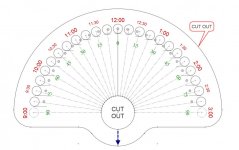
I made a simple paper template to help see and learn cut angles. I got the idea after watching Shane's aiming system U-tube video.

To use it, save the .jpg file to your computer, then print it on a sheet of 8x10 paper. I use heavy weight paper for durability. Cut out on the perimeter line, and the large center circle.

On the table, place the cut out circle over the ghost ball, while pointing the arrow back to the cueball.
Site from the desired pocket back through the object ball to ghost ball center, and note the nearest angle or clock position.
The outer dark circles represent the object ball as seen from the shooters position. The dashed circles represent the ghost ball.
The small black dot represents the contact point on the object ball.
The smallest circles represent the cue tip, or shaft, or sight line, relative to the object ball, when the cueball is struck dead center.

This is based on the geometric aim line, so speed and the throw effect may require some compensation.
A medium or a bit softer stroke works best for me and my Cuetec R360.
After a while, you learn to see the angles or clock positions while standing, and may not need to use the template on the table. I now just hold my cue aligned with the cueball passing through the object ball, with the tip above at 12:00 and estimate the clock "time" of the pocket. Just refer to the tip/OB alignment for that angle, until you have those memorized.

Until recently I had always used the ghost ball, but my old eyes started playing tricks on me. This "flat perspective" way of sighting seems to help me. This works without even sighting from the pocket through the object ball to find the contact point, but I still do that, for verification.


Dan

Edit: Revised template to include ghost ball and contact point at sight picture.
Second Edit: Revised template info to place over the ghost ball. Also revised the above text for using the template.
 

Attachments

  • Cut Shot Template Revised.jpg
    Cut Shot Template Revised.jpg
    83 KB · Views: 6,309
Last edited:

joewag2

AzB Silver Member
Silver Member
Dang, that's impressive Dan! That had to take alot of time and effort.

A huge sincere Thank You!

Sent from my SCH-I400 using Tapatalk 2
 

LAMas

AzB Silver Member
Silver Member
I made a simple paper template to help see and learn cut angles. I got the idea after watching Shane's aiming system U-tube video.

To use it, save the .jpg file to your computer, then print it on a sheet of 8x10 paper. I use heavy weight paper for durability. Cut out on the perimeter line, and the large center circle.

On the table, place the cut out circle over the object ball, while pointing the arrow back to the cueball.
Site from the desired pocket back to the object ball, and note the nearest angle or clock position.
The outer smaller circles represent the object ball as seen from the shooters position.
The smallest circles represent the cue tip, or shaft, or sight line, relative to the object ball, when the cueball is struck dead center.

This is based on the geometric aim line, so speed and the throw effect may require some compensation.
A medium or a bit softer stroke works best for me and my Cuetec R360.
After a while, you learn to see the angles or clock positions while standing, and may not need to use the template on the table. I now just hold my cue aligned with the cueball passing through the object ball, with the tip above at 12:00 and estimate the clock "time" of the pocket. Just refer to the tip/OB alignment for that angle, until you have those memorized.

Until recently I had always used the ghost ball, but my old eyes started playing tricks on me. This "flat perspective" way of sighting seems to help me. This works without even sighting from the pocket through the object ball to find the contact point, but I still do that, for verification.

Dan

Great effort.
You might consider putting a line under each OB to represent the table to assist in the relationship of the ferrule and it's sides to the OB. The larger cut angles where the ferrule or it's side is sighted off of the edge of the OB become more vague in terms of reference to the cut angle.
Thanks.:smile:
 

oldschool1478

AzB Silver Member
Silver Member
Thanks LAMas, good idea!
"You might consider putting a line under each OB to represent the table to assist in the relationship of the ferrule and it's sides to the OB. The larger cut angles where the ferrule or it's side is sighted off of the edge of the OB become more vague in terms of reference to the cut angle."

Like this?
 

Attachments

  • CUT SHOT TRAINING TEMPLATE 2.jpg
    CUT SHOT TRAINING TEMPLATE 2.jpg
    83.2 KB · Views: 6,423

LAMas

AzB Silver Member
Silver Member
Thanks LAMas, good idea!

Like this?

I like it.

For those shots that are to be aimed farther out from the side of the ferrule touching the edge of the OB; why not add a dotted diameter/s to the side of the ferrule and the edge of the OB. This won't be as accurate for the image/size of the ferrule will change depending on the distance between the CB and OB; but it will give a better relationship of how far the ferrule must be to effect that shot. The dotted ferrule will start by overlapping the OB edge and progress untill it is one dotted ferrule , then until it becomes necessary to have 2 dotted ferrules etc..:smile:
 
Last edited:

One Pocket John

AzB Silver Member
Silver Member
Nice job.

Thanks from an ol' timer.

John


Edit. Man this a pretty neat template. Printed and cut it out. I have a table about 8' away from my desk. Set it up and I have to say this is one hell of an idea works great.
 
Last edited:

AtLarge

AzB Gold Member
Gold Member
Silver Member
I made a simple paper template to help see and learn cut angles. ...

Nice template, Dan; it should be helpful. But you should also be aware of the following.

A "cut angle" shown on your template is the acute angle between these two lines: (1) the line from the center of the CB to the center of the OB and (2) the line from the center of the OB to the target.

Conventionally, however, a cut angle needed for a shot is measured as the acute angle between these two lines: (1) the line from the center of the CB to the center of the ghost ball and (2) the line from the center of the GB (through the center of the OB) to the target.

In other words, the cut angle achieved with a shot is just the number of degrees the OB is knocked off the pre-collision path of the CB.

[This all ignores the effects of throw and spin.]
 

oldschool1478

AzB Silver Member
Silver Member
Nice template, Dan; it should be helpful. But you should also be aware of the following.

A "cut angle" shown on your template is the acute angle between these two lines: (1) the line from the center of the CB to the center of the OB and (2) the line from the center of the OB to the target.

Conventionally, however, a cut angle needed for a shot is measured as the acute angle between these two lines: (1) the line from the center of the CB to the center of the ghost ball and (2) the line from the center of the GB (through the center of the OB) to the target.

In other words, the cut angle achieved with a shot is just the number of degrees the OB is knocked off the pre-collision path of the CB.

[This all ignores the effects of throw and spin.]

This is exactly how I found the angles shown. I erased the ghost balls later as they were only a distraction. The template was just to give me a site reference to aim the tip of my cue relative to the outer edge of the OB. It works very well for me even accounting for throw, if I use the right speed, and hit the CB dead center. I do have brand new Aramith Tournament balls, that don't have a lot of stick to them, so not as much throw as more worn or dirty balls. The 760 cloth is also new.

Dan
 

LAMas

AzB Silver Member
Silver Member
AtLarge,

I had to study what was being diagrammed. I asked that a line representing the table be added so that I could study what the perspective was, and concluded that the diagram was geometrically correct:

- The center of the CB is to be aimed at the center of the OB for a straight in shot.

- The center of the CB is aimed at the edge of the OB for a 30 degree cut angle.

- The center of the CB is aimed off of the edge of the OB by 2.5 ferrule diameters or ~1.125" for an 11.43 mm diameter ferrule for a very thin cut <90 degrees. This will be different for a 13.00 mm dia ferrule etc.

With trial and error, one can adjust to the resulting cut angle sans CIT and further adjust for CIT, speed english and distance between the CB and OB etc.. The results for the shooter must be commited to memory and be recalled (without the tool) when not practicing with it.

As I said, I accept that the diagram is geometrically correct.....but that may just be me and the author of the tool.

Be well...:smile:
 
Last edited:

AtLarge

AzB Gold Member
Gold Member
Silver Member
This is exactly how I found the angles shown. I erased the ghost balls later as they were only a distraction. The template was just to give me a site reference to aim the tip of my cue relative to the outer edge of the OB. It works very well for me even accounting for throw, if I use the right speed, and hit the CB dead center. I do have brand new Aramith Tournament balls, that don't have a lot of stick to them, so not as much throw as more worn or dirty balls. The 760 cloth is also new.

Dan

Perhaps I'm not understanding it correctly. But you said you use the template by putting the cut-out over the OB, pointing the arrow at the CB, and then reading the necessary cut angle from the template.

For a given OB position and target, the GB position is fixed. So the line from center GB to target is fixed, and that's one of the lines used in defining the cut angle.

But the other line used (conventionally) in defining the cut angle runs through the centers of the CB and GB. The location of that line depends on where the CB is, i.e., how far away it is from the OB down the line defined by the arrow. The CB could be in an infinite number of positions with the arrow of your template still pointed at it. And each of those different positions for the CB creates a different cut angle (conventional terms); the closer the CB is to the OB (always still on the "arrow line"), the sharper the cut angle.

If the arrow pointing at the center of the CB came out of the center of the GB instead of the center of the OB, then the cut angle would be the same regardless of the distance between GB and CB on the "arrow line."

In other words, shouldn't the cut-out on your template be located over the GB rather than over the OB?
 

LAMas

AzB Silver Member
Silver Member
This is exactly how I found the angles shown. I erased the ghost balls later as they were only a distraction. The template was just to give me a site reference to aim the tip of my cue relative to the outer edge of the OB. It works very well for me even accounting for throw, if I use the right speed, and hit the CB dead center. I do have brand new Aramith Tournament balls, that don't have a lot of stick to them, so not as much throw as more worn or dirty balls. The 760 cloth is also new.

Dan

Dan,
If one can see the center of the GB that sends the OB to the pocket/target, then the reference angles are unecessary - just shoot the CB at the center of the GB.

I have difficulty seeing/imagining the center of the GB - sometimes it smaller (thick hit) and at other times is larger (thin hit).:frown I also have difficulty seeing the GB center or where the GB touches the cloth to aim at, but that just me.

So all of these years, I use the stick to look at the included angle from (1) the center of the OB to the pocket/target and (2) the center of the OB back to the center of the CB. I determine what that angle is and i recall from my memory, the corresponding spot on the OB to aim the CB at for cut angles from 0 to 30 degrees. For cut angles from 30 to 90 degrees, I look for the number of ferrule diameters, or fractions thereof, away from the edge of the OB - like the template/diagram/tool.

The template is a clever way to diagram, based on the necessary included /shot angle, where to aim when instructional words without the aid of the template fail - very useful.

Works for me.:smile:
 

AtLarge

AzB Gold Member
Gold Member
Silver Member
... So all of these years, I use the stick to look at the included angle from (1) the center of the OB to the pocket/target and (2) the center of the OB back to the center of the CB. I determine what that angle is and i recall from my memory, the corresponding spot on the OB to aim the CB at for cut angles from 0 to 30 degrees. For cut angles from 30 to 90 degrees, I look for the number of ferrule diameters, or fractions thereof, away from the edge of the OB - like the template/diagram/tool. ...

But the two lines you described do not define a unique cut angle. A CB close to the OB and a CB distant from the OB (but both CB's on the same line from center OB) require two different cut angles -- and, therefore, two different aiming spots on or off the OB.
 

LAMas

AzB Silver Member
Silver Member
But the two lines you described do not define a unique cut angle. A CB close to the OB and a CB distant from the OB (but both CB's on the same line from center OB) require two different cut angles -- and, therefore, two different aiming spots on or off the OB.

AtLarge,
You are correct and the template will not work when the CB and OB are too close together for the aim line from the CB to the GB necessarily changes, and the angle gets larger as the CB is closer to the GB. The CB rotates in an arc about the GB.

That said, when the CB and OB are far apart, say 2 diamonds or more, it is usefull and the aiming points on the template will work well enough for the novice to learn.

Dan,
You understand GB aiming for you said and discarded it for the purposes of developing your template.

AtLarge has a good point that can be addresed in your template or another template.

Draw a semicircle from 3:00 to 9:00 with a radius of 2.25" from the center of your OB hole on the shooters side. Extend each radiating path to the pocket line through the hole center to the nearside toward the CB and shooter stopping at the semicircle. Put a dot at the end of these radiating lines.

For each desired cut angle from the OB to the pocket, there will now be a dot (base of the GB) near the shooter where the CB is to be aimed at. The CB will simultaniously roll atop the dot and contact the OB sending it to the pocket. This will simulate the Cranfield Arrow.

I think you know what I am describing and can discard it for this may be too much trouble and not the utility of your template.

The problem with what I just proffered is that once one removes this template, there will be no dot to aim the CB at...just the GB.:smile:

On the otherhand, if one uses the appropriate dot fot the cut angle to the pocket, they will see that their shaft is aiming at the same location as your the picture on your template.

Be well.:smile:
 

One Pocket John

AzB Silver Member
Silver Member
I use the "back of ball" aiming method and have for almost 50 years. I shoot at the OB with the tip of my cue thru the QB (like the cue ball is transparent). When my tip is outside of the OB then I use cue tip widths.

The template makes sense to me and I will use it for some cut angles I have issues with. Like the blind cuts.

Thanks again.:smile:


John
 

oldschool1478

AzB Silver Member
Silver Member
But the two lines you described do not define a unique cut angle. A CB close to the OB and a CB distant from the OB (but both CB's on the same line from center OB) require two different cut angles -- and, therefore, two different aiming spots on or off the OB.

You are correct.
I just set up an OB on the center spot, and CB on the head spot, (24.75 " CBC to OBC). Then moved the CB closer to OB to check aim point.
After re-testing with 24" or more CBC to OBC, the aim point works for me.
With 12" CBC to OBC, I have to add 1/2 tip aim correction.
With 6" CBC to OBC, I have to add 1 full tip aim correction.

The main reason I made the template was to help me see the OB to pocket clock/angle. I assumed I would have to adjust the aim point after testing. My first tests did not include CB to OB distances closer than 2 feet. That was a mistake. I was surprised how well it worked on longer cuts so I didn't mess with it. The best thing for me, was that it helped me to see the angles, and a shot "picture", to store in my head. I only use it now, when I am having trouble with particular shots.
I will continue to test, and update as needed. It would be great if some others would do the same, and report back here. I wear bifocal glasses, that I modified for pool, by lowering the nose pads about 5/16". This allows me to get low on the shot, and not have me looking through the frame at the top. I also bent the frame so the lenses angle up to make them more perpendicular to the shot when I am down on the shot. All of this may have altered my perspective view.

Dan
 

theUBC

AzB Silver Member
Silver Member
Thanks for helping a lot of players with this template.
All angles are correct! I measured them too!

The two small circles are both correct two. I guess the size of the ball (5.72 cm) will be perfect as well- but could not measure as I my printer just ran out of ink...

The angles are pretty perfect for distances between 1 and 3 diamonds-
a good way to get a good picture for the angle!!!

Beeing closer to the object ball (1 diamond) we have to cut the OB more as the angle gets steeper cos of the ball's diameter + bigger CIT
- or further away ( adjustments are only needed on rather slower follow shots! speed 1- speed 2 without stun action) here we have to make a fuller contact with the object ball as the angler gets smaller and we percieve the OB smaller too...) need adjustment.

Now with this templete we can see how much adjustments in degrees we need when aiming- SO THIS A GOOD THING.

I have such a template in my book the SEE-SYSTEm as well- but I like yours better!

GOOD JOB!

P.S. @ oldschool: you got PM from me
 

AtLarge

AzB Gold Member
Gold Member
Silver Member
... AtLarge has a good point that can be addresed in your template or another template.

Draw a semicircle from 3:00 to 9:00 with a radius of 2.25" from the center of your OB hole on the shooters side. Extend each radiating path to the pocket line through the hole center to the nearside toward the CB and shooter stopping at the semicircle. Put a dot at the end of these radiating lines.

For each desired cut angle from the OB to the pocket, there will now be a dot (base of the GB) near the shooter where the CB is to be aimed at. The CB will simultaniously roll atop the dot and contact the OB sending it to the pocket. This will simulate the Cranfield Arrow. ..

LAMas -- Your solution would give the correct aiming points (base of GB), but the numbers on the template would still not be the correct cut angles, because they relate to the OB-to-CB line rather than the GB-to-CB line.

Conceptually, the correct solution is for the cut-out to be over the GB rather than over the OB, with the arrow pointed at the CB. Then the cut-angle numbers would be correct.
 

AtLarge

AzB Gold Member
Gold Member
Silver Member
... I just set up an OB on the center spot, and CB on the head spot, (24.75 " CBC to OBC). ...

Sounds like something is slightly off with your table or your measurement. The center spot and the head spot are two diamonds apart. On a 9-foot table, the diamonds (centers thereof) are 12.5" apart, so two diamonds would be 25" (one-quarter of the 100" playing surface).

... I was surprised how well it worked on longer cuts ...

Right; the farther the balls are apart, the smaller the difference in basing the cut angle on the CB-to-OB line versus the CB-to-GB line.
 
Last edited:

oldschool1478

AzB Silver Member
Silver Member
Sounds like something is slightly off with your table or your measurement. The center spot and the head spot are two diamonds apart. On a 9-foot table, the diamonds (centers thereof) are 12.5" apart, so two diamonds would be 25" (one-quarter of the 100" playing surface).

My table is fine. My reinforcement donuts were not placed correctly.:eek:
Please forgive me, I had just gotten out of bed, and I sleep in a dunce cap!

Dan
 
Top