That sounds good. I would usually just wet the sides of the tip and burnish it with the inside of a pack of paper matches. It was just the right size.there was a time I did tips and ferrule replacements in N.J. on a big lathe.
I would use clear paste shoe wax on the side of the tip and spin it fast and burness it with the paper side of the sandpaper.
You are using an out of date browser. It may not display this or other websites correctly.
You should upgrade or use an alternative browser.
You should upgrade or use an alternative browser.
HOW TO REPLACE A CUE TIP … No Special Tools Required
- Thread starter dr_dave
- Start date
There you go! There is a way to use a rubber band without the clamp as well.Might be good to talk about various burnishing methods. Leather, brown paper bag, brown cardboard, dollar bills, heck maybe even blue jeans or even glass. I don't think it's too important what you use to burnish, but it might be good to add different methods to the resource page.
Also if you're interested in different products, that tweeten tip clamp as pictured is really inexpensive and does a good job without damaging your shaft:
View attachment 579602
Last edited:
I learned a trick, from Adam Brostoski, Paramount Billiards room owner Long Beach CA 70's and on.
Adam is the father of the owner of Golden West Billiards, the tables you often see on Price is Right.
The glue burp' after the tip/ferrule are faced is what Adam showed me.
Super glue gel.
Apply proper amount to tip bottom. Apply tip to the faced ferrule, turning it around, pulling it off to make sure, both glue flat surfaces are ''wet'' before the burp.
Center the tip over the shaft, hold shaft vertically couple feet off the floor and drop/bounce it ''Once''.
Look at tip and center.
It will have a glue overhang on the ferrule/tip due to the drop, do a final ck for it being centered. Set it somewhere Vertical to dry
Tip burping. A bit odd, but “interesting.”
This is great, thank you Dave for posting, and Bob for your input to Dave.
You’re welcome.
I confess it reminds me of those videos of kids in Pakistan making AK-47s with the crudest of implements, on the floor of their workshops.
I did want to mention that for a lot less money than just one of those fancy cues you can get a rudimentary cue lathe, like the "SHARPSHOOTER POOL CUE TIP LATHE," on eBay for about $250 plus shipping. Seems like a good investment if you're seriously into pool.
Good point about the lathe. That is affordable, especially for somebody who plans to replace lots of tips.
Also, surprised there's no mention of burnishing compounds other than water. Saliva, even, or beeswax? I got a bottle of gum trag (tragacanth). Produces a lovely, shiny burnish.
I’ve always wondered about burnishing. I never cared much about shininess ... I don’t really care how my cue looks. But does burnishing also significantly add to the strength of the tip and help resist mushrooming? I wouldn’t think so, but I’d be curious to hear from others who might know more.
Thanks,
Dave
In reality it's glue ''burping''....the hydraulic action of the drop bounce, allows this action too remove ANY AIR bubbles, key to giving the glue it's Strength by utilizing the ''Full surface'' grip of the opposing surface by having NO air pockets in the glue facings.Tip burping. A bit odd, but “interesting.”
In a similar VISUAL mindset of the BURP like.... it's a person....who's getting very fat 80 + lbs overweight....wears a ''belt''....and Visually....carries and even amount of overhang fat above and below the belt line.
")
Last edited:
Try to avoid clamps, rubber bands, razors, knifes, and swords. You don't need any of them.There you go! There is a way to use a rubber band without the clamp as well.
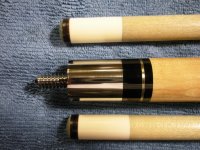
By the way pictures of anyone's do it yourself work would be welcome here. So far, Dr Dave and I have been the only ones to put them up. Here are a couple others. This is a Richard Black cue. Do it yourself pics would be welcome here, rather than theory.
All the best,
WW
Attachments
You are correct on that. Those tools have so much play in them, you'll end up with an uneven ferrule top. Get good with a file, and you'll be much better off than those crap tools.This Tweeten tool looks nice but never felt like I needed one.

Sent from my SM-T830 using Tapatalk

All the best,
WW
In reality it's glue ''burping''....the hydraulic action of the drop bounce, allows this action too remove ANY AIR bubbles, key to giving the glue it's Strength by utilizing the ''Full surface'' grip of the opposing surface by having NO air pockets in the glue facings.
In a similar VISUAL mindset of the BURP like.... it's a person....who's getting very fat 80 + lbs overweight....wears a ''belt''....and Visually....carries and even amount of overhang fat above and below the belt line.
I understood what you wrote the first time. I just don't think it is the best approach. Adding a drop of glue to the center of the tip or ferrule (after smearing glue over the entire tip-back surface) and pressing/turning slowly followed by lots of pressure work just as well (without the awkward drop maneuver), IMO.
Thanks for the input, though,
Dave
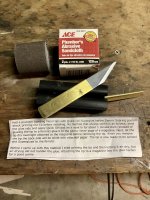
Here are some of my tools.
Plumbers pipe sandpaper, cut a strip lengthwise and fold in half and while it’s clamped in the vise apply a shoe shine motion.
Rubber clamp is used for regripping golf clubs.
Japanese carving knife with bevel on one side, allowing the blade to slide down the ferrule
A note from Searing on how he preps tips.
Attachments
22572-03-1000.jpg (1000×1000) (rockler.com)
My trusty five inch draw knife I have used to install several tips. Scary sharp, only beveled on one side, easy to control. As we are seeing, tip installs are a lot like playing pool. It is more the Indian than the arrow.
Another little scrap of information, most people aren't using the little brass handled knives as intended. The idea was to put the bevel against what you are going to save and the backbone of the knife is off to the side letting you see where you are cutting better.
Hu
A note from Searing on how he preps tips.
Would you be willing to share (or paraphrase) the contents of the note?
Thanks,
Dave
I’ve always wondered about burnishing. I never cared much about shininess ... I don’t really care how my cue looks. But does burnishing also significantly add to the strength of the tip and help resist mushrooming? I wouldn’t think so, but I’d be curious to hear from others who might know more.
Does anybody think burnishing does anything more than add shine? Does it provide an functional benefits?
I'm pretty sure it prevents, or retards, mushrooming of the tip.Does anybody think burnishing does anything more than add shine? Does it provide an functional benefits?
Does anybody think burnishing does anything more than add shine? Does it provide an functional benefits?
I'm pretty sure it prevents, or retards, mushrooming of the tip.
I've heard that a lot also, but I've always doubted it; although I can see how it might help a very small amount. Does anybody think it helps a lot and can explain why? It would be interesting to do a long-term test with and without burnishing to see if it makes a significant difference or not. Has any every done such a test?
Thanks,
Dave
Absolutely yes. Cut the old tip off, a little bit above the fiber pad. Then cut or file just down to the fiber pad. Makes the next tip installation much easier, as you only have to tape the ferrule, and no lower.is it possible to retain the old fiber pad with this cutting method?
anyway nice video on DIY tip replacement DrDave.
All the best,
WW
The answer is yes, but you have to be vigilant about it. After every time playing or practicing, I give the tip a wet thumb and a good hard rubbing with a paper towel. I don't get any mushrooming, because I do it every time. It doesn't matter whether it's a single or layered tip. But again, you have to do it often, or your tip will probably mushroom. Maybe a little hard to prove, but all the tips you see above have been played with many times, and burnished after every practice, no mushrooming. You be the judge.Does anybody think burnishing does anything more than add shine? Does it provide an functional benefits?
All the best,
WW
I agree with you once again. There is nothing like experience to do a job right. Yes, I used primitive tools to put my tips on, but the interesting thing is they NEVER came off! I've installed tips in my home with the same tools for some of the best Pinoy players and they did just fine with them afterwards, and have yet to get a complaint. Yes, my "process" would take overnight, with the clean up the next morning, but the end result was a clean looking tip that was very playable and one that they loved.22572-03-1000.jpg (1000×1000) (rockler.com)
My trusty five inch draw knife I have used to install several tips. Scary sharp, only beveled on one side, easy to control. As we are seeing, tip installs are a lot like playing pool. It is more the Indian than the arrow.
Another little scrap of information, most people aren't using the little brass handled knives as intended. The idea was to put the bevel against what you are going to save and the backbone of the knife is off to the side letting you see where you are cutting better.
Hu
nice video on DIY tip replacement DrDave.
Thanks.
The answer is yes, but you have to be vigilant about it. After every time playing or practicing, I give the tip a wet thumb and a good hard rubbing with a paper towel. I don't get any mushrooming, because I do it every time. It doesn't matter whether it's a single or layered tip. But again, you have to do it often, or your tip will probably mushroom. Maybe a little hard to prove, but all the tips you see above have been played with many times, and burnished after every practice, no mushrooming. You be the judge.
All the best,
WW
I've used Triangles (always burnished) and never had any trouble with mushrooming. The next time I replace the Triangle on my Revo, I'll leave it unburnished to see if there is any difference.
Thanks,
Dave