I made a simple paper template to help see and learn cut angles. I got the idea after watching Shane's aiming system U-tube video.
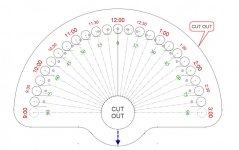
To use it, save the .jpg file to your computer, then print it on a sheet of 8x10 paper. I use heavy weight paper for durability. Cut out on the perimeter line, and the large center circle.
On the table, place the cut out circle over the ghost ball, while pointing the arrow back to the cueball.
Site from the desired pocket back through the object ball to ghost ball center, and note the nearest angle or clock position.
The outer dark circles represent the object ball as seen from the shooters position. The dashed circles represent the ghost ball.
The small black dot represents the contact point on the object ball.
The smallest circles represent the cue tip, or shaft, or sight line, relative to the object ball, when the cueball is struck dead center.
This is based on the geometric aim line, so speed and the throw effect may require some compensation.
A medium or a bit softer stroke works best for me and my Cuetec R360.
After a while, you learn to see the angles or clock positions while standing, and may not need to use the template on the table. I now just hold my cue aligned with the cueball passing through the object ball, with the tip above at 12:00 and estimate the clock "time" of the pocket. Just refer to the tip/OB alignment for that angle, until you have those memorized.
Until recently I had always used the ghost ball, but my old eyes started playing tricks on me. This "flat perspective" way of sighting seems to help me. This works without even sighting from the pocket through the object ball to find the contact point, but I still do that, for verification.
Dan
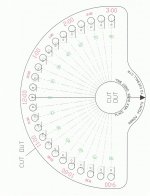
Edit: Revised template to include ghost ball and contact point at sight picture.
Second Edit: Revised template info to place over the ghost ball. Also revised the above text for using the template.
To use it, save the .jpg file to your computer, then print it on a sheet of 8x10 paper. I use heavy weight paper for durability. Cut out on the perimeter line, and the large center circle.
On the table, place the cut out circle over the ghost ball, while pointing the arrow back to the cueball.
Site from the desired pocket back through the object ball to ghost ball center, and note the nearest angle or clock position.
The outer dark circles represent the object ball as seen from the shooters position. The dashed circles represent the ghost ball.
The small black dot represents the contact point on the object ball.
The smallest circles represent the cue tip, or shaft, or sight line, relative to the object ball, when the cueball is struck dead center.
This is based on the geometric aim line, so speed and the throw effect may require some compensation.
A medium or a bit softer stroke works best for me and my Cuetec R360.
After a while, you learn to see the angles or clock positions while standing, and may not need to use the template on the table. I now just hold my cue aligned with the cueball passing through the object ball, with the tip above at 12:00 and estimate the clock "time" of the pocket. Just refer to the tip/OB alignment for that angle, until you have those memorized.
Until recently I had always used the ghost ball, but my old eyes started playing tricks on me. This "flat perspective" way of sighting seems to help me. This works without even sighting from the pocket through the object ball to find the contact point, but I still do that, for verification.
Dan
Edit: Revised template to include ghost ball and contact point at sight picture.
Second Edit: Revised template info to place over the ghost ball. Also revised the above text for using the template.
Attachments
Last edited: