Dealing with clusters in one of the most important things that you need to do when playing the game of straight pool. One of the basic mistakes I see with beginners is that they try to blast the clusters out of the rack area.
Always remember:
A) This is not necessary.
B) 14.1 is a game of finesse and precision, not power and might.
C) You achieve more by moving the balls less.
Here is a basic situation where we have several open balls, and several balls clustered in the rack area.
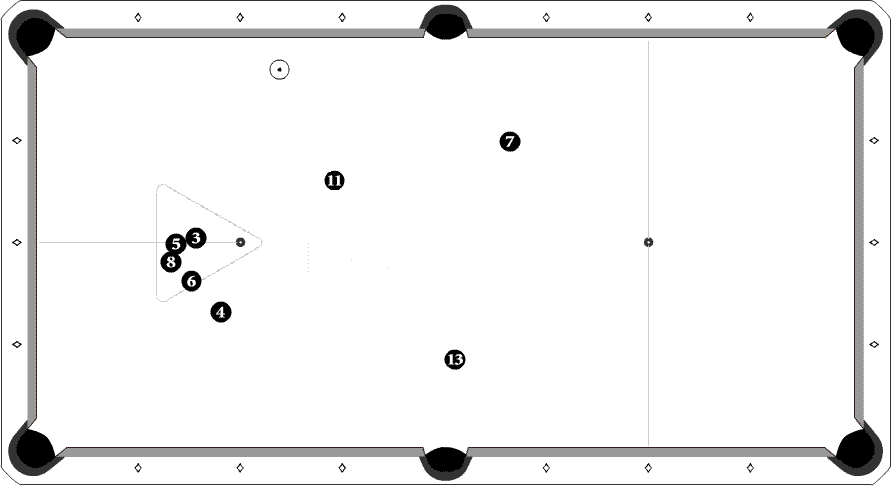
You already have a break ball with the 4 sitting exactly where you want it. You need to take that into consideration when breaking up any cluster in the rack area.
A rule that I follow is this:
Once I have a break ball, all secondary break shots should move the balls AWAY from my break ball - and the cue ball should not go near the break ball either.
If you play this game with any regularity, you know why I follow that rule. All of us at sometime or another have knocked the break ball out of position by accident. Once it's gone, it's gone - and you can't put it back where it was. That is why I follow that rule.
Back to the table -
Let's look at what you have in this situation by evaluating every ball on the table and its purpose.
The first thing I do is I look at my break ball and work my way backwards through the rack.
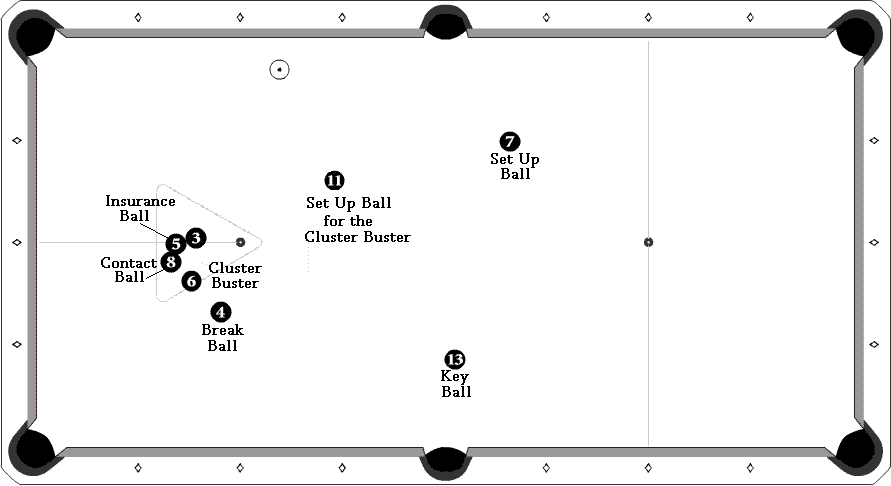
4 Ball - Break Ball - From here you need to look for a good key ball. You want to end up perfectly for a good break shot with the 4 ball so you need to find a way to get there. Its no use to fight through this rack and not get a good shot on the 4, so lets see what you have already.
Look at the 13. It is set up right in front of the side pocket, and although it looks like you can shoot it at any time, you need to think this through. If you get perfectly on that 13 ball, and can put it in that side pocket with a stop shot, you will be rewarded with a great shot on that 4 ball that will definitely open up the next rack of balls.
So, the 13 ball is important. Don't shoot it, don't move it. Leave it where it is and use it to your advantage. Now comes the next question... How are we going to get on that 13?
Look at the 7 ball. The 7 ball is slightly up table, but perfectly in line to get a stop shot on the 13 ball. The 7 ball will be our "Set Up Ball" - all we need is to get a stop shot on the 7 ball - which leads us to a stop shot on the 13 ball. Stop shot, stop shot, break ball. Easy enough? Well, we still have a cluster to deal with, so lets turn our attention over to that.
The first thing that you should look at is the position of the cue ball. Look at what you have and what you don't have FROM THAT POSITION. You have a shot on the 11 ball, but not a shot to break out the cluster, at least - NOT YET.
Looking at the 4 ball cluster, you can clearly see that the 6 ball has a pocket. It also affords you an opportunity to open the cluster.
This makes the 6 ball our CLUSTER BUSTER. However, we're not going to blast the crap out of this cluster. We need to proceed intelligently.
This is how to do it intelligently:
a) Identify the ball to break the cluster
b) Ensure that your existing break ball is not in danger of being moved
c) Identify a contact ball that will be used to break the cluster
d) Identify an insurance ball that will be shot after the cluster is dispersed
A player of lower intelligence will proceed to smash the crap out of it and hope for the best.
Now that we have identified the 6 ball, we need to see how we are going to get on it... look at our shot on the 11 ball. Perfect. That's our set up ball.
By looking at this cluster, you can see that after you pocket the 6 ball, you will have a natural angle to deflect into the 8 ball - close to the gap between the 8 and the 5 - but we want to make sure that we "tap" the 8 ball first.
Did you notice that I said "tap" not "break out" or "crush" or "blast to smithereens"? "Tapping the balls out" is exactly what we are going to do. After this cluster is dispersed, you want to end up with a shot on the 5 ball.
Now you've learned all that, let's attack this layout...

The 11 ball is shot into the side pocket, rolling forward maybe a rotation or two to get a perfect angle to get on the 6 ball in the corner. Be careful not to go too far.
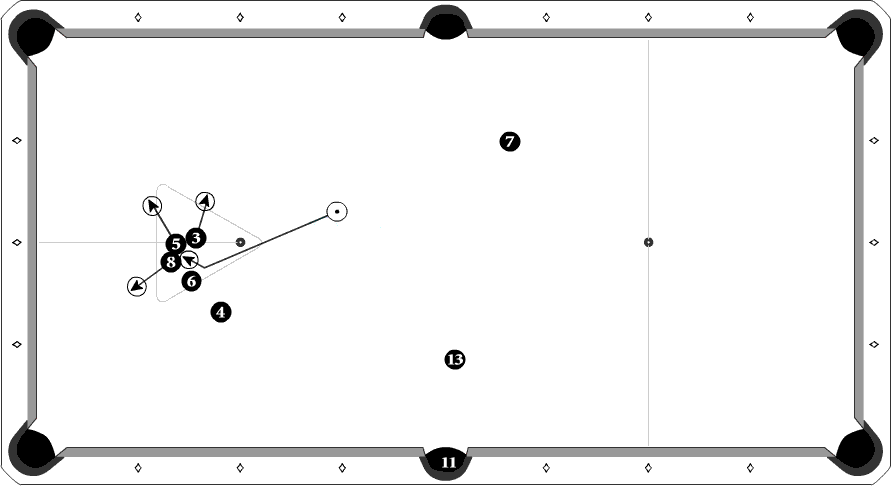
Look at how I have diagrammed the break out. The cue ball pockets the 6 - and goes to the 8 ball, AND THEN THE 5 BALL. Yes, you want to contact both balls. When I shoot the 6 ball, I want to stun that shot, not draw or follow. I want the cue ball to pocket the 6 ball, then "tap the balls out" gently.
You merely want the balls to end up where they are not touching other.
You don't want the balls splattered all over the table.
You just want them open to a pocket, and not touching.
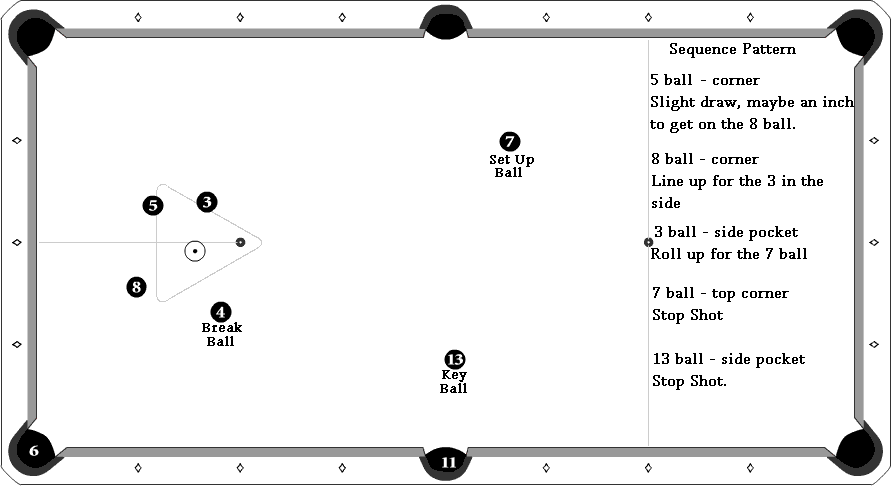
As you can see, the cluster has been broken up, and you can now proceed to your "End Sequence" - which we went over earlier. In the diagram I have plotted the course to get into the next rack of balls successfully.
By following the rules I have just gone over, you will start to welcome clusters as challenges, and as opportunities instead of seeing them as road blocks and trouble spots.
(Hope this helps you - feel free to set this one up and practice it - its a basic cluster break up - kind of easy for advanced players- but good practice nonetheless - yes this and MUCH MORE will be in the book which is almost ready)
Always remember:
A) This is not necessary.
B) 14.1 is a game of finesse and precision, not power and might.
C) You achieve more by moving the balls less.
Here is a basic situation where we have several open balls, and several balls clustered in the rack area.
You already have a break ball with the 4 sitting exactly where you want it. You need to take that into consideration when breaking up any cluster in the rack area.
A rule that I follow is this:
Once I have a break ball, all secondary break shots should move the balls AWAY from my break ball - and the cue ball should not go near the break ball either.
If you play this game with any regularity, you know why I follow that rule. All of us at sometime or another have knocked the break ball out of position by accident. Once it's gone, it's gone - and you can't put it back where it was. That is why I follow that rule.
Back to the table -
Let's look at what you have in this situation by evaluating every ball on the table and its purpose.
The first thing I do is I look at my break ball and work my way backwards through the rack.
4 Ball - Break Ball - From here you need to look for a good key ball. You want to end up perfectly for a good break shot with the 4 ball so you need to find a way to get there. Its no use to fight through this rack and not get a good shot on the 4, so lets see what you have already.
Look at the 13. It is set up right in front of the side pocket, and although it looks like you can shoot it at any time, you need to think this through. If you get perfectly on that 13 ball, and can put it in that side pocket with a stop shot, you will be rewarded with a great shot on that 4 ball that will definitely open up the next rack of balls.
So, the 13 ball is important. Don't shoot it, don't move it. Leave it where it is and use it to your advantage. Now comes the next question... How are we going to get on that 13?
Look at the 7 ball. The 7 ball is slightly up table, but perfectly in line to get a stop shot on the 13 ball. The 7 ball will be our "Set Up Ball" - all we need is to get a stop shot on the 7 ball - which leads us to a stop shot on the 13 ball. Stop shot, stop shot, break ball. Easy enough? Well, we still have a cluster to deal with, so lets turn our attention over to that.
The first thing that you should look at is the position of the cue ball. Look at what you have and what you don't have FROM THAT POSITION. You have a shot on the 11 ball, but not a shot to break out the cluster, at least - NOT YET.
Looking at the 4 ball cluster, you can clearly see that the 6 ball has a pocket. It also affords you an opportunity to open the cluster.
This makes the 6 ball our CLUSTER BUSTER. However, we're not going to blast the crap out of this cluster. We need to proceed intelligently.
This is how to do it intelligently:
a) Identify the ball to break the cluster
b) Ensure that your existing break ball is not in danger of being moved
c) Identify a contact ball that will be used to break the cluster
d) Identify an insurance ball that will be shot after the cluster is dispersed
A player of lower intelligence will proceed to smash the crap out of it and hope for the best.
Now that we have identified the 6 ball, we need to see how we are going to get on it... look at our shot on the 11 ball. Perfect. That's our set up ball.
By looking at this cluster, you can see that after you pocket the 6 ball, you will have a natural angle to deflect into the 8 ball - close to the gap between the 8 and the 5 - but we want to make sure that we "tap" the 8 ball first.
Did you notice that I said "tap" not "break out" or "crush" or "blast to smithereens"? "Tapping the balls out" is exactly what we are going to do. After this cluster is dispersed, you want to end up with a shot on the 5 ball.
Now you've learned all that, let's attack this layout...
The 11 ball is shot into the side pocket, rolling forward maybe a rotation or two to get a perfect angle to get on the 6 ball in the corner. Be careful not to go too far.
Look at how I have diagrammed the break out. The cue ball pockets the 6 - and goes to the 8 ball, AND THEN THE 5 BALL. Yes, you want to contact both balls. When I shoot the 6 ball, I want to stun that shot, not draw or follow. I want the cue ball to pocket the 6 ball, then "tap the balls out" gently.
You merely want the balls to end up where they are not touching other.
You don't want the balls splattered all over the table.
You just want them open to a pocket, and not touching.
As you can see, the cluster has been broken up, and you can now proceed to your "End Sequence" - which we went over earlier. In the diagram I have plotted the course to get into the next rack of balls successfully.
By following the rules I have just gone over, you will start to welcome clusters as challenges, and as opportunities instead of seeing them as road blocks and trouble spots.
(Hope this helps you - feel free to set this one up and practice it - its a basic cluster break up - kind of easy for advanced players- but good practice nonetheless - yes this and MUCH MORE will be in the book which is almost ready)
Last edited:
")


")