Buzz - A joint issue and a potential repair. Pics

Newton

AzB Silver Member
Silver Member
I have been making some dust - again due to this Philippine cue I have been working
on now for a long time. First it was the joint which dissolved and I repaired - now
the cue has started to make a buzz in the A joint.

The owner is very fond of this cue - it plays after his liking and I made him a matching OB1 shaft.

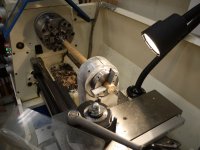
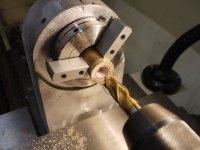
Now - internal A joint buzz is something I have not repaired before but please follow the post and the pics and I'll try to explain what I have experienced and at the end my question...

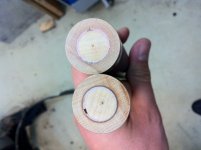
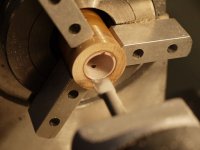
This pic shows the cue after I cut it. Note the purple ish gaga used. It looks like some form of filler for house walls or cars....?
Not to mention the cavities and the gap - which I'm 99% sure is causing the buzz..
 

Attachments

  • bilde-2.JPG
    bilde-2.JPG
    98 KB · Views: 973
Last edited:
Mounted the forarm in the lathe and started turning the internals clean.
Note the non-centered hole used...
 

Attachments

  • 1.jpg
    1.jpg
    67.7 KB · Views: 942
  • 4.jpg
    4.jpg
    61.4 KB · Views: 903
More cavities

The purple/pink ish stuff was used as a filler for sure...

I center bored with a endmill, then turned it slowly to go through the pinkish material and then used a EDIT:16mm endmill, coring drill and finished with a turning tool to make it 100% straight walled.
 

Attachments

  • 5.jpg
    5.jpg
    50.5 KB · Views: 862
  • 6.jpg
    6.jpg
    62.6 KB · Views: 853
  • 8.jpg
    8.jpg
    50.3 KB · Views: 850
Last edited:
The problem

Well, I cleaned both ends up and as mentioned I had to core the last section out
since my endmill was not long enough. Then I turned the ID to 17mm.

The problem I'm now facing is as follows :

The core was not jointed with a metal screw in any ends. The cue was fairly
week in the A joint and the buzz is most likely caused by the large gaps and the materials used.

1 :Now I would like to screw the sections together but since the cavities is fairly deep
I have problems getting a tap in and actually tap a hole - deep inside the cavities.
In case I would use one in each end and screwed one in first - let the glue dry up - then
fine trim the other end and use a screw in this end also and tighten the two parts thoroughly.

If I mang to get this done - I'm not sure if the solution is optimum and potentially
cause a buzz free cue.

2:
If I'm not able to make a tool to tap in the deep end I think making wood threads
in the opening could be a problem.
The idea is to use the whole hole as a alinement and then have wood threads at the
end - but the wall thickness is not thick on this (it has some form of leather grip)
so I think this could be asking for trouble.


3:
The last idea I have is to chop the long internal tenon made in 1: - tap and screw each end of the two pieces - one
in the forearm the other in the butt and then have a additional metal joint in the A joint
- using the A ring as a buzz ring.
This solution demands 3 metal joints and would cause a weight increase since nothing was used originally.

West system would be used.

Not sure on what to do but was just wondering what my friends up here thinks.
Has any one seen this pinkish material before ?

Thanks
 
Last edited:
Since it a cored cue, I'm wondering if the filler is Titebond polyurethane glue, I think it is actually purple ..probably enough said there.

Anyway, if you have the ability, I think live threading the mortises to accommodate a threaded maple dowel might be you best choice. If it were me, I'd thread the forearm and handle bores, then thread half of a maple dowel to fit the forearm side. I'd glue it up and after fully cured, cut and thread the newly built tenon to fit the handle side. Glue the cue back together and call it good.

Doing it this way, the new tenon should be perfectly concentric with the forearm, and when finished the cues weight and balance should be basically the same as before.

Thanks Dan.

Solution 2) in other words. Hmm - this would for sure make the most "clean" repair
since there would be no metal parts inside which could cause issues.

The cue it self is not cored but it has - I guess 10-15cm cored in each end. I found it strange that there was nothing to hold the parts together.. I guess
the cue builder has used some form of wise or similar - but that don't make sense to me either..

I would try to measure tomorrow the wall thickness and see how much meat I have
to work on. Current ID is as mentioned 17mm ....

Thanks for your thoughts.
 
Great job Kent.
Nice toys.
How about threading in a phenolic rod in the handle then drill/bore the phenolic rod to receive the tenon and threads ?

Thread on a maple plug down the forearm with oversized plug sticking out for the handle.
Turn that plug for the alignment tenon then thread the bottom .
 
Last edited:
Great job Kent.
Nice toys.
How about threading in a phenolic rod in the handle then drill/bore the phenolic rod to receive the tenon and threads ?

Thread on a maple plug down the forearm with oversized plug sticking out for the handle.
Turn that plug for the alignment tenon then thread the bottom .

Hmm, did not think of that one.
I have never used any phenolic in a A joint but it should be doable. The problem
is live threading deep - which is a problem with the tools I have (inside that is).

I think if I should live thread the idea of using the wood tenon and live thread
at the opening of each end (handle/butt) would be the easiest since I don't need
to go terrible deep.
Would measure my phenolic tomorrow and judge what to do.

Toys is toys - it what we can use them for which is important:smile:

Thanks for your tip.
K
 
Ahh - had forgotten that one but I think that solution could change the weight
and possible the hit so I think I would go for all wood or in worst case Joeys solution.
Thanks for the reminder though :wink:

K
I was going to point out that placing pins in the A joint will most probably change the original hit of the cue, which the customer likes. I would use the all wood approach to keep the hit as close to the original before the repair.

Alan
 
Bob Dzuricky has nice crisp pics of 4 A joint methods on his awesome site.

With the combination of live-tooled tight fits and good glue,there is no longer a reason to have problems such as this unless the cue was allowed to endure 170+ temps in a car somewhere,or someone else tried to take it apart and added heat.

Sure there are other ways,BUT in my opinion Bob is perhaps the best T+D in the cuemaking world other than maybe Mike Lambros (who I've heard worked at JPL,the pinnacle of zero-error machining),so I'll follow his lead.

To the OP,that is a nice mount for your 3-jaw steady rest. It would be hard to beat for sure :wink:. Tommy D.
 
You can bore out the front and glue in a long, maple dowel that has glue relief slots cut in the sides of the dowel using the West system epoxy thickened with Cab-o-sil. Fully coat the inside of the hole in the front as well as the dowel itself then assemble these pieces making sure that the dowel bottoms out and that there is a lot of glue squeezing out from the glue slots. A day or two later you will have a permanently solid front with a long tenon sticking out that you can machine to go into the handle.

The pictures of the original "A" joint cross section were very informative.
 
I rigged my live threading gear tonight and I do for sure have some issues.
My father re-worked my spindle by changing the bearings and the TIR is just horrible.
You notice it very well when you use a long threading mill...
So I need to machine a new setup for my DeWalt spindle which would take some time.. :-(

Paul: Your solution is what the cuemaker has used previously. I think the glue/filler used
is the reason for the buzz however not being able to tighten the cue feels strange..
I guess you mean a deep threaded screw in the handle should be used ?

Tommy: I'm aware of Bobs page and I send him some emails every now and then.
The problem is however as described - there is a tenon required in each end in the 150mm range and non of Bobs methods would work.
To be sure that the buzz goes away I was forced to remove all of the original
and replace it with new.
Personally I would like to secure the tenon in both ends with screws or wood threads
but if Pauls suggestion is working out - I think this might be the quickest cure
for me.
That is gluing the tenon in the forearm/handle and using a screw to fix it in the other.
Another would be just to glue a tenon in handle and forarm and just use one of the stock ways as shown by Bob..

Would see what materials I have available to make a new mount for the DeWalt for live threading - in worst case I go with Pauls suggestion.

Thanks for your thoughts.
K
 
For alignment, make sure the faces are true. If they aren't, it doesn't matter how straight your tenon is, you'll end up crooked.
 
Back
Top