You are using an out of date browser. It may not display this or other websites correctly.
You should upgrade or use an alternative browser.
You should upgrade or use an alternative browser.
Custom Pool Room
- Thread starter dsoriano
- Start date

I haven't commented in awhile on this project. I know you've received tons of compliments on the project...as well you should...I just wanted to thank you once again for 1) doing the project, 2) taking the time to share the project, and 3) making both the first two absolutely "fun" to be a "spectator"!!!
You've created one of the best...dare I say the second best...threads ever to appear on AZ...(sorry, but the Funny Pic/Gif thread still leads it by a small margin...but you're closing the gap!") ).
).
HUGE THANK YOU FOR INVOLVING THIS ENTIRE COMMUNITY IN THIS PROJECT!!!
Jason
You've created one of the best...dare I say the second best...threads ever to appear on AZ...(sorry, but the Funny Pic/Gif thread still leads it by a small margin...but you're closing the gap!
).HUGE THANK YOU FOR INVOLVING THIS ENTIRE COMMUNITY IN THIS PROJECT!!!
Jason
I haven't commented in awhile on this project. I know you've received tons of compliments on the project...as well you should...I just wanted to thank you once again for 1) doing the project, 2) taking the time to share the project, and 3) making both the first two absolutely "fun" to be a "spectator"!!!
Jason
Thanks, it's a little challenging and time consuming to upload, then compress the pictures. There's so much involved in this project I really dont want to over load this site or post to many pics. I struggle with how many pics I should post and how detailed I should get in each phase. It could easily get out of hand. Starting this thread has actually benefited me too. I've gotten some really good suggestions and ideas from you guys. I feel bad when I don't get to respond to all the comments or questions but I'll try.
This weekend i'll finish installing the puck lighting and I'll start framing the wet Bar so hopefully I'll have more pictures soon.
Have great weekend guys!
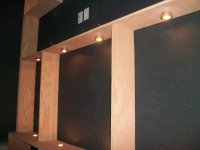
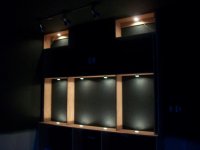
This weekend I was able to spend a little time on the Bar. I wired the puck lights. In order to make these low voltage 12v lights work on 110, (without spending $100 on a transformer) I needed to wire 10 in a series curcuit. So I had to add two lights to the original 8. I decided to place them in the top partition boxes. I have two stain glass design I will be adding to cutouts that will be lit up by these lights. See post #213 http://forums.azbilliards.com/showpost.php?p=3348316&postcount=213
I placed these on a dimer and can't wait o install the mirros and glass shelves!
I placed these on a dimer and can't wait o install the mirros and glass shelves!
Attachments
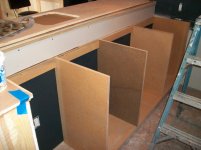
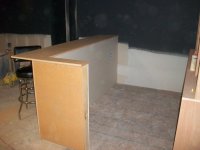
I had some time Saturday afternoon so I started framing up the wet Bar. I cut all the 2x4's and attached them together using wood glue and 3" deck screws. After squaring and leveling it I then I screwed it down into the floor joist. Solid!!


I then wired the plugs. two counter plugs and two bottom for the fridge and microwave. I aslo ran the drain for the bar sink. It's not shown in the pic but you can see where I drilled and stubbed it out on the bottom plate.

Next I intalled the 1/2" drywall. I'll paint this and use it as my backing for the open cabinet unit.


I then wired the plugs. two counter plugs and two bottom for the fridge and microwave. I aslo ran the drain for the bar sink. It's not shown in the pic but you can see where I drilled and stubbed it out on the bottom plate.
Next I intalled the 1/2" drywall. I'll paint this and use it as my backing for the open cabinet unit.
Hey bartender, what time does that table open up?:grin: Keep it going, looks great!
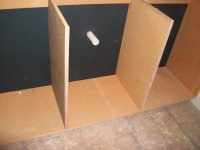
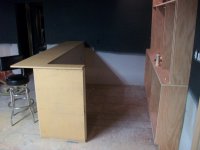
I then decided to continue covering the wet bar. I used 3/4" particle board. This is very heavy dense stuff. I decided to use this as oppose to drywall knowing theres a posibility the bottom paneling might take a beating when people are seated at the stools. This will withstand alot of abuse compared to drywall. This will all be covered using Oak.
The Bar top is also particle board. I will brace this using corbles that I still have to make. I haven't decided what I'll use for the final bar top, I've considered everything from plywood to 3/4" oak flooring planks stained and finished with a high gloss polyurethane.
The Bar top is also particle board. I will brace this using corbles that I still have to make. I haven't decided what I'll use for the final bar top, I've considered everything from plywood to 3/4" oak flooring planks stained and finished with a high gloss polyurethane.
Attachments
what is going in the middle of the back bar where the wires for the pucks are? I love the design but I would have recessed the middle 4 lights and added more wood to make a cover over the wires and fixtures. I have followed this thread and your workmanship is topnotch you are making a great room and I always look forward to your updates.
Does it seem fair that you're man cave is going to be a lot nicer than most bars? Once the city sees your creation, they may reclassify it as a business so that they can come back and have a drink! 
Yours is definitely going to be the place to be! Why do you live so far away?!!!!
Keep up the great work! I wait for these updates like my dogs wait for treats! With my tongue out and my butt wagging!:thumbup:
Yours is definitely going to be the place to be! Why do you live so far away?!!!!
Keep up the great work! I wait for these updates like my dogs wait for treats! With my tongue out and my butt wagging!:thumbup:
Each and every time I visit this thread, I am completely amazed at the design, construction and fine craftsmanship.
Keep up the good work and I am enjoying all the updates.
Keep up the good work and I am enjoying all the updates.
Top-Notch
WOW!
It just get better and better. Thanks for allowing us along for the ride. This project is beyond amazing. You have set a very high bar of excellence for your design and implementation of your vision.
Does your father still help out when he has time?
Take care and thanks for sharing.
If you ever move-will you take the room with you?
what is going in the middle of the back bar where the wires for the pucks are? I love the design but I would have recessed the middle 4 lights and added more wood to make a cover over the wires and fixtures. I have followed this thread and your workmanship is topnotch you are making a great room and I always look forward to your updates.
If you're refering to the middle shelf, I plan on adding a second piece of plywood on top (double shelf) to cover the wires. Funny you mentioned about recessing the top lights, I thought about that and still might, (I was to tired to drill the holes) but I need to add all of the trim facing. The middle shelf will have a 3-1/2" oak face, wide enough to cover the lights. If they're very visible I'll drill the holes and be sure to credit you for talking me into it!:wink:
Yours is definitely going to be the place to be! Why do you live so far away?!!!!
Keep up the great work! I wait for these updates like my dogs wait for treats! With my tongue out and my butt wagging!:thumbup:
Each and every time I visit this thread, I am completely amazed at the design, construction and fine craftsmanship.
Keep up the good work and I am enjoying all the updates.
Man
does it get any better than this??? sweeet.. Turn it in part time to a streaming venue !
Thanks Guys! It's been a long journey and I'm feeling the pressure of getting it done. My family is so excited they keep asking me when is it going to be done? My six year old daughter wants me to buy her a cue; a pink one.
If you're refering to the middle shelf, I plan on adding a second piece of plywood on top (double shelf) to cover the wires. Funny you mentioned about recessing the top lights, I thought about that and still might, (I was to tired to drill the holes) but I need to add all of the trim facing. The middle shelf will have a 3-1/2" oak face, wide enough to cover the lights. If they're very visible I'll drill the holes and be sure to credit you for talking me into it!:wink:
Haha thanks I just personally hate the look of surface mounted pucks so it caught my eye. I know you will make it look good no matter how you do it.
WOW!
Does your father still help out when he has time?
If you ever move-will you take the room with you?
Yeah he does, he's not over as often as he use to be (daily basis). The past phases of the work were more labor intensive so we'd get together and plan our schedules in advance. Now since its more detail work I work on it on my some-what spare time. He'll show up on some evenings and lend me a hand. For the past week and 1/2 he's had the stomach flu so he hasnt' seen the progress I've made on the Bar. But as soon as he feels better I'm expecting his usual Walk Thru Inspection.:sorry:
As for moving, i hope I never have to. I built my house and it's paid for. So I plan on dying here.
Well you've gotten into the fun part of it now, and it won't be long now before you're having your grand opening. It is really looking good and coming together nicely. I know everyone on the forum that is following your progress is extremely impressed and jealous of your skills to put this project together, but I'm wondering what do your neighbors think about it? are they cool with all of the construction noises going on? No complaints I hope.
Yeah he does, he's not over as often as he use to be (daily basis). The past phases of the work were more labor intensive so we'd get together and plan our schedules in advance. Now since its more detail work I work on it on my some-what spare time. He'll show up on some evenings and lend me a hand. For the past week and 1/2 he's had the stomach flu so he hasnt' seen the progress I've made on the Bar. But as soon as he feels better I'm expecting his usual Walk Thru Inspection.:sorry:
As for moving, i hope I never have to. I built my house and it's paid for. So I plan on dying here.
Well sir, your work needs some improvement. After you get finished with this project, you can practice your billiards parlor design/building techniques at my house next...
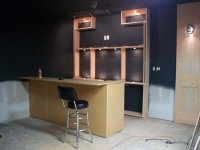
Wet Bar
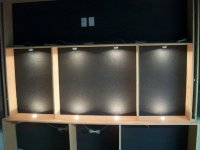
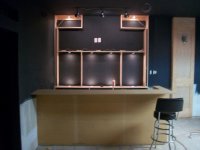
I continued working on the Wet Bar. I built the bottom cabinet but had my son paint the back before I installed it. I applied veneer on the front facing. I decided not to add doors. The Microwave will be located to the far right and the mini fridge to the left. The layout and spacing feel really comfortable between the wall unit and wet bar.
I continued working on the Wet Bar. I built the bottom cabinet but had my son paint the back before I installed it. I applied veneer on the front facing. I decided not to add doors. The Microwave will be located to the far right and the mini fridge to the left. The layout and spacing feel really comfortable between the wall unit and wet bar.