Cut Aiming Template

oldschool1478

AzB Silver Member
Silver Member
Oldschool1478,
Can you draw a light/dotted GB around the aim dot for each cut angle dot, in your template, and put a black dot around the GB equator where it appears on the OB.

This will help those that use the side of the CB to aim like CJ Wiley and others?
Thanks

You should understand I was looking for a way to eliminate the need for a ghost ball or contact point when I made the template.
That said, I can see how it may be useful to those who do use the ghost ball, and will make another one like you describe. Today is my regular weekly game day with my best friend, and pool nemesis ;), but I'll see what I can do tomorrow.

Thanks again for all the interest,
Dan
 

LAMas

AzB Silver Member
Silver Member
You should understand I was looking for a way to eliminate the need for a ghost ball or contact point when I made the template.
That said, I can see how it may be useful to those who do use the ghost ball, and will make another one like you describe. Today is my regular weekly game day with my best friend, and pool nemesis ;), but I'll see what I can do tomorrow.

Thanks again for all the interest,
Dan

Thanks in advance.
It has been said that edge of the CB aiming is a subset of GB aiming and can be used as a primary or secondary visual for more accurate aiming...at the GB.

Be well.:thumbup:
 

oldschool1478

AzB Silver Member
Silver Member
Oldschool1478,
Can you draw a light/dotted GB around the aim dot for each cut angle dot, in your template, and put a black dot around the GB equator where it appears on the OB.

This will help those that use the side of the CB to aim like CJ Wiley and others?
Thanks

As requested, I have revised the template in my first post to include the ghost ball and contact point at the sight picture.
For those wanting a vector file, save this attached zip file.

Dan
 

Attachments

  • Cut Aim Template Revised.zip
    30 KB · Views: 377

oldschool1478

AzB Silver Member
Silver Member
My pleasure ... and thank you!

Thanks for the clarification. I still think the template might also be useful to others as an aiming training template (regardless of shot distance) by centering it on the ghost-ball position. This also gives one practice visualizing and locating the ghost-ball position, and allows one to make a correspondence between the visualized ghost-ball positions and the required aim points illustrated on your template.

Again, great idea, regardless of how one chooses to use it.

Regards,
Dave

After further review of my drawing for this template, and help from the very patient Dr. Dave:embarrassed2: I have come to agree, that the template hole should be placed over the GHOST ball, NOT the object ball. I had been measuring the angle to the pocket relative to the OB/CB line and should have used the GB/CB line.
This will require setting a ghost ball on the table while using the template.

I have revised the first post and template .jpg to reflect these changes.
Sorry for any confusion I may have caused.

Dan
 

LAMas

AzB Silver Member
Silver Member
After further review of my drawing for this template, and help from the very patient Dr. Dave:embarrassed2: I have come to agree, that the template hole should be placed over the GHOST ball, NOT the object ball. I had been measuring the angle to the pocket relative to the OB/CB line and should have used the GB/CB line.
This will require setting a ghost ball on the table while using the template.

I have revised the first post and template .jpg to reflect these changes.
Sorry for any confusion I may have caused.

Dan

Please post up the previous version that goes over the OB because I can no longer put your template over the OB and the GB doesn't exist so it won't get in the way anyway.

You can just change the resulting cut angle where the BG is the vertex of the resulting cut angle instead of the OB. This won't make much difference since depending on the several factors, the cut angles are only approximate and can be different for different shooters and environmental conditions.

Also can you put a dot where the GB edge/circumference contacts the equator of the OB.

Are you having any fun yet?:smile:

Be well.
 

oldschool1478

AzB Silver Member
Silver Member
Please post up the previous version that goes over the OB because I can no longer put your template over the OB and the GB doesn't exist so it won't get in the way anyway.

You can just change the resulting cut angle where the BG is the vertex of the resulting cut angle instead of the OB. This won't make much difference since depending on the several factors, the cut angles are only approximate and can be different for different shooters and environmental conditions.

Also can you put a dot where the GB edge/circumference contacts the equator of the OB.

Are you having any fun yet?:smile:

Be well.

LAMas,
The template is the same as before. Only the hole placement text has changed.
You can still use it as before, if you want to.
At OB/CB distances of 30" or more, it will work pretty well on the OB, because the error diminishes with distance. But move the CB to 10" from the OB and you will need another 1/2 tip width to compensate. Changing the sight picture to reflect that would only be correct for that 10" distance.
Placing the template over the GB, self corrects at any distance.
Also, the contact dot is already on the revised template.

If you want to customize the template for yourself, just download the .dwg vector file I posted above. You will need a vector editing program to open and edit it. Do a google search for a free one if you don't already have one installed. I wont be making any further changes to the .jpg.

Dan
 

dr_dave

Instructional Author
Gold Member
Silver Member
LAMas,
The template is the same as before. Only the hole placement text has changed.
You can still use it as before, if you want to.
At OB/CB distances of 30" or more, it will work pretty well on the OB, because the error diminishes with distance. But move the CB to 10" from the OB and you will need another 1/2 tip width to compensate. Changing the sight picture to reflect that would only be correct for that 10" distance.
Placing the template over the GB, self corrects at any distance.
Also, the contact dot is already on the revised template.

If you want to customize the template for yourself, just download the .dwg vector file I posted above. You will need a vector editing program to open and edit it. Do a google search for a free one if you don't already have one installed. I wont be making any further changes to the .jpg.
Good job Dan. FYI, I've also updated my cut angle estimation resource page.

Again, great work with the template. I think it can be very useful to help people learn to aim.

Regards,
Dave
 

LAMas

AzB Silver Member
Silver Member
Good job Dan. FYI, I've also updated my cut angle estimation resource page.

Again, great work with the template. I think it can be very useful to help people learn to aim.

Regards,
Dave

Dave,
Why did you talk oldschool into putting the words, "Place Hole Over Ghost Ball" on his template?

You can't put the template over a ghost ball that is a ghost and isn't there? Where do I put the OB now?

Before, I could put the template over the OB and the CB behind the arrow and look for the line to the pocket/target, and see the relevant picture on that line that showed me where the spot on or off of the OB is to aim at - on the OB.

I would aim at that spot and the OB went to the pocket even though the degree text wasn't correctly referenced to the GB.

Why?:confused:
 

dr_dave

Instructional Author
Gold Member
Silver Member
Good job Dan. FYI, I've also updated my cut angle estimation resource page.

Again, great work with the template. I think it can be very useful to help people learn to aim.
Dave,
Why did you talk oldschool into putting the words, "Place Hole Over Ghost Ball" on his template?
I didn't suggest this to Dan ... he did it on his own, based on what he saw on my cut shot resource page (and based on the information in my responses to his PM and e-mail messages); although, I do think his change is appropriate.

You can't put the template over a ghost ball that is a ghost and isn't there? Where do I put the OB now?

Before, I could put the template over the OB and the CB behind the arrow and look for the line to the pocket/target, and see the relevant picture on that line that showed me where the spot on or off of the OB is to aim at - on the OB.

I would aim at that spot and the OB went to the pocket even though the degree text wasn't correctly referenced to the GB.
The aim point and ghost ball illustrations on the template are not accurate if you measure the angle from the CB-OB line. They were created by Dan using the standard cut-angle definition (e.g., neglecting throw, the required aim for a 30 degree cut angle is a 1/2-ball hit, as shown on the template). If you use the CB-OB line instead of the CB-GB line, the measured angle will not give the correct cut angle. Your approach will work decently at large distances between the CB and OB, but at shorter distances, the error can be significant. IMO, the template is much more useful if you do your best to approximate the ghost-ball position. When practicing, people can even place a ball in the ghost-ball position (or use a ghost-ball template or a Cranfield Arrow or other aids available on my templates resource page) until they become better at visualizing the GB center on their own. FYI, advice for improving this skill can be found here:

Regards,
Dave
 

LAMas

AzB Silver Member
Silver Member
The included angle from the center of the GB to the pocket/target and the CB to the GB hasn't much utility for me for it changes as the separation between the CB and OB changes.

I prefer the original template with the angle described by the line from the pocket/target to the center of the OB and the line from the center of the CB to the center of the OB.

The diagram also hints at how the edge of the CB can be aimed at divisions on the OB for 0-90 degree cut angles. the dots in front of the OB hole are where the GB would rest (center) for each cut angle described.

Just sayin.:smile:

CTCPC-Model.jpg
 

Spantiznik

AzB Silver Member
Silver Member
Oldschool .. Thanks for creating this template !!

Saved and printed and folded and added to my Case as a training when people stop to ask me to show them how to cut OBs.

This makes it alot easier to explain.

*cheers*
 
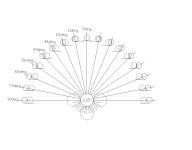
I made a simple paper template to help see and learn cut angles. I got the idea after watching Shane's aiming system U-tube video.

To use it, save the .jpg file to your computer, then print it on a sheet of 8x10 paper. I use heavy weight paper for durability. Cut out on the perimeter line, and the large center circle.

On the table, place the cut out circle over the ghost ball, while pointing the arrow back to the cueball.
Site from the desired pocket back through the object ball to ghost ball center, and note the nearest angle or clock position.
The outer dark circles represent the object ball as seen from the shooters position. The dashed circles represent the ghost ball.
The small black dot represents the contact point on the object ball.
The smallest circles represent the cue tip, or shaft, or sight line, relative to the object ball, when the cueball is struck dead center.

This is based on the geometric aim line, so speed and the throw effect may require some compensation.
A medium or a bit softer stroke works best for me and my Cuetec R360.
After a while, you learn to see the angles or clock positions while standing, and may not need to use the template on the table. I now just hold my cue aligned with the cueball passing through the object ball, with the tip above at 12:00 and estimate the clock "time" of the pocket. Just refer to the tip/OB alignment for that angle, until you have those memorized.

Until recently I had always used the ghost ball, but my old eyes started playing tricks on me. This "flat perspective" way of sighting seems to help me. This works without even sighting from the pocket through the object ball to find the contact point, but I still do that, for verification.


Dan

Edit: Revised template to include ghost ball and contact point at sight picture.
Second Edit: Revised template info to place over the ghost ball. Also revised the above text for using the template.
Check out this template: (4) AimRight V2 Pool Practice Tool Basics - YouTube It is a similar idea. The video (and others at the channel) gives many ideas for how to use such templates. One can learn much from diligent practice, including learning: to develop sound mechanics, to aim, to estimate angles, throw compensation and position play (cue ball paths at different cut angles). The template here gives the advantage of immediacy: print it out and start using it today. The commercial one has other advantages, including a user's guide that will especially help advanced players.
 

Kjackxon

Member
I simply love using the AimRight template, and its complementary software "Angles Challenge 101."

Out of the many comments and tips about how to aim - I feel comfortable when I can get the perspective view, drop down on the line, and take the shot. I can use the template on the table as a visual, finding and resolving issues, practicing challenging shots, and building my perspective. The software component gives me the analytical and statistical perspective. It DOES not prevent you from scratching or from billiarding yourself. Treat this like making an investment for your future. Make whatever you do work for you.
 
Top