likestorack
Registered
What is the best way to go about cutting a wrap channel on a pre-existing wrapless cue?
can achieve the same thing offsetting tailstockBest done on a taper machine.
The taper bar should match the cue's taper .
can achieve the same thing offsetting tailstock
i cut mine in after the finish, indicating at both ends
can achieve the same thing offsetting tailstock
i cut mine in after the finish, indicating at both ends
 Curved handle.
Funny you should mention this. I just put up a video showing the first butt w/wrap groove that I did on my CNC. I haven't squared the corners yet but that's pretty basic. The main thing was to cut the groove to the correct depth & taper in one operation.Most fascinating way of doing it is on a CNC taperer.
Try that on a SW cue.
I cut mine all throughout the tapering stages of the cue .
Much easier for me that way .
Take a taper of the butt sleeve. Go down .035" and taper the handle.
.005" allowance for the finish . Sand a little more if the leather is a little over .020" thick.
Use sharpest tool insert to cut the two shoulders.
Most fascinating way of doing it is on a CNC taperer.
I did it once and nearly destroyed the cue. I forgot to factor in the joint screw's added length .
I caught it before the cutter went down 12.5" inches down from the joint screw's tip.
It would have made the forearm some 11" long and the wrap channel over 13" long.
Joey
That's what offsets are for!
Royce
Tailstock or G-codes?
I don't touch my tailstock's set screws once centered.
G-codes? I wrote my codes manually without offsets at all.
Rookie!
Funny you should mention this. I just put up a video showing the first butt w/wrap groove that I did on my CNC. I haven't squared the corners yet but that's pretty basic. The main thing was to cut the groove to the correct depth & taper in one operation.
Funny you should mention this. I just put up a video showing the first butt w/wrap groove that I did on my CNC. I haven't squared the corners yet but that's pretty basic. The main thing was to cut the groove to the correct depth & taper in one operation.
Bob
Really nice Bob! Cool video as usual.
It's good to see the new machine working well.
I finally got around to installing a couple of clearpaths on one of mine. It's just a turning center, but they do work great. I'm still hoping to keep upgrading the other machines as well.
Royce
Funny you should mention this. I just put up a video showing the first butt w/wrap groove that I did on my CNC. I haven't squared the corners yet but that's pretty basic. The main thing was to cut the groove to the correct depth & taper in one operation.
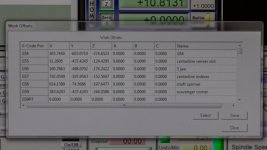
Lol. Royce, notice the G58 written on my spinner base in the video. That's so I don't forget which offset goes with which station. My 3-jaw chuck fits into the round register on my scavenger board. That's G56. My indexer is G57 but all I really save there is the X coordinate (which is the Y axis on your machine).I was really talking about work coordinates, or work offsets.When you use a homing system on your machine, lots of options open up that let you do all kinds of things. When you "Home" your machine, you send it to a known and extremely consistent location. Home is usually Z up, X left, and Y back. The machine will have home switches in those locations and when "referenced to home", the machine will go back and find those switches. This "Home" location is the basis for all work coordinate locations.
For example, if you are cutting shafts on a turning center. First you reference home so the machine knows where it's at, and select an open work coordinate like G54. Then you jog over and touch off on you your work and adjust the DRO's to the proper numbers. just like normal. Basically, you are setting a new coordinate of X,Y, and Z zero locations that are associated with the coordinate G54. Once you save it, anytime your machine is homed out, you can load the G54 coordinate and go to that position.
So, if you set a coordinate for shafts where the Y axis is on the diameter of the part and X is set at the end of your stock, You can consistently go back to that location.
If you set a different offset, like G55, for your cues, the Y should still be the same, as it's the diameter, but the X will be in a different location. The right one for where the cue is.
Obviously, the parts you machine must be consistent so, when loaded on the machine, they are actually at the same place, but that's pretty easy to do.
Most of my machines just use one or two coordinates, but a couple of them have more than a dozen. Each one is for a specific operation, so all the programs related to that operation call up the appropriate work coordinate for that location.
Royce
Lol. Royce, notice the G58 written on my spinner base in the video. That's so I don't forget which offset goes with which station. My 3-jaw chuck fits into the round register on my scavenger board. That's G56. My indexer is G57 but all I really save there is the X coordinate (which is the Y axis on your machine).
I should probably mark them with something more permanent than magic marker.
I use the Config/Fixtures tab to double check the numbers but that's a good idea using the G59P numbers - even for making duplicate work stations in case you accidentally overwrite one.Bob
Man, I know what you mean!
I need to cheat sheet or something. I usually end up opening up an existing program to make sure I get it right. Boy, it's ugly when you use the wrong one!
Also, don't forget that you can use G59p7 all the way up to G59p223 or so. Pretty much all of my normal are G59P something. That way the only way to get into that coordinate is to type it in or through the program. I find that they don't get accidentally changed that way.Royce