You are using an out of date browser. It may not display this or other websites correctly.
You should upgrade or use an alternative browser.
You should upgrade or use an alternative browser.
Deluxe cue smith and cutting points
- Thread starter jecues
- Start date
To get really wide points you use a lot of offset on your tailstock. To get long AND wide points you play a balancing game with your offset and your crossfeed wheel. If you have too much offset, you eat all your wood before your points are very long. Take lots of shallow passes as you change your offset/crossfeed wheel position to slowly get to where you want to be. If you have firewood, use that to practice on. After half a dozen pieces things will make more sense.
As for getting the offset to begin with, there is an Allen screw on the right side of your tailstock; loosen that screw and you can offset your tailstock. The screw is directly under the retaining pin which holds the handle in place.
As for getting the offset to begin with, there is an Allen screw on the right side of your tailstock; loosen that screw and you can offset your tailstock. The screw is directly under the retaining pin which holds the handle in place.
Last edited:

Do yourself a favor and buy an extra trailstock for offsetting, so you don't have to mess with the one you have centered. I bought an extra and lightly scored it with a razor once I found where I liked it for 4,6,8 points.
I like to draw things that work for me so I don't forget what I did.
That's cheating...
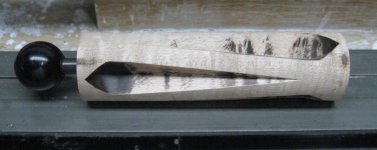
This post is one of the best tricks I have seen for overcoming the bind severe off-setting can put the cue in. I would think that this would also eliminate the tendancy for the cue to slip and cause the points to be off.Here is what I like to do. I only use the ball for cutting butt sleeves. I back cut a slight angle on my forearms to cut down on the binding. I like to draw things that work for me so I don't forget what I did.
Thanks for sharing. I would add that using the rear chuck to hold a rod that could be slid up against the back side of the ball would also keep it from slipping backwards. I have not tried this ball method, but it seems like a great way to go.
I would add that using the rear chuck to hold a rod that could be slid up against the back side of the ball would also keep it from slipping backwards. I have not tried this ball method, but it seems like a great way to go.
I forgot to mention that's exactly what I do. I also have a 60º dead center that is long enough to be clamped in both my chucks. (Faster set up for turning). When I'm cutting points on a forearm I slide the dead center up to the V point to back the forearm from slipping.
Last edited:

Attachments
I was wondering how you cut wide points with a deluxe cue smith. I understand you need to offset it some how but do not really know how to do this on a deluxe cue smith. Any help would be appreciated

Hi,
One simple thing you can do for wider points is to use .030 veneer stock as opposed to .040. The point stock with the .030 will also be much higher by a big margin.
You also can cut two points grooves deeper than the centerline, then glue in your points and re index to cut the other points. You will have to make some sample units to test and proof you geometry.
Good luck,
Rick G
I use a piece of 1/8th inch thick by 1-1-2 inch wide by about 15 inches long brass plate. What I do is c-clamp that brass plate to the bottom of my taper bar and use my concave live center instead of the larger bearing to give me extra travel on my cross slide.
I have a line scribed onto the plate so I can keep the same offset, it allows me to cut wide and long points and requires only minimal set-up, and no offsetting the tailstock.")
I have a line scribed onto the plate so I can keep the same offset, it allows me to cut wide and long points and requires only minimal set-up, and no offsetting the tailstock.
This is true. I was in a shop where they used 60 degree bits to cut six point cues. This kept the points spaced perfectly even like the 4 pointers with 90 degree grooves.If I understand the question right. Just some food for thought, there is no law the point has to be 90 degrees.
This is true. I was in a shop where they used 60 degree bits to cut six point cues. This kept the points spaced perfectly even like the 4 pointers with 90 degree grooves.
It seems I was not clear in my above post on the purpose for using the 60 degree cutter. So maybe this will explain it a little better:
The purpose of the 60 degree cutter is that the edges of wood in the point blank are parallel. That cannot be done with a 90 degree v bit. You have a 4 point cross with the blank wood thickness the same all the way around with a 90 bit in 4 points. But a 60 gives the same thing with 6 crosses all the same width. If has nothing to do with the angle of the cut. It is the shape of the groove I was addressing.
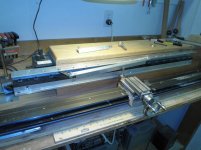
Just to share a little. I made a new taper bar on my Hightower lathe just for points. It is a 1 1/2 inch aluminum angle with holes every 2 inches. The smaller bars that actually make the taper are 3/4 aluminum angle. I made 2 sizes but I can quickly make any others that I need. I also made a smaller diameter cam follower so I can get more travel.
Kim
Kim
Attachments
Kim,
That is a nice addition and looks easy to change over.
Thanks Chris,
I can make any angle/length of point or butterfly just by making a new length of 3/4 aluminum angle. And I don't have to offset the tail stock. The aluminum angle is from Lowes and is cheap.
Kim
I use a piece of 1/8th inch thick by 1-1-2 inch wide by about 15 inches long brass plate. What I do is c-clamp that brass plate to the bottom of my taper bar and use my concave live center instead of the larger bearing to give me extra travel on my cross slide.
I drew up a bunch of angled followers but never followed though with making them. I don't like to climb cut, I like to cut going down hill. This puts you ending @ the deep end. Do you find that to be a problem? Which way do you cut? The bearing idea is a great solution to limited depth travel.
Last edited:
Kim, that is really ingenious. I have an angle plate already cut and was wondering how I was going to mount it. What I had figured out was more difficult than what you did. You just made my life 100% easier.
Thanks.
Thanks.
I drew up a bunch of angled followers but never followed though with making them. I don't like to climb cut, I like to cut going down hill. This puts you ending @ the deep end. Do you find that to be a problem? Which way do you cut? The bearing idea is a great solution to limited depth travel.
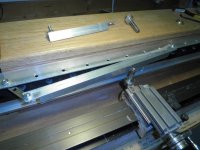
I have cut both ways and left to right seems to work better for me. It is smoother when the roller is going "down hill". Ending up in the deep end doesn't seem to be a problem. Maybe this will lead some one to an even better solution. I do clean and lube everything before cutting just so it cuts smooth.
The stack of little bearings are from RC car wheels. (got em on ebay) The pin is a turned down 3/8 bolt shank.
Kim