The
I'm guessing you mean the guys in Clay Center?
Real nice guy, has alot of cool tables laying around waiting to be refinished. Ken Hash is a good friend of his I believe.
They both referred me to each other anyway in the past.....
785.632.5909
http://www.billiardrestoration.com/Antique-Pool-Tables/oliver-briggs.htm
http://www.oldpooltables.com/catalog.asp?group=g2
Whether it's a Newport or a Briggs, or a BigKahuna,(which is what I'm now calling it after all of your work) you're turning this project into a great job that seems like it's well worth the time and energy you've put into it!:thumbup:
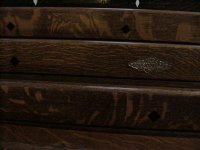
OTLB said:Sorry I just looked through some of your postings and pics. I am very surprised or should I say NOT surprised some of the experts in here didn't mention this already. Also your Diamonds s\b Ebony. I have worked on over a dozen of these Briggs tables and you can ask The Billiard Restoration Compnay in KS to verify as they are experts as well.
Now I am off to make a GC V table with 3 inch pockets and no extra facings
I'm guessing you mean the guys in Clay Center?
Real nice guy, has alot of cool tables laying around waiting to be refinished. Ken Hash is a good friend of his I believe.
They both referred me to each other anyway in the past.....
785.632.5909
http://www.billiardrestoration.com/Antique-Pool-Tables/oliver-briggs.htm
http://www.oldpooltables.com/catalog.asp?group=g2
Whether it's a Newport or a Briggs, or a BigKahuna,(which is what I'm now calling it after all of your work) you're turning this project into a great job that seems like it's well worth the time and energy you've put into it!:thumbup:


")