You are using an out of date browser. It may not display this or other websites correctly.
You should upgrade or use an alternative browser.
You should upgrade or use an alternative browser.
Diary of an antique Brunswick
- Thread starter Bigkahuna
- Start date
those rails look sweet..
Bigkahuna said:Just thought I would post some pictures for you guys that have been following this.
I have been doing refinishing for the last few days some days I can get two coats on. I have been using thinned down urethane and sanding between coats I am up to 8 coats now. I bought and $18 brush but it certainly doesn't work as well as spray equipment. I will probably at some point actually do some wet sanding and the buff the rail tops out with a buffer and some compound.
You are doing really good work there and show some real patience and desire to do the job RIGHT.... as oppossed to quick. I admire your skills and dedication to the task.
Bumpy Cushions
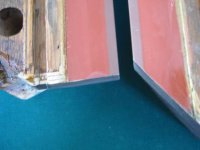
I found some time yesterday towards the end of the day to get some work done, so, here we are with the cushions installed. I did mess up on the first rail and got cushion height of 1 1/2? lining the cushion seemingly up with the top of the sub-rail. So I have torn the cushion back off and that was a ***** at first until I figured out that I could just lift a bit and then cut the glue with a razor. I have some adhesive remover I will use on the glue to get the contact cement off and then will shoot for it again. There certainly is not a lot of room for error when you are putting these cushions on as commitment happens pretty quick with the contact cement. Basically what I did was start the cushion at one end and then lightly lay the cushion on the sub rail guiding with my finger along the sub-rail as I went along. I then checked the cushion nose for straightness using a straight edge and confirmed the nose height was correct. If I had to make an adjustment to the cushion it was just barely sitting on the glue and trust me you do not want to push down on the cushion while trying to move it. Then I just worked along the cushion pushing down to get full adherence with the contact cement. Yes, you table mechanics can chuckle as I am sure there is some trick to this. The rest of the cushions came out real nice after I got into getting them started in the correct place and laying them straight. On many of the tables I play on when I look at the cushions I feel as though I need to get my sea legs and I am very happy with these.
The rails I think I have 15 or 16 coats of urethane on. Of course most of those coats were with some real thinned down urethane and with sanding between coats the finish is pretty thick but not as thick as if I were laying it on thick with no sanding. Some days I could get up early, sand, clean up and get a coat on then the same at night. I took me about 1.5 hours for each coat. I will probably do one more coat of un-thinned urethane and then do some wet sanding and then buff with a buffer and compound. I will probably do this just before putting the cloth on the rails so I can deal with any OOPS that may happen to the finish.
After the rails are finished I will be dealing with the slates there are a few repairs that need to be done and this will take some time. Man looking at those cushions makes me want to slap it back together and just start playing! NO! I have to resist the urge and practice delayed gratification.
Last edited:
Facing the Bouncing
I have the cushions finished and the rail facings on. I cut the cushions using an electric carving knife which did not work real well. If there were to be a next time I would have probably worked to find a better solution. I then tried the electric carving knife to trim up the facings and screw that! I found that with just a razor blade I was able to cut them real close. But, let me tell you that the belt sander to flush off the cushions and facings is the nuts! The sander I was using was just a regular belt sander so it was definateley bulky but with a little care I was able to get everything perfect! So, certainly a few steps here.
Get the cushions on, let sit overnight, (probably overkill but that is me).
Trim and belt sand cushion ends.
Glue on the facings, let sit overnight.
Trim and belt sand facing edges.
Attachments
Not sure what is next?
I am pretty happy with the pocket openings which are now at about 4.75 inches. Keep in mind these were over 5 inches and I am looking to increase playability and not trying to go to some crazy pocket size. I have measured my current set up for the slate shelf and am about 1.75 inches measured from the median of the points for the pocket openings to the drop off point on the shelf. If I put a ball against the cushion facing and at the drop off point then I would say you could see about 35% of the ball sighting down the cushion. I am not sure what is correct here????
I am at a point where I am not sure how to proceed. The pocket shelves are wood on the older tables. They were beat and broken when I originally got the table ten years ago. So, I made up some new ones increasing the radius and extended the shelves a bit. I tried to do a decent job at the time bit it was never a good repair. I used plywood which got me close to the level of the table and then used bees wax for the last 1/8? or so. From there I would take a block plane and plane down the bees wax to get it flush. When done it was level but would not last as the wood was attached to the boards on the back of the slate and there was always is some movement. I know the antique tables use the wood because the machinery to cut the slate was not around. But, even if I went with wood again and got these attached to the slate with some epoxy or something I am not sure if this is the best way to do this. Make a mold and form the shelf using liquid steel??? Any thoughts?
Last edited:
Getting Back At It!
It has been a while since I have posted here simply because this project has been sitting.
I have the rails covered which I was a bit apprehensive about but really in an evening I had them done and they look great. I just followed the Simonis instructions that are posted everywhere. I will say that those instructions say not to stretch the cloth along the feather strip, however, those should say not to stretch the cloth very much as the first rail I did the cloth is loose at the top. It would be nice to figure out if I could shrink this up? I would think to over stretch this area would increase the number of folds under the rail for the corner pocket facings when you do this stretch. The rails just look great the finish came out excellent after a bunch of coats and steel wool or wet sanding and I was so happy to have them now covered.
I just finished getting the pockets riveted back onto the original irons, (now re-plated in nickel for 100 bucks), this afternoon. As I stated earlier in this post I bought pockets that included irons on Ebay pretty reasonable. However, most disappointing was that my irons are quite a bit larger than the ones I bought. So, I took them off the new irons and tried stretching the leather using warm water and then alcohol which I found to work the best. Working with these pockets has been very trying and if had this to do over again I would have sold these pockets to get my money back and send the original irons in to have new pockets fitted at Hood or someone else. What I have ended up with after a lot of work is pockets that still do not fit right. So, I am trying to get creative with the area that is uncovered on the irons and have some decorative rope to trim off with. Some of the finish has rubbed of so now I have to dye the leather. All in all the pockets are a losing situation and wish I had listened to advise I had gotten early on and just sent the irons in.
Next I need to replace the wooden pocket shelves which are common to these old tables. I tried some poplar but it seems too soft and perhaps MDF is the answer. I guess I am going to have to double up some 3/4 MDF and then cut it down somehow. Anybody had any experience with this?
Some of my backer boards are loose in areas, so, I am going to try to get them off with out damaging the bluestone, (yes, bluestone not slate), and then glue them back on. Does anyone have suggestions on getting the backer boards off and what to use for glue? Keep in mind the wooden pocket shelves are attached to the backer boards, (I think), so these need to be solid.
Last edited:
I'm tackling a similar project. I have an unknown antique oversized 8ft I've been trying to get back into shooting order. Mine isn't a "restoration" per se, as it is just getting a table together that can be used for practice.
On my pocket shelves I used 2x4 planed down and trimmed to fit, with increased shelf depth. I used a two part epoxy to fill in and attach the shelves to the slate and slate liners, as well as a couple of long narrow crown staples for good measure. Once set, I used bondo to smooth out the transition into the pocket. Worked pretty well.
Like I mentioned before my table is similar to yours in that it's an antique t-rail table. My slate liners were screwed on from the top down. Once I removed the screws and flipped the slates, the liners came right off. I replaced my liners with some 1 x 6 poplar, trimmed to size. Pre-drilled the holes and screwed the boards back onto the slate. No problem, except I had to flip the slates by myself (get a friend to help you).
Lastly, on your pocket leathers dilemma, honestly you have so much time invested into your table already I think it would be worth the extra cost to have it look right in the end. I would scrap the eBay pockets and send your irons off for replacement leathers.
Your table looks great so far, keep it up.
Last edited:
Cycopath,
I think I am going with the MDF on the pocket shelves. My plan was to glue it as you have done and then make a template for the final radius to be shaped with a router once installed. Then cut it flush with the slate or cut it flush then radius as it would be.
Thank you for the thoughts. My backer boards are glued on with no screws and they are coming off pretty hard. Maybe I should just try to get some contact cement in there where it is loose.
I gotta go with what I got on the pockets as I sell real estate and it has been slow, (maybe you have heard). I am sure in the future I will get the right ones but these do not look bad now and are a sure improvement over what I had.
Bigkahuna said:I gotta go with what I got on the pockets as I sell real estate and it has been slow, (maybe you have heard). I am sure in the future I will get the right ones but these do not look bad now and are a sure improvement over what I had.
Ok, fair enough, but you have to promise that your next BIG commission check you send your irons off for new leather.
Deal?
cycopath said:I'm tackling a similar project. I have an unknown antique oversized 8ft I've been trying to get back into shooting order. Mine isn't a "restoration" per se, as it is just getting a table together that can be used for practice.
On my pocket shelves I used 2x4 planed down and trimmed to fit, with increased shelf depth. I used a two part epoxy to fill in and attach the shelves to the slate and slate liners, as well as a couple of long narrow crown staples for good measure. Once set, I used bondo to smooth out the transition into the pocket. Worked pretty well.
Like I mentioned before my table is similar to yours in that it's an antique t-rail table. My slate liners were screwed on from the top down. Once I removed the screws and flipped the slates, the liners came right off. I replaced my liners with some 1 x 6 poplar, trimmed to size. Pre-drilled the holes and screwed the boards back onto the slate. No problem, except I had to flip the slates by myself (get a friend to help you).
Lastly, on your pocket leathers dilemma, honestly you have so much time invested into your table already I think it would be worth the extra cost to have it look right in the end. I would scrap the eBay pockets and send your irons off for replacement leathers.
Your table looks great so far, keep it up.
Call Ken Hash at 410-256-8388 (Mon-Sat 9am-6pm) or E-mail info@classicbilliards.net
I just spoke with him a couple of days ago about getting pockets for a pair of Pfister's I'm going to be doing in the next couple of weeks.
The man has everything you can ever imagine finding.
It's mind boggling how much stuff he has, and he's always really easy to deal with.
Your table is looking great!
Thanks for the updated pictures, looks like someone has good attention to detail and deserves to take some pride in their work!
Want to come start on my latest Anniversary project?lol
antique Brunswick Madison
Your avatar looks just like the 8' antique Brunswick Madison I got set up & delivered for $700. It was discounted because the sides were not "finished" that is someone had begun to paint it or strip it & never completed the job. The previous owner traded it for one of those new Chinese tables because he or she had redecorated their basement. They sacrificed function & durability for appearance. Guests have come to play & commented that the table plays better than many new tables.
Tom334 said:All I did was wet the corners where they fold over the front of the iron. Didn't need much water to be able to work the leather and sew them up. The leather streached pretty easy... Try searching online and see what you can find for "tooling leather". I had no problems with the dye. And putting the whole thing in water, not to sure about that. Thanks for the nice table comment!!! Now if I stop playing pool long enough I can finish the basement... sometime...")
Your avatar looks just like the 8' antique Brunswick Madison I got set up & delivered for $700. It was discounted because the sides were not "finished" that is someone had begun to paint it or strip it & never completed the job. The previous owner traded it for one of those new Chinese tables because he or she had redecorated their basement. They sacrificed function & durability for appearance. Guests have come to play & commented that the table plays better than many new tables.
A little more work
Well I did the treatment of the table frame that keeps the pockets from getting abused against the table frame as you can see from the first couple of photos. You will see I just glued down some leftover 860 I had. This was done at least a couple of times in the past as evidenced by old remaining cloth which I removed. So, I am not sure if this was something Brunswick did originally but it seemed like a good plan.
I am going from beeswax to bondo on the seams. The beeswax was shrinking on me from the last time I put the table together. My concern was the beeswax will inhibit adhesion of the bondo. So, I took a heat gun and just heated the beeswax and then rubbed off the beeswax with a fresh paper towel. This got these areas pretty dry looking and then I will hit it with a Scotchbrite pad lightly.
The pockets are done and they look pretty good after dyeing and polishing them. The decorative rope I added to make up for the leathers coming up short on the irons I am on the fence about but I am going to wait until they are on to judge and I think they will do just fine.:shrug: :shrug:
I am currently working on the slate repairs which I have lamented over for a long period of time as it seems few had any advice for me on this subject. I have come up with a method that I think will get these repairs dead nuts. If this is something table mechanics aren't doing now they may want to consider this method as it seems to be working out so far. I am hoping the materials I used for this method are going to stand the test of time because if not this stuff is going to be tough to remove.
I did post some pics of the frame which is massive. If my house were to ever fall down I swear I could grab a chainsaw and cut my way through the debris to find this table intact. Hopefuly, I will have the slate repairs done soon and will post up the results.:banghead:
Last edited:
An Update
Here are a couple of the slate repairs I have done. In the first photo you can see I had a pretty big chunk taken out and it was around one of the barrel nuts for the rail bolts. The second photo is what I had to do to mold in the hole for the bolt and the barrel nut. Basically, I just taped the barrel nut onto the sleeve and then waxed everything so I could remove the sleeve and everything would come apart which worked just fine.
In the third photo is another repair where about a 1/4 to 3/8 of an inch had been chipped off the top of the slate again around one of the barrel nuts. Using some tape and a spacer used for sway bar links on cars I was able to come up with a mold for the JB Weld cold weld epoxy I am using. I was able to find this product in larger tubes than most places will stock. JB calls it Industro Weld and it comes in a much larger tube and at about $16 which I found at Fastenal.
After the JB Weld hardened up overnight I took my router fitted with a flush cutting attachment and cut the JB Weld flush to the surface of the slate then used a flush trim bit to do the sides of the slate.
Using the flush cutting attachment was touchy because the particular router I was using did not really have the ability to do fine adjustments, (See fourth picture). I have seen routers with finer adjustments than this one. To adjust the router I put down some tape and made adjustments until I was taking the adhesive off. In the fifth picture I checked everything with a machinist straight edge and it is dead nuts. This repair really came out great and I am totally happy with it.
Now the fight goes on:smash:
Last edited:
Bigkahuna said:Here are a couple of the slate repairs I have done. In the first photo you can see I had a pretty big chunk taken out and it was around one of the barrel nuts for the rail bolts. The second photo is what I had to do to mold in the hole for the bolt and the barrel nut. Basically, I just taped the barrel nut onto the sleeve and then waxed everything so I could remove the sleeve and everything would come apart which worked just fine.
In the third photo is another repair where about a 1/4 to 3/8 of an inch had been chipped off the top of the slate again around one of the barrel nuts. Using some tape and a spacer used for sway bar links on cars I was able to come up with a mold for the JB Weld cold weld epoxy I am using. I was able to find this product in larger tubes than most places will stock. JB calls it Industro Weld and it comes in a much larger tube and at about $16 which I found at Fastenal.
After the JB Weld hardened up overnight I took my router fitted with a flush cutting attachment and cut the JB Weld flush to the surface of the slate then used a flush trim bit to do the sides of the slate.
Using the flush cutting attachment was touchy because the particular router I was using did not really have the ability to do fine adjustments, (See fourth picture). I have seen routers with finer adjustments than this one. To adjust the router I put down some tape and made adjustments until I was taking the adhesive off. In the fifth picture I checked everything with a machinist straight edge and it is dead nuts. This repair really came out great and I am totally happy with it.
Now the fight goes on:smash:
Hey Bigkahuna,
That looks great. Thanks for sharing. We should have tags of some sort in here for different things like-slate repair,cushion work, leveling, recovering, etc....I know the title says what the topic is but sometimes, like now if someone was looking to repair slate they would know it is in this thread. Keep up the good work and please keep posting.
Brunswick?
Wow, that is news! What is it about my table that suggests it is an Oliver Briggs? The name plate on the end rail looks very original and has a round button on the back for gluing it into place. There is a recess in the rail that receives this button. It was either factory installed or very well installed. Another thought might be that both companies used the same size and configuration name plate.
Scruffy, what are your thoughts on this?
OTLB said:Your table was made by OLIVER BRIGGS Boston MA and is not a Brunswick Newport FYI
Wow, that is news! What is it about my table that suggests it is an Oliver Briggs? The name plate on the end rail looks very original and has a round button on the back for gluing it into place. There is a recess in the rail that receives this button. It was either factory installed or very well installed. Another thought might be that both companies used the same size and configuration name plate.
Scruffy, what are your thoughts on this?
OTLB
Banned
Sorry I just looked through some of your postings and pics. I am very surprised or should I say NOT surprised some of the experts in here didn't mention this already. Also your Diamonds s\b Ebony. I have worked on over a dozen of these Briggs tables and you can ask The Billiard Restoration Compnay in KS to verify as they are experts as well.
Now I am off to make a GC V table with 3 inch pockets and no extra facings
Now I am off to make a GC V table with 3 inch pockets and no extra facings
Pocket shelves
For the pocket shelves I ended up using MDF. I originally bought poplar but wasn?t real happy with the density and stability of a grained wood. The MDF I got was very dense and you can cut this stuff pretty thin without having to worry about it splitting at the grain. I could not find 1 inch so I had to get ? and then glue it.
What I did was to take my flush cutting attachment and drill some holes in it so now I have a trammel to cut a radius, (see photo one). I had to make up some crescent shaped pieces so there were two different radiuses and two different shapes one for the corners and one for the sides. Because I was using ?? and gluing them I had to cut 12 pieces using four different radiuses. Then I had to plane these down thinner which again I did with the flush cutting attachment before cutting the crescents away from the board. The other picture has me setting up for the cuts. I did this outside and used a respirator due to formaldehyde in the MDF. Just the cutting took about 1.5 hours.
I glued them together and then trimmed up with the belt sander for a better fit into the slate and to get the correct distance for the drop off. The slate radius was cut buy hand so the trimming was necessary. Next I glued them to the slate backer boards using Gorilla Glue and also using the JB Weld cold weld epoxy between the slate and pocket shelf. I clamped everything up and let it sit overnight.
Using the flush cutting attachment with my router I then cut everything flush with the slate. Now this part did not go without cause for concern. In some areas I couldn?t get the wood and epoxy flush and in others I was cutting into the slate. I spent some time trying to figure out what was wrong with this process and was able to figure out that the slate was low around the pocket shelf area. So in fact, I was cutting the pocket shelf flush to area where the flush cutting attachment was resting further back in the playing field. However, it was not flush to the low area where the pocket shelf was and even had a noticeable bump there. So, where I was hitting the slate the adjustment was too low.
So, someone replacing these pocket shelves in the past had done some sanding to fair out the area around the pocket shelves and took material off of the slate surface. Now I just set the router to flush went right along and cut all the pocket shelves. After checking all shelves with the machinist straight edge I found all of them needed some filler. Using JB Weld and the back side of a wall paper scraper blade as a spreader, (which was very straight), I skim coated the area approaching the pocket shelves.
I then took the flush cutting attachment off the router. The back side of this is machined flat so I attached piece of 120 grit sticky back paper to it and used it as a big sanding block. Now I have gotten three uses out of this including, flush cutting, trammel tool, and machined flat sanding block. Two of the pocket shelves came out perfect after a skim coat and sand the other four I did a second time and one of them took three to get it so that I could not find a low spot with the straight edge. The one that took three coats I had to go out into the playing field further as this one was the worse. One note with JB Weld you have to let it sit overnight to cure or you are going clog the sandpaper real quick.
Now I may have gone overboard with getting this so accurate but it seemed to me that if a ball can roll off hitting a piece of paper or the foot spot then this needed to be real accurate. Under the cloth it would seem the Princess and the Pea theory would have an effect. I am not sure if there is a recommended tolerance so to me as perfect as I could get it was best. Also I am using thinner faster cloth so any roll will be worse with this cloth.
Last edited: