I've been converting one piece cues, real maple ones, into sneaky petes and even a J/B cue...a prototype of sorts.
Here's a pic of the J/B Cue. 15oz was way light, so I settled for 18. I made the butt portion a quick release by turning down the threads. i meed to take a few more threads off as Its really a almost quick release. The cue works great, i was really surprised! After letting 5-6 people try it out at my local pool hall, I have one order!

These are a few of my "FrankenCUES". They are going to one of my best friends who owns a body shop and is clear coating them.

So a good friend of mine buys a 314-2 shaft and doesn't have a butt for it. I have one of the sneaky petes with a 3/8-10 pin that fits the shaft. So he hits a few with it and now I'm making him a burr for his predator shaft. This is my first shot at matching up a butt and shaft, not to mention making a delrin joint.
Here are the pics from tonight's adventures. The shaft lines up perfect, just need to sand a tad more to compensate for the clear.
I epoxied the joint on, it was a very tight fit, in getting "fit" down pretty good

Here's a pic of it turned down. Notice the wood is a little worked over? Going from a one piece to a two piece, I had to "find" the right diameter as the predator shaft had a larger diameter than if I would have split the cue evenly. So I made a tenon that filled up the joint and nailed the diameter! The butt is 28.5" long, with shaft, I'll be at 57.5", maybe close to 58" with bumper.

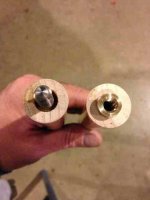
Here's the joint pin installed. It's taken a lot of trial and error getting joint pins in straight. It's been frustrating to say the least. Center drills and boring bars are a huge help. I'm almost near getting the process nailed down.

So I did some finishing sanding and will be off to the body shop for clear tomorrow.
The main reason I posted this is due to some of the PMs asking how and what was I doing with my lathe. I'm all open to suggestions, questions and criticism. I'll take all the info I can get and share my experience.
FIRE AWAY!
Tank
Here's a pic of the J/B Cue. 15oz was way light, so I settled for 18. I made the butt portion a quick release by turning down the threads. i meed to take a few more threads off as Its really a almost quick release. The cue works great, i was really surprised! After letting 5-6 people try it out at my local pool hall, I have one order!
These are a few of my "FrankenCUES". They are going to one of my best friends who owns a body shop and is clear coating them.
So a good friend of mine buys a 314-2 shaft and doesn't have a butt for it. I have one of the sneaky petes with a 3/8-10 pin that fits the shaft. So he hits a few with it and now I'm making him a burr for his predator shaft. This is my first shot at matching up a butt and shaft, not to mention making a delrin joint.
Here are the pics from tonight's adventures. The shaft lines up perfect, just need to sand a tad more to compensate for the clear.
I epoxied the joint on, it was a very tight fit, in getting "fit" down pretty good
Here's a pic of it turned down. Notice the wood is a little worked over? Going from a one piece to a two piece, I had to "find" the right diameter as the predator shaft had a larger diameter than if I would have split the cue evenly. So I made a tenon that filled up the joint and nailed the diameter! The butt is 28.5" long, with shaft, I'll be at 57.5", maybe close to 58" with bumper.
Here's the joint pin installed. It's taken a lot of trial and error getting joint pins in straight. It's been frustrating to say the least. Center drills and boring bars are a huge help. I'm almost near getting the process nailed down.
So I did some finishing sanding and will be off to the body shop for clear tomorrow.
The main reason I posted this is due to some of the PMs asking how and what was I doing with my lathe. I'm all open to suggestions, questions and criticism. I'll take all the info I can get and share my experience.
FIRE AWAY!
Tank

")
 I'll definitely make my way to Cinci some time!