You are using an out of date browser. It may not display this or other websites correctly.
You should upgrade or use an alternative browser.
You should upgrade or use an alternative browser.
Custom Pool Room
- Thread starter dsoriano
- Start date
Stain
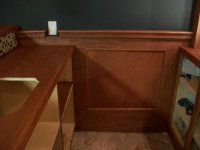
I decided on Red Chestnut. I started staining Saturday evening and by Sunday I was complete with most of it. Here are a few pics. Color varies greatly with the camera flash but it all came out consistant.
These are the pads I always use when staining.


You'll notice I started to stain the particle board shelves. I was suprised how nice the MDF took the stain and how good it looked. Good enough for under cabinet shelves.

I decided on Red Chestnut. I started staining Saturday evening and by Sunday I was complete with most of it. Here are a few pics. Color varies greatly with the camera flash but it all came out consistant.
These are the pads I always use when staining.
You'll notice I started to stain the particle board shelves. I was suprised how nice the MDF took the stain and how good it looked. Good enough for under cabinet shelves.


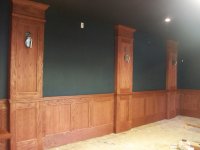
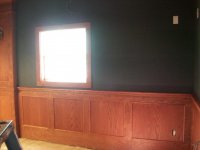
More pics of the room. FYI, do follow the directions when working with stain in closed areas. Fumes can get pretty strong.
Once I complete the stain and polyurethane, I'll post a full pic of the room.
Once I complete the stain and polyurethane, I'll post a full pic of the room.
Attachments

dsoriano,
If you are going to poly the bartop I would suggest more than several coats. I applied 9 coats of poly to mine some years back.
If I had the style of bartop that you have I would have used this product for a deep, clear and indestructible finish.
http://eti-usa.com/envirotex-lite/
Look into it.
If you are going to poly the bartop I would suggest more than several coats. I applied 9 coats of poly to mine some years back.
If I had the style of bartop that you have I would have used this product for a deep, clear and indestructible finish.
http://eti-usa.com/envirotex-lite/
Look into it.
I used to think I was a pretty mellow person, but this thread is teaching me levels of envy I never knew I had.
The stain looks great!
You aren't alone. :embarrassed2:
Great choice on the color! It really helps pull the whole place together.
Brian in VA
Brian in VA
Sorry to ruin all the back-patting and brown-nosing here, but...
1. Production cues?! Why don't you just make your own?
B. I am moving in. All you other people can stop by for a few hours at any time.
") :thumbup:
:thumbup:
1. Production cues?! Why don't you just make your own?
B. I am moving in. All you other people can stop by for a few hours at any time.
:thumbup:Where is my cot? Bathroom?
Stain is looking really good, I think it will go really well with your choice of carpet color. It won't be too much longer and you'll be stocking the bar, refurbishing and setting up the tables, putting in the sound system/TVs and ready to play with your new toys. Looking forward to Big Trucks broadcast of your Grand Opening!
It's probably been mentioned already, but have you already installed the AC/Heat unit? I see the openings for the vents, but there are no fixtures in place yet.
It's probably been mentioned already, but have you already installed the AC/Heat unit? I see the openings for the vents, but there are no fixtures in place yet.
Wow. Just . . .
I am in awe. I decided this was as good a place as any for my first post to the forum.
You have a beautiful room, already, even incomplete. Your wife, what could be said?
I laughed out loud at the "Didn't get anything done this weekend - Oh, but I did slap this beautifully designed and executed cue rack together in a few spare minutes."
I was sad when I got to this page, because it meant I will be waiting with everyone else for updates. Up until now, I've just been reading a few pages here and there, and progress seemed lightning fast. Hurry up and finish already, darn it!
hey blackie...
maybe we can agree to disagree on a few threads...
but i have to totally agree with you here
besides:
1. i want to be first on your/dsoriano's waiting list for a cue
B. please send me my time slot for playing at dsoriano's, i'll gas up my sled
plus: if i clean up every day, whatever needed, could i get a time slot to play JoeyA?
all the best, and dsoriano you are amazing my friend!! i have been lurking this thread for more that 6 months - and for sure you are amazing
what else can i say besides you are an inspiration to us all, Thank You Sir,
smokey
Sorry to ruin all the back-patting and brown-nosing here, but...
1. Production cues?! Why don't you just make your own?
B. I am moving in. All you other people can stop by for a few hours at any time.
maybe we can agree to disagree on a few threads...
but i have to totally agree with you here
besides:
1. i want to be first on your/dsoriano's waiting list for a cue
B. please send me my time slot for playing at dsoriano's, i'll gas up my sled
plus: if i clean up every day, whatever needed, could i get a time slot to play JoeyA?
all the best, and dsoriano you are amazing my friend!! i have been lurking this thread for more that 6 months - and for sure you are amazing
what else can i say besides you are an inspiration to us all, Thank You Sir,
smokey
Very, Very productive weekend!
I got a lot done this weekend.
(1) I made the Speaker mounts. I decided instead of spendind over a $100 on cheap plastic mounts that are supported by drywall anchors, I'd design some and this is what I came up with. I spent $25 on materials and a buddy from work helped me weld them.
I designed the top tube cut at 45 deg and the bottom rod at 25 deg so they cancel each other out to give me 15 deg for the Speaker angle.
The top tube has a welded nut to secure the bottom bracket. This worked great. Once I hung the speakers there was no give or twisting motion.

I bought a 3"x3' flat sheet of 1/8" metal, I marked then drilled the holes and cut the mounting brakets.


Here they are completed and sliped together.

I then cleaned them up, primered and painted them with the same metalic finish paint I used on the light fixtures.

I got a lot done this weekend.
(1) I made the Speaker mounts. I decided instead of spendind over a $100 on cheap plastic mounts that are supported by drywall anchors, I'd design some and this is what I came up with. I spent $25 on materials and a buddy from work helped me weld them.
I designed the top tube cut at 45 deg and the bottom rod at 25 deg so they cancel each other out to give me 15 deg for the Speaker angle.
The top tube has a welded nut to secure the bottom bracket. This worked great. Once I hung the speakers there was no give or twisting motion.
I bought a 3"x3' flat sheet of 1/8" metal, I marked then drilled the holes and cut the mounting brakets.
Here they are completed and sliped together.
I then cleaned them up, primered and painted them with the same metalic finish paint I used on the light fixtures.
Last edited:
Speaker mounts
(2) I then screwed them into the double top plate with wood screws.
You will also notice I installed the terminal Speaker Post wall plate and connected the speaker wires.

Here I drilled and screwed the bottom brackets to the speakers.

I tried taking good pictures but the room is so dark I had to put the camera on night settings and it looks bad, but oh well.
Its a shame the speakers hide the brackets, they were so pretty!


(2) I then screwed them into the double top plate with wood screws.
You will also notice I installed the terminal Speaker Post wall plate and connected the speaker wires.
Here I drilled and screwed the bottom brackets to the speakers.
I tried taking good pictures but the room is so dark I had to put the camera on night settings and it looks bad, but oh well.
Its a shame the speakers hide the brackets, they were so pretty!
Last edited: