So shooting that ball is too risky but cutting this in isn't? This shot has sell out written all over it. Not only is it very low percentage to pocket the ball, it's almost a 100% chance to sell out if he misses. He actually got lucky and only left Alex a hard shot when he missed...
You are using an out of date browser. It may not display this or other websites correctly.
You should upgrade or use an alternative browser.
You should upgrade or use an alternative browser.
Alex-Scott 1p - Gameplay
- Thread starter MJ_Ro
- Start date
So shooting that ball is too risky but cutting this in isn't? This shot has sell out written all over it. Not only is it very low percentage to pocket the ball, it's almost a 100% chance to sell out if he misses. He actually got lucky and only left Alex a hard shot when he missed...
I've seen Scott cut that ball in probably 50 times..playing him and watching him play. Short story even shorter, it just wasn't his night.
I think the difference is that if he makes this cut shot he goes 4/5 rails and bumps into the 4 next to Alex's pocket, getting shape on the 2 ball, then the 1 ball breaking open the stack and possibly running 8 and out. The potential reward is much greater. Also, Alex doesn't have every ball an the table sitting a foot from his hole. Also, the ball count is different.So shooting that ball is too risky but cutting this in isn't? This shot has sell out written all over it. Not only is it very low percentage to pocket the ball, it's almost a 100% chance to sell out if he misses. He actually got lucky and only left Alex a hard shot when he missed...
He was never running out in the first scenario.
I think the difference is that if he makes this cut shot he goes 4/5 rails and bumps into the 4 next to Alex's pocket, getting shape on the 2 ball, then the 1 ball breaking open the stack and possibly running 8 and out. The potential reward is much greater. Also, Alex doesn't have every ball an the table sitting a foot from his hole. Also, the ball count is different.
He was never running out in the first scenario.
He doesn't have to win from either situation... but this shot is much lower percentage and much more risk than reward.
I'll start by conceding that my one pocket knowledge is limited.
I can't stress enough how tough that table is for those of you who think that shot is unmissable. I will say that at that angle, it's very makeable, but not unmissable.
From the way I see it, it's straight in. the only shot you can play any semblance of position on is the 6. That shot would be extremely difficult on this table from the angle he would end up at. So your reward for making the 13 is one ball MAYBE two. The punishment for missing either of those two balls is guaranteed loss of game.
I think the percentages dictate getting balls away from Alex's pocket.
Edit to add: The ball count is 1 for Scott to -2 for Alex. I don't think taking big risks would make any sense here.
IMO I think he can get out from there actually..I'm so far below Scott I'm looking at the bottom of his feet when we talk but if I get some odds ill bet I can get atleast 4 from there
..On that table..

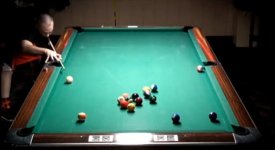
It's Scott's turn at the table, he's got the bottom left pocket. After locking Alex behind the 3, Alex tried to go 3(4?) rails behind the 12 , he fouled and we are in the current position. Scott doesn't shoot the straight in 13? :embarrassed2: What? .He shoots a safety of the 10.
Am i seeing things wrong here.. Why not shoot the 13?
IMO, there is a bit of an optical illusion going on here.
It looks to me like, holding the edge of a piece of paper to the screen, that the 13 is actually straight to the end rail side of the pocket -- he has no position play to the 6, or anything else, and Alex's pocket is surrounded. IOW, Scott's upside is to get one (on a tight table), but his down side is to lose the game if he misses.
Lou Figueroa
Even if he stops the ball the slight cut on the 6 is not difficult..The best in the world shoot them in the center..That's why they are the best.
I would disagree. I think that Scott felt that he could control whitey enough here that even if he missed he wasnt leaving Alex straight in. I also believe that he felt if he mad it he had a very good chance to win the game. That's the situation you live for in 1 pocket. the other situation, as LouF stated, was upside = 1 ball, downside = loss of game. That's my humble opinion. I'm not going to argue the point much more because honestly, I am not qualified to argue about 1 pocket. If you wanna argue about a rotation game situation, I'll play along.He doesn't have to win from either situation... but this shot is much lower percentage and much more risk than reward.
IMO, there is a bit of an optical illusion going on here.
It looks to me like, holding the edge of a piece of paper to the screen, that the 13 is actually straight to the end rail side of the pocket -- he has no position play to the 6, or anything else, and Alex's pocket is surrounded. IOW, Scott's upside is to get one (on a tight table), but his down side is to lose the game if he misses.
Lou Figueroa
I don't see the illusion.
Attachments
I would disagree. I think that Scott felt that he could control whitey enough here that even if he missed he wasnt leaving Alex straight in. I also believe that he felt if he mad it he had a very good chance to win the game. That's the situation you live for in 1 pocket. the other situation, as LouF stated, was upside = 1 ball, downside = loss of game. That's my humble opinion. I'm not going to argue the point much more because honestly, I am not qualified to argue about 1 pocket. If you wanna argue about a rotation game situation, I'll play along.
If he pockets the 13 it's pretty natural shape to slide over for the 6 with the perfect angle to get down for the 7 and the 10 would be next. I could see him getting 4 before he would have to do anything funny.
I don't see the illusion.
Holding a sheet of paper up to the screen and putting the edge through the center of the CB and 13 there doesn't appear to be an angle in the direction of the 6. If you just look at the screen shot it looks like there is an angle, but after checking it out with a straight edge I'm no so sure it's there.
Lou Figueroa
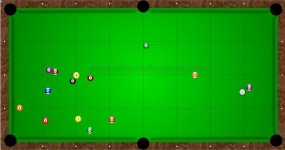
The angle of the camera + lens distortion. When you look at the grid I laid out, you'll see there is clearly an angle to slide over for the 6 pretty naturally. Perspective can be strange on camera but it's pretty easy map things out once you've made a grid.
The angle of the camera + lens distortion. When you look at the grid I laid out, you'll see there is clearly an angle to slide over for the 6 pretty naturally. Perspective can be strange on camera but it's pretty easy map things out once you've made a grid.
Even on the grids you have the 13 in two different spots. At a minimum, if there is an angle to the 6, it's not much, so that would explain Scott's decision.
Lou Figueroa
Caveat: If I played SF in one-pocket I'd need at least a 3-12 spot and the break. And he has to wear Earl-weights on his wrists.
That said, it seems to me that the reason to shoot the 13 (and maybe the 6) is to get better position for clearing out Alex's pocket. As the balls lay, he's jacked up over the 10 and doesn't have a good angle for clearing multiple Alex-balls and remaining safe.
One-pocket has quickly become my favorite spectator pool game. I just wish I was a better shot-maker and could play it.
Even on the grids you have the 13 in two different spots. At a minimum, if there is an angle to the 6, it's not much, so that would explain Scott's decision.
Lou Figueroa
Ok, whatever you say bud.
I don't see the illusion.
The 15 and 4 are quite an illusion.
I don't play one pocket AT ALL, and it's blatantly obvious that going down to 6 games in an 8 ahead set is a Huge difference than 4 games ahead. The pic shows as everyone sees, almost a total sellout if he shapes for the 6 next. I would think his number one imperitive at that point (5 down) is to NOT SELL OUT..... all other possibilities fall to number 2 or lower. If in addition he's not 'feeling' it... I really don't understand anyones' not seeing his choice as the right one. He is waiting for, and trying to get to shots WITH Cover, and if I wasn't feeling it and it were my money I would do the exact same thing (not that I'm even on the same planet as him).
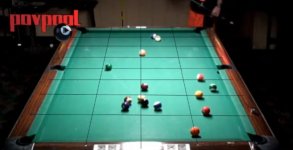
As to the other cut shown by Cleary.... it looks like a 5 railer to soft on the end rail for the 6th where at worst he pushes the outside ball over to his side and possibly leaves a bank.... but tough to see from the pic. Scott plays that kind of position all day long when I've seen him play. I also don't know at what point the score was here and that mandates the play to a large extent.
Just musings from a hacker.
td
Ok, whatever you say bud.
Lou is right. On your actual table with the grid, the line through centers of the CB and 13 ends about three inches to the left of the pocket as the shooter stands, on the footrail. On your Wei table sketch, the line through the centers is pointing about 3/4 of a diamond to the right of the pocket, on the long rail. You can also see that in your Wei sketch the 13 ball is at the midpoint of two of the cross-lines (that go from long rail to long rail). In the actual photo, it's not in the midpoint but rather much closer to one of the cross-lines. (This could be partly due to the difference between an aerial view and an angled view.)
That aside, in your Wei table sketch, it's fairly natural to get on the 6 and then come over for the 7/10/3/5. In the actual shot, if you use Lou's paper method, it looks feasible to hit the 13 about 15 mph and stun over for the 7.
I suspect the logic was "I lose even if I rattle this ball and leave it in the hole, but if I make it, then I still have to play safe." For me, I'd still shoot the 13, but to get a better line on the safety where I don't have to shoot over the 12 ball.
Cory
Last edited:
I agree Smitty. I didn't watch the match but by all accounts Scott was off for some reason. He could sell out 3 times more than he could make and throw in the possible lack of confidence at the time and you have a good decision by him.
Lou is right. On your actual table with the grid, the line through centers of the CB and 13 ends about three inches to the left of the pocket as the shooter stands, on the footrail. On your Wei table sketch, the line through the centers is pointing about 3/4 of a diamond to the right of the pocket, on the long rail. You can also see that in your Wei sketch the 13 ball is at the midpoint of two of the cross-lines (that go from long rail to long rail). In the actual photo, it's not in the midpoint but rather much closer to one of the cross-lines. (This could be partly due to the difference between an aerial view and an angled view.)
That aside, in your Wei table sketch, it's fairly natural to get on the 6 and then come over for the 7/10/3/5. In the actual shot, if you use Lou's paper method, it looks feasible to hit the 13 about 15 mph and stun over for the 7.
I suspect the logic was "I lose even if I rattle this ball and leave it in the hole, but if I make it, then I still have to play safe." For me, I'd still shoot the 13, but to get a better line on the safety where I don't have to shoot over the 12 ball.
Cory
Is the table wider at the bottom of the picture or the top? The camera can do funny things with how you think the balls are.