Custom Pool Room

dsoriano

AzB Silver Member
Silver Member
Prototype Light

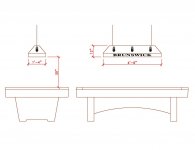
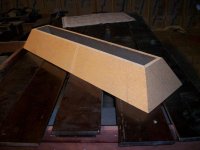
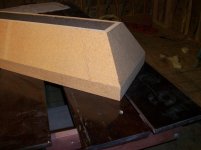
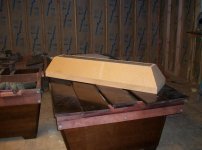
I've been pondering over a light design and I have a bunch of MDF board in my storage and decided to build a Prototype Table Light. The actual light will be made of Red Oak. As to not waste oak lumber I decided to practice on my compond miter cuts and get an idea how this would look and get a feel for the size. I decided to make it a little longer than your average light. Most lights are a little under four feet. This light measures 4'-6". Instead of using fluorescent tubes I want to use fluorescent bulbs. This will give me the ability of adjustingf how the table is aluminated. the color spectrum and wattage.
I'm really satisfied on how the design turned out. Size and width is perfect.
 

Attachments

  • Table Lite Model (1).jpg
    Table Lite Model (1).jpg
    77.5 KB · Views: 2,193
  • Picture 011.jpg
    Picture 011.jpg
    96.2 KB · Views: 2,181
  • Picture 017.jpg
    Picture 017.jpg
    97.4 KB · Views: 2,194
  • Picture 025.jpg
    Picture 025.jpg
    93.7 KB · Views: 2,178
Last edited:

berko

Aggressively passive
Silver Member
Light looks great.

Unless you have a ton of oak just laying around, it might be nice to buy some high quality veneer and get some contrasting/accenting wood in there.
 

Mark Griffin

AzB Gold Member
Gold Member
Silver Member
WOW - what a good job!

Dsoriano-

Great job.
I cannot believe you are builidng this a such a reasonable number.

I have NOT read all 8 or 9 pages BUT -

I think you should make your light bigger. You show 4'6" in length. If you go with floursecent bulbs (as I read), you will find they probably do not give you the light you want.

I (with a friend) built and designed the CSI/Diamond lights everyone sees at the various tournaments around the country. We went with 5' floursecent (4 bulbs) T-5. The key is the parabolic grid. Not the white plastic, the chrome style. These lights would be overkill and over budget for you room but you might want to at least go 5' inlength.

Lighting is VERY importnat with everything you are doing.

And you are doing a GREAT JOB!!!

Mark Griffin
 

dsoriano

AzB Silver Member
Silver Member
Speaker Feeds

Here I stubbed out and cleaned up the speaker feeds. Even though everything will eventually be covered up I like for it to look clean and neat. I will be installing Terminal Speaker Binding post wall plates for the finish.
 

Attachments

  • Picture 030.jpg
    Picture 030.jpg
    97.4 KB · Views: 2,121
  • Picture 029.jpg
    Picture 029.jpg
    95.6 KB · Views: 2,113
  • wall plate.JPG
    wall plate.JPG
    25.3 KB · Views: 2,103

Dan White

AzB Silver Member
Silver Member
Actually I did consider that and ran the idea pas my wife, she didn't go for it.

We put a urinal in our store, which my wife objected to at first. After awhile she realized that nobody was peeing on the toilet seat. Now she loves the urinal. :p
 

Dan White

AzB Silver Member
Silver Member
I didn't read every single post in this thread, but here's a question: Did you plan on accommodating a ball polisher? I couldn't do without one now. Some are designed to be set down into a counter. If you get one be sure it isn't too far from the tables so it is easy to use. Also, get one that fits all 16 balls at the same time.

Awesome project, very envious. Can't wait to see the finished product!
 

dsoriano

AzB Silver Member
Silver Member
The rules call for the lights to be at least 40 in above the table bed. If you put them at 30 in you will ding your shaft on them.

http://www.wpa-pool.com/web/WPA_Tournament_Table_Equipment_Specifications

Check no. 15.

Jim Eales

That's odd, every thing I've read states 29.5". I 've even measured all the pool rooms Ive been to. An easy way to measure is stand your shaft on the table and you'll notice the light is just above the tip. Never seen one higher than that.
 

dsoriano

AzB Silver Member
Silver Member
Light looks great.

Unless you have a ton of oak just laying around, it might be nice to buy some high quality veneer and get some contrasting/accenting wood in there.

With a little over a half sheet of a grade A oak plywood, I can make both lights. Which I will have left from the wainscoting. I'm not a veneer kind of guy. Thanks for the idea though.
 

Alex Kanapilly

AzB Silver Member
Silver Member
What a great project! Nice job, you're a lucky man.

BTW, from some of the posts, it looks like there's some interest in AutoCAD. If anytone wants a good CAD program that costs nothing, check out sketchup by google. There's a free version that does a lot, the full version is $150 (compared to well over $2500 for AutoCAD). It's not as powerful as AutoCAD, but it can do everything you've seen in this thread and a lot more. Just an FYI.
 

dsoriano

AzB Silver Member
Silver Member
Drywall

I picked up the drywall this weekend and a bucket of screws. I'll be installing 5/8" 12 ft's on the ceiling and 1/2" on the walls. I'm not quite done yet with the plumbing and HVAC connections, but I can at least start in the main room. I'll rent a drywall lift and start installing this coming weekend.
 

Attachments

  • Picture 012.jpg
    Picture 012.jpg
    96.6 KB · Views: 2,035
  • Picture 013.jpg
    Picture 013.jpg
    93.4 KB · Views: 2,032

"Popeye"

living vicariously
Silver Member
This is just great. Thanks for sharing your journey. I wasn't a member of AZ when I refinished the basement to make my pool room and wish I could have shared my highs and lows with the build. Its looks great so far.
Cheers, Mark
 

david(tx)

AzB Silver Member
Silver Member
I picked up the drywall this weekend and a bucket of screws. I'll be installing 5/8" 12 ft's on the ceiling and 1/2" on the walls. I'm not quite done yet with the plumbing and HVAC connections, but I can at least start in the main room. I'll rent a drywall lift and start installing this coming weekend.


Hey , have enjoyed following your journey and progress and appreciate your posting the pictures , beats visualizing , and i know it takes up some of your time . See you followed the house themes a little . Is the ground there clay or sandy ?

Like the simplicity of your structure , and the window size , makes it tough for a smash and grab . Looking forward to the completion , hope you and your family have a great time in there.:clapping:
 

PETROBOY

AzB Silver Member
Silver Member
Your room looks fantastic, I look forward to seeing more updates. Thank you for taking the time to keep us updated.
 

$TAKE HOR$E

champagne - campaign
Silver Member
Great looking room you have so far. In case it hasnt been asked, that entire building is setting on concrete blocks?
 

FSutton

Full Rack Banks only!
Silver Member
I live in Austin... Wanna play sometime? I'll let you hit with my brand new South West... :) very nice room I'd like to have something like that when I get older..
 

dsoriano

AzB Silver Member
Silver Member
Drywall Phase

With the help of my wife I started to install the drywall on the ceiling. I rented a lift for $30. It's a great investment, especially if you're installing 12 ft sheets, even more so if they're 5/8" like these are. I can't imagine doing it any other way.
 

Attachments

  • p-0002 (18).jpg
    p-0002 (18).jpg
    86.2 KB · Views: 1,719
  • p-0002 (19).jpg
    p-0002 (19).jpg
    92.8 KB · Views: 1,793
  • p-0002 (20).jpg
    p-0002 (20).jpg
    89 KB · Views: 1,794
Top