Let's Talk About the "Southwest" Roll

[...]

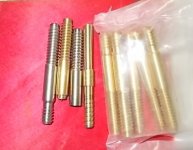
I am new to Hardinge lathes but am going to try the brass tapered collets that were taper machined on a CNC lathe to match my butt and shaft tapers at the size I install my pin and thread my shafts..[...]

It's astonishing to me how you boast of incredible - no make that unbelievable - accuracy when installing your joint pin, and yet naively think you'll get the best result using brass emergency collets machined on a different lathe than the one they're to be used on. The gaps in your knowledge and common sense are truly staggering.

If you want the best accuracy possible you will machine the collets on the same lathe they'll be used on later. Doing that automatically compensates for any runout in the headstock, collet seat, and any number of other characteristics of that lathe. You can't reliably get that kind of repeatable accuracy any other way, and as boastful and know-it-all as you are about... well, about everything, it's kind of telling that you aren't even aware of that simple beginner machinist's trick.

You ought to be embarrassed. Your personality quirks ensure that you aren't, of course... but you ought to be.

TW
 
To know if there is an issue in the cue running out in the middle with it between centers with both ends turning true, we would need to know how the cue was secured at the joint end for starters. If it is screwed into a mandrel and either the mandrel or the cue has a facing problem, the cue will be bent in the middle to get it turning true at both ends, therefore giving a false warped appearance. If the lathe chuck has any run out it will magnify all the way down the cue and force the cue to be pulled/bent over to allow the live center to go into the end of the butt. That will cause run out in the middle of the cue.
 
I built cues for my first several years without a big bore lathe. And I am still convinced that a single bearing in a steady rest is about as good of a way to install a joint pin as you can get. Using two steady rests can assure a cue is actually turning to the tolerances that have been mentioned here. But that still does not assure you will get the pin in perfect.
 
Joey,

.00025 is the pin run out indicated not the differential between the bore and reamed hole of the pin barrel.

Size on size is no go. It has to be a little bigger. Without a ground hole gauge it is pretty hard to hit a bore size when measuring the hole. I guess most must skim cut the bore and test the pin if it don't fit just skim a little more till it goes. In that case the operator would not know the exact size of the hole. He would only know the hole was larger than barrel because it went in. I know my size! .3775

When you bore the hole how do you measure the hole size during the boring process.

Rick
The barrel is .372". You have to ream that hole to .3775" to be able to get it straight . WHAT DO YOU CALL THAT ? The hole is not straight , so you have to make that hole bigger.

There is no freaking way that hole is .3775" after reaming .
You still don't get it . You're talking from the side of your mouth .
IF YOU CAN REAM THAT HOLE TO .3775, you can ream it at .372".
And with an oversized minor hole for the bottom threads, your screw would indicate within a thou or less IF YOU CLAIM YOU CAN REAM TO WITHIN HALF A THOU. Not .3770", but .3775"?
If you can ream that accurately, why the heck are you bothering with over sized hole and manipulating the joint screw ?

Pic attached is some screws and chopped screws.
The SS one has a barrel of .381".
The brass has a barrel of .382".
I use the chopped screws to gauge the barrel hole .
I don't care what kind of caliper you have . Using a caliper to measure that hole is not as good as using a plug gauge.

Now, imagine SW installing their screw that has no barrel.
You have to give them a lot of respect for that . Not an easy thing to do.

PS
If you can hold tolerance within a thou of concentricity, you will have no need for a sanding mandrel before finish.
 

Attachments

  • Pins.JPG
    Pins.JPG
    61.1 KB · Views: 954
Having run a surface grinder a few time i can say that Machinist who run these machines can hold accuracy levels in the tenth's and it can be measured with micrometers with a veneer scale. One of the tricks to using a surface grinder is that the spindle has to run for some time to warm up the bearings and they leave them running all day. Even the centrifical force of turning the spindle off then back on after dressing the wheel can throw it off enough to scrap a part.

Shop's that produce parts with an accuracy in the tenth's also have a metrology lab with separate climate control and all parts must be allowed to normalize for a period of at least 12 hour to be measured at those levels. All measuring equipment must be sent to NIST at least once a year for a certification sticker. Even with the best Interrapid tenth's indicator even the angle of indicators arm is an issue. If anyone concerned want to google cosine error it will explain it better than I can.

As Jake pointed out that an indicator placed on one end of a 3 inch joint screw doesn't mean the other end of that pin (which cannot be measured) is concentric and on the same theoretical center line.

At a TIR of only 2 tenth's many factors come into play as others have said. Things like spindle bearing, chuck type and wear, the quality of the tools used to cut it. At that level even the surface roughness of the pin come into play and the coating on it if any is applied. If the pins have cut threads on them and not ground threads If cut on a cnc lathe a 64 RMS finish would be a great finish but that could still equate to a tenth of TIR on its own.

I don't think even a Hardinge manual lathe on its best day has a spindle that runs at 2 tenth's. There's also the accumulation of tolerance in the parts Say the spindle, face plate,chuck body, and collet all have 5 tenth's accuracy assigned to them you could have as much as 2 thousandths run out.

One thousandth of on inch is all that is needed to change a part from a light press fit to a slip fit. If one wants to take the time to look up in the machinery hand book under part fit two parts machined to the exact same size to a half thousandth interference is a light press but it changes as the size of the part changes.
 
Just a little info, Joey Gold uses an old Clausing lathe retrofitted with digital read.. Not sure if the chuck is a Hardinge but the machine is extremely accurate....

..... Ok back to the movie....:)
 
...
As Jake pointed out that an indicator placed on one end of a 3 inch joint screw doesn't mean the other end of that pin (which cannot be measured) is concentric and on the same theoretical center line.

...

Doesn't everyone in here with any sense understand this? I make no claims of being a machinist, but this is like the twilight zone to me. Everyone (or at least most everyone?) but Rick knows with such a large hole the chances of the pin being straight after artificial manipulation are very slim. This is such a simple concept in the world of machining that these conversations about it and Rick's .00025 perspective and attitude is almost astounding.
 
The barrel is .372". You have to ream that hole to .3775" to be able to get it straight . WHAT DO YOU CALL THAT ? The hole is not straight , so you have to make that hole bigger.

There is no freaking way that hole is .3775" after reaming .
You still don't get it . You're talking from the side of your mouth .
IF YOU CAN REAM THAT HOLE TO .3775, you can ream it at .372".
And with an oversized minor hole for the bottom threads, your screw would indicate within a thou or less IF YOU CLAIM YOU CAN REAM TO WITHIN HALF A THOU. Not .3770", but .3775"?
If you can ream that accurately, why the heck are you bothering with over sized hole and manipulating the joint screw ?

Pic attached is some screws and chopped screws.
The SS one has a barrel of .381".
The brass has a barrel of .382".
I use the chopped screws to gauge the barrel hole .
I don't care what kind of caliper you have . Using a caliper to measure that hole is not as good as using a plug gauge.

Now, imagine SW installing their screw that has no barrel.
You have to give them a lot of respect for that . Not an easy thing to do.

PS
If you can hold tolerance within a thou of concentricity, you will have no need for a sanding mandrel before finish.

Like you, I live bore (not all but a lot) holes and use a thread mill to cut threads. For a joint pin install, I ream. Where are Tucker's drill, bore, ream pictures at?

I have a .382 reamer and a .383 reamer. Every once in a while even a pin from Tommy might need a .383. But, most of the time .382 seems to be .0005 larger than the barrel. Perfect. Bore to within .003 (or so) of the reamer diameter and then ream. My reamers are long. At first, I considered cutting them down but someone suggested to me that being long they might follow the bore easier and overcome any very small misalignment of the tail stock. (I never move mine and believe mine is accurately set, but perceived insurance feels nice.)

The last pin I installed my cheap indicator moved about a quarter of a thou dry fit. After glue up it showed about .0005. That was my best viewed result I can recall. My typical result is around .001-.00125. A "straight" pin that was not manipulated that shows .001 is better every day of the week than an artificially manipulated .00025 pin that is in all probability canted due to floating in an epoxy filled and over sized hole.

Nobody truly gives a shit how Rick installs his pins. It is his BS tolerance claims that he throws around which are implausible (as a standard every time) to begin with and ludicrous when considering his method doesn't hold up to sound machining principles.
 
Way too many personalities and egos. Ask as simple question and the mud goes flying every time. Some things never change.


It's astonishing to me how you boast of incredible - no make that unbelievable - accuracy when installing your joint pin, and yet naively think you'll get the best result using brass emergency collets machined on a different lathe than the one they're to be used on. The gaps in your knowledge and common sense are truly staggering.

If you want the best accuracy possible you will machine the collets on the same lathe they'll be used on later. Doing that automatically compensates for any runout in the headstock, collet seat, and any number of other characteristics of that lathe. You can't reliably get that kind of repeatable accuracy any other way, and as boastful and know-it-all as you are about... well, about everything, it's kind of telling that you aren't even aware of that simple beginner machinist's trick.

You ought to be embarrassed. Your personality quirks ensure that you aren't, of course... but you ought to be.

TW

TW,

I have stated that I am not a machinist. Maybe your perceived personality quirks can be related to all of the LSD and other mind bending drugs I did in the 60s and early 70s. I definitely had a lot of brain rebuilding to do after that period. I am surly a different person than I would have become.. LOL I don't know if it was for the good or the worst but I wouldn't change a thing if I could do it over. Lot of fun and free love.

Allen ordered the collets and I am sure he will be doing the tapering as you have suggested. And this was something I was aware of using the same machine. May be he will be cutting the undersized tapers on the CNC lathe and then finish it off mounted on the specific maching as you have suggested. This stuff I will leave to a pro. I just want to build the best cue I can.

He is a professional machinist who specializes in prototype work and is a CNC instructor so I would be stupid to intervene in any way.

If this does not work so what, it was worth the college try.

I am not a "know it all" but after building cues for 11 years I am in a very good place with Esoteric Cue.

Rick
 
Last edited:
The barrel is .372". You have to ream that hole to .3775" to be able to get it straight . WHAT DO YOU CALL THAT ? The hole is not straight , so you have to make that hole bigger.

There is no freaking way that hole is .3775" after reaming .
You still don't get it . You're talking from the side of your mouth .
IF YOU CAN REAM THAT HOLE TO .3775, you can ream it at .372".
And with an oversized minor hole for the bottom threads, your screw would indicate within a thou or less IF YOU CLAIM YOU CAN REAM TO WITHIN HALF A THOU. Not .3770", but .3775"?
If you can ream that accurately, why the heck are you bothering with over sized hole and manipulating the joint screw ?

Joey,

The whole idea is not to have a tight fit, remember. Then I can set the pin in the position I desire. Not, "this pin is out over a thou off, now I have the plug and re bore and hope it is better next time. Or even worse, " it's out over a thou, It will be alright". I don't fly like that.

That is what the encapsulation of the epoxy structure media does as a structural annulus gap filler. Along with the pin set gizmo, there is no canting. BTW, That device is not as simple as it looks.

Did you think I would slip a detail like that.

I want the mechanics to do as my will dictates. To have those thoughts, sometimes you have to approach things from a view point that is 180 degrees from what is thought to be conventional. Thinking outside the box and not being afraid to try new things made me a multi millionaire. I think I will keep my methods going against the grain with a questioning attitude, thank you.

I always answer your questions, why don't you answer my simple ones addressed to you.

What amuses me it that everyone gets in such a bothered condition and does not give one thought to the fact that I am getting these results and am sharing this stuff with them. They would rather say "this is the way I was taught and the way everyone else is doing it". "How dare you do it in a different way and how dare you think you can get the results you show on the video. Something must be rigged, what about spindle bearing run out, your tail stock can't be that good?

The floating pin concept I have been using now for over 8 years compensates for all of the tiny variables. If the cue is held at the nose and butt and you can shim the cue to zero indicated within the tapered collet, then that starting point makes my method work and also makes your method work better.

Rick


This gizmo is a tensioning device that faces to the cue thrusting the pin into a position where the epoxy can cure with the pin is concentric to the slightly over sized bore. It is a very simple tool I made for just that reason. No magic trick or smoke and mirrors, it just works.

 
Joey,

The whole idea is not to have a tight fit, remember. Then I can set the pin in the position I desire. Not, "this pin is out over a thou off, now I have the plug and re bore and hope it is better next time. Or even worse, " it's out over a thou, It will be alright". I don't fly like that.

Rick, you can word it any way you want. You can paint it any way you want.
It's a WORK-AROUND.
It's a work around to a set-up that cannot hold tolerances tight enough for a pin to sit right at a thou or less of run-out.
I designed and sold a jig to work around inaccurate 3-jaw aluminum jaws Taig lathe .
I can get that gizmo you show cnc'd with 4 indexed set screws and that pin would indicate close to zero.

EVERYONE thinks outside of the box if you are in this venture long enough.
But, don't paint the outside of the box in gold .

I did answer your question.
From the pic I posted, some can figure out how to make life easier .
 
Last edited:
Joey,

The whole idea is not to have a tight fit, remember. Then I can set the pin in the position I desire. Not, "this pin is out over a thou off, now I have the plug and re bore and hope it is better next time. Or even worse, " it's out over a thou, It will be alright". I don't fly like that.

That is what the encapsulation of the epoxy structure media does as a structural annulus gap filler. Along with the pin set gizmo, there is no canting. BTW, That device is not as simple as it looks.

Did you think I would slip a detail like that.

I want the mechanics to do as my will dictates. To have those thoughts, sometimes you have to approach things from a view point that is 180 degrees from what is thought to be conventional. Thinking outside the box and not being afraid to try new things made me a multi millionaire. I think I will keep my methods going against the grain with a questioning attitude, thank you.

I always answer your questions, why don't you answer my simple ones addressed to you.

What amuses me it that everyone gets in such a bothered condition and does not give one thought to the fact that I am getting these results and am sharing this stuff with them. They would rather say "this is the way I was taught and the way everyone else is doing it". "How dare you do it in a different way and how dare you think you can get the results you show on the video. Something must be rigged, what about spindle bearing run out, your tail stock can't be that good?

The floating pin concept I have been using now for over 8 years compensates for all of the tiny variables. If the cue is held at the nose and butt and you can shim the cue to zero indicated within the tapered collet, then that starting point makes my method work and also makes your method work better.

Rick


This gizmo is a tensioning device that faces to the cue thrusting the pin into a position where the epoxy can cure with the pin is concentric to the slightly over sized bore. It is a very simple tool I made for just that reason. No magic trick or smoke and mirrors, it just works.


Your gizmo there is nothing more than a fancy nut. The locking force it provides you is what allows you to then center your pin. You bore your hole oversized and as such need another device to indicate center on your pin. And you're right it's not smoke and mirrors, it's extra work that isn't needed. Out of all these cue makers in the world, you're the only one making claims like you do Rick. Doesn't that tell you something about the way you do things. If cue makers who have been making cues for 30 years don't use the words you do. Don't use your methods, and don't agree with you one bit. Aren't you the slightest bit intrigued to as why?

And for the record, you are not getting the results you claim. There is no way in hell you can get your pin to run perfectly true to that low of run out when you bore an oversized hole. You lie so much you've begun to believe yourself. It's a condition from burning your brain out on drugs like you claim.
 
Last edited:
Your gizmo there is nothing more than a fancy nut. The locking force it provides you is what allows you to then center your pin. You bore your hole oversized and as such need another device to indicate center on your pin. And you're right it's not smoke and mirrors, it's extra work that isn't needed. Out of all these cue makers in the world, you're the only one making claims like you do Rick. Doesn't that tell you something about the way you do things. If cue makers who have been making cues for 30 years don't use the words you do. Don't use your methods, and don't agree with you one bit. Aren't you the slightest bit intrigued to as why?

And for the record, you are not getting the results you claim. There is no way in hell you can get your pin to run perfectly true to that low of run out when you bore an oversized hole. You lie so much you've begun to believe yourself. It's a condition from burning your brain out on drugs like you claim.


Ok,

Install one of your pins and take a video indicating your TRO.

I will be happy to watch it.

Rick
 
Rick, you can word it any way you want. You can paint it any way you want.
It's a WORK-AROUND.
It's a work around to a set-up that cannot hold tolerances tight enough for a pin to sit right at a thou or less of run-out.
I designed and sold a jig to work around inaccurate 3-jaw aluminum jaws Taig lathe .
I can get that gizmo you show cnc'd with 4 indexed set screws and that pin would indicate close to zero.

EVERYONE thinks outside of the box if you are in this venture long enough.
But, don't paint the outside of the box in gold .

I did answer your question.
From the pic I posted, some can figure out how to make life easier .


Joe,

The question was:

When you bore the hole how do you measure the hole size during the boring process?

If you think that your not boring your hole bigger than the barrel then I can not help you on that one. How much bigger is your hole and how do you measure it.

I know mine is .3375 over the .372 barrel.

That is pretty simple.

A DRO does not measure a hole size.

A reamer follows a smaller smaller bored hole and gives you a number. In my case the number is large enough to give me the small annulus gap that I desire at a pre determined RPM speed. Higher speed cause the the reamer to ossilate like a Reed on a clarinet and can make the hole a bit bigger.

Rick
Caliper, 3/8 drill shank as gauge and chopped joint screw .

If you think your .3775" reamer really creates a .3775" hole, then you should use a .372" or .3725" reamer . This thought escapes you somehow.

I don't use the chuck as that's where the lathe vibrates the most.
Steady rest and bearing work for me.
Now, if you can mount a 4-jaw ( independent ) on a steady rest, that would be the nuts.

Some old timers actually used a drill press to drill their joint screws' holes.
 
"Two-tenths Rick" doesn't understand why other cuemakers doubt his claims of repeatably getting 0.00025" tir accuracy. And we don't understand why he can't understand our doubt.

Here's why, Rick. It's your methods. Floating a pin in a loose hole filled with epoxy is NOT good workmanship no matter how you try to color it. Your entirely unearned sense of superiority - combined perhaps with your history of drug abuse - has you believing you're so smart that conventional machining practices, established over a few hundred years of carefully honed experience, don't apply to you. "Thinking outside the box" is fine, and anyone can do it. But whether or not those outside-the-box thoughts turn out to be lunacy is an entirely different matter.

Here's a fine example I found among your cuemaking videos: http://s636.photobucket.com/user/scdiveteam/media/IMG_1867_zpskfhujzwd.mp4.html

In this video you show rolling an assembled cue to prove how straight it is. We know this is a recent video because we can see your nearly finished "Scimitar Cue" in the same frame.

I took a quick screen-cap, and enlarged a portion of the photo to show the surface you're rolling the cue on. Holy crap! That felt-covered rail has got to fluctuate by at least 0.100" with lumps and bumps - and we can't even see how bad the butt end is.

There's a cue chucked into a lathe near the tip of the shaft, and I guess you set up your camera angle to use that cue as a reference line - apparently to show how straight you think the rolling cue is. But the fact that you think this video proves anything is a clear measure of just how delusional your thinking must be.

.
Two-tenthsRick_zps756b3353.jpg


TW

 
Last edited:
"Two-tenths Rick" doesn't understand why other cuemakers doubt his claims of repeatably getting 0.00025" tir accuracy. And we don't understand why he can't understand our doubt.

Here's why, Rick. It's your methods. Floating a pin in a loose hole filled with epoxy is NOT good workmanship no matter how you try to color it. Your entirely unearned sense of superiority - combined perhaps with your history of drug abuse - has you believing you're so smart that conventional machining practices, established over a few hundred years of carefully honed experience, don't apply to you. "Thinking outside the box" is fine, and anyone can do it. But whether or not those outside-the-box thoughts turn out to be lunacy is an entirely different matter.

Here's a fine example I found among your cuemaking videos: http://s636.photobucket.com/user/scdiveteam/media/IMG_1867_zpskfhujzwd.mp4.html

In this video you show rolling an assembled cue to prove how straight it is. We know this is a recent video because we can see your nearly finished "Scimitar Cue" in the same frame.

I took a quick screen-cap, and enlarged a portion of the photo to show the surface you're rolling the cue on. Holy crap! That felt-covered rail has got to fluctuate by at least 0.100" with lumps and bumps - and we can't even see how bad the butt end is.

There's a cue chucked into a lathe near the tip of the shaft, and I guess you set up your camera angle to use that cue as a reference line - apparently to show how straight you think the rolling cue is. But the fact that you think this video proves anything is a clear measure of just how delusional your thinking must be.

.
Two-tenthsRick_zps756b3353.jpg


TW


TW,

I must admit you are one hell of an observer.

I am going to change that felt as it is very thick and not dimensionally uniform.

I used to have a pool table in my shop but needed more space. That flat surface on top of my assembly table needs some TLC. When you posted how important the table tolerance was you were reading my mind concerning this rail in the video.

Rick

PS that is not the scimitar cue. It has a turquoise compounds and the forearm is not splattered with variations of the same inlay. I am listening to your advise you see and will be posting this cousin cue shortly. Still not an art cue but a fancy player.

After see Steve Klien's post on the video camera with the cross hairs I will be doing some drop in veneer pockets in some future point cue forearms.
 
Last edited:
Will it ever end! Place your bets on how many pages this will go on for!


Hey anyone know what the popcorn emoticon is?
 
Back
Top