For future reference (to Derek) - you can save the diagram by clicking the save button at bottom left,
and it pops up an option for "save PNG" or "save SVG".
Choose save png and that will bring up an image of your diagram.
You can then share the link to that image, or save the pic itself to your computer.
The link to the image should look like this:
https://pad.chalkysticks.com/3b1b1.png
And if you remove the .png at the end, that will bring people to the original diagram
where they can move the balls around and draw lines (but not on the phone, just desktop).
https://pad.chalkysticks.com/3b1b1
My first instinct is what Grindz said. I guess the 1 was makeable but I would hope not to make it.
Instead I'd try my best super soft safety like this:
https://pad.chalkysticks.com/67159.png
Locking onto the 10 as shown would be kind of a miracle, but I wouldn't worry about selling out the 10,
the problem is if they are able to see the 13 in the side. You just pray they either can't see it, or they can but they dog it.
Then you can start a proper runout with the hanging 1 ball and easy 2.
In fact, a failed shot on the 13 might get you position your biggest problem, the 4.
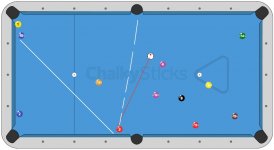
If you feel like the opponent can't miss and you must run out right now, I think the 3 bank is the shot,
since we know in hindsight the 1 can be thrown in. Shape on the 2 is automatic, then from the 2...
I would hope to fall straight on the 4 if it passes to the corner. Like this: https://pad.chalkysticks.com/02aad.png
Afterwards, you throw in that 1 and take what you can get on the 2.
I'm not sure how hard you can afford to hit the cue ball while twirling in that 1.
You might be stuck trying to carom the 8 off the 11 or something.
and it pops up an option for "save PNG" or "save SVG".
Choose save png and that will bring up an image of your diagram.
You can then share the link to that image, or save the pic itself to your computer.
The link to the image should look like this:
https://pad.chalkysticks.com/3b1b1.png
And if you remove the .png at the end, that will bring people to the original diagram
where they can move the balls around and draw lines (but not on the phone, just desktop).
https://pad.chalkysticks.com/3b1b1
My first instinct is what Grindz said. I guess the 1 was makeable but I would hope not to make it.
Instead I'd try my best super soft safety like this:
https://pad.chalkysticks.com/67159.png
Locking onto the 10 as shown would be kind of a miracle, but I wouldn't worry about selling out the 10,
the problem is if they are able to see the 13 in the side. You just pray they either can't see it, or they can but they dog it.
Then you can start a proper runout with the hanging 1 ball and easy 2.
In fact, a failed shot on the 13 might get you position your biggest problem, the 4.
If you feel like the opponent can't miss and you must run out right now, I think the 3 bank is the shot,
since we know in hindsight the 1 can be thrown in. Shape on the 2 is automatic, then from the 2...
I would hope to fall straight on the 4 if it passes to the corner. Like this: https://pad.chalkysticks.com/02aad.png
Afterwards, you throw in that 1 and take what you can get on the 2.
I'm not sure how hard you can afford to hit the cue ball while twirling in that 1.
You might be stuck trying to carom the 8 off the 11 or something.
![CropperCapture[227].png](https://forums.azbilliards.com/data/attachments/374/374732-8e74399df04829c323b928041a1820d8.jpg "CropperCapture[227].png")