You are using an out of date browser. It may not display this or other websites correctly.
You should upgrade or use an alternative browser.
You should upgrade or use an alternative browser.
Custom Pool Room
- Thread starter dsoriano
- Start date
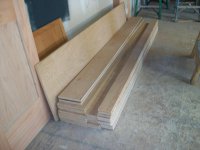
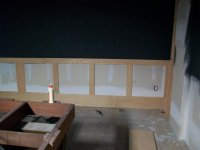
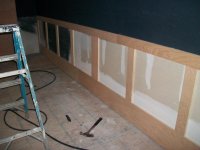
Started wainscoting
Well with the holliday I thought I'd really get some work done, WRONG!:sorry: Friday I spent most of the day ripping the stiles and rails for the wainscoting, and Monday I took the family out and by the time I got back it was 3-ish. So I didn't get as much done as I wanted.
I started puting up the wainscotting around the room and inserted the inner panels on the build-outs. My goal was to complete the intire room. I at least got half way.
Attachments

Last edited:
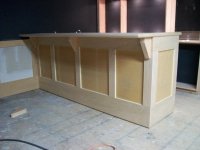
Bar
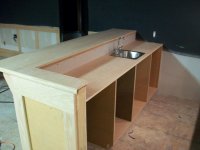
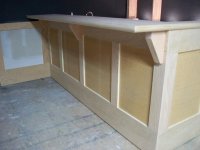
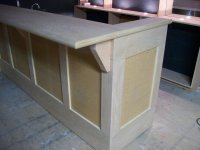
Here I added the counter and Bar tops. I also started adding the oak trim on the bar. I attached the oak top to the MDF with wood glue and #10 wood screws from underneath. I used 1-1/2" half round oak for the counter edge and 45'd the corner. I'll be adding square stock to the back side after I tile the back-splash.
With the counter being really solid I almost didn't add the corbles, but I'm glad I decided too. The counter looked a little to much like a kitchen counter without them. I was thinking of buying some but once I saw how expensive they were ($30-$100 ea!) I decided I would make them. I used some scrap plywood I had laying around and joined three pieces then ran them on the table saw then glued and srcewed them in before I added the bar top to hide all the screws. Then I added the veneer to the front side and gave it light sand. They make a big difference in how the bar looks. I'm glad I didn't get tired and skip this step. With so much detail work needing to be done it's pretty easy to want ot skip some steps. So I have really been trying to stick to my plans.
Attachments
your room is really starting to come together. I am amazed at what you have done so far, can't wait to see if completed. :thumbup:
Wow, this project has turned from a boys club house to a mini night club very quickly.
In the cue repair, building world, I can always appreciate the guys who are innovative. As in, they don't wait around for others to build them jigs and such, they come up with a design and build it themselves.
Same here, we got a guy who doesn't have to hire contractors to do his bidding. My Dad was a very good carpenter. One of the things he possessed
is a minds eye. He would incorporate his carpentry skills with landscaping for example, and boom, you had something that was unbelievable. All he had to do is think of it and it was a done deal. See, same here.
The difference between doing it yourself and hiring out is literally thousands of dollars. And the most important part, the satisfaction of doing it yourself and a job well done.
I can only do certain jobs myself and have had to hire people for the rest.
Its very disappointing to spend hard earned money only to have to redo a job yourself.
Great job Bud, I can't wait to see the finished Club House.
Here I added the counter and Bar tops. I also started adding the oak trim on the bar. I attached the oak top to the MDF with wood glue and #10 wood screws from underneath. I used 1-1/2" half round oak for the counter edge and 45'd the corner. I'll be adding square stock to the back side after I tile the back-splash.
With the counter being really solid I almost didn't add the corbles, but I'm glad I decided too. The counter looked a little to much like a kitchen counter without them. I was thinking of buying some but once I saw how expensive they were ($30-$100 ea!) I decided I would make them. I used some scrap plywood I had laying around and joined three pieces then ran them on the table saw then glued and srcewed them in before I added the bar top to hide all the screws. Then I added the veneer to the front side and gave it light sand. They make a big difference in how the bar looks. I'm glad I didn't get tired and skip this step. With so much detail work needing to be done it's pretty easy to want ot skip some steps. So I have really been trying to stick to my plans.
LIVE stream????? I would like to stream the first match.
dsoriano v Bigtruck :shocked2:

Ray
(serious)
Wow, this project has turned from a boys club house to a mini night club very quickly.
Same here, we got a guy who doesn't have to hire contractors to do his bidding. My Dad was a very good carpenter. One of the things he possessed
is a minds eye. He would incorporate his carpentry skills with landscaping for example, and boom, you had something that was unbelievable. All he had to do is think of it and it was a done deal. See, same here.
The difference between doing it yourself and hiring out is literally thousands of dollars. And the most important part, the satisfaction of doing it yourself and a job well done.
Great job Bud, I can't wait to see the finished Club House.
Thanks, you coudn't be more right. So far I've spent anywhere from $6-$7000 in materials. If I would have paid contractots it could easily be $10,000 in labor alone. That's one thing my Dad taught me, is, learn to to do things right, and you'll save your self some money and alot of headaches.
I have plans on tallying up all my expenses when I'm done to get a final number on what this room set me back and I'll be sure to post the final numbers.
But if you have someone else do it, you save on a lot of backaches and missing fingers.
. I have a ton of admiration for what you are doing and really enjoying your thread. I hope you invite everyone over for the grand opening though.Admirable work sir keep up the good work
LIVE stream????? I would like to stream the first match.
dsoriano v Bigtruck :shocked2:
Ray
(serious)
Can I be a railbird? I'll come up and sweat some action.. just make sure you build Truck a platform for streaming so all the future big money matches can be streamed.
Thanks, you coudn't be more right. So far I've spent anywhere from $6-$7000 in materials. If I would have paid contractots it could easily be $10,000 in labor alone. That's one thing my Dad taught me, is, learn to to do things right, and you'll save your self some money and alot of headaches.
I have plans on tallying up all my expenses when I'm done to get a final number on what this room set me back and I'll be sure to post the final numbers.
I would gladly pay you that amount and more to come out and build this at my place. I could try to do this on my own but I'm having enough problems just replacing the carpet with hardwood floors!
Like Kano said, your work is inspiring. Keep it up! Everything looks great so far!
By the way, have you looked into the dance lessons? Tienes que bailar con tu esposa! She deserves at least a night out dancing!
He tratado. Las cumbias y las coridas, las estoy aprendiendo, pero lo que son las merengues y las salsas NO PUEDO MOVER MIS CADERAS!!
He tratado. Las cumbias y las coridas, las estoy aprendiendo, pero lo que son las merengues y las salsas NO PUEDO MOVER MIS CADERAS!!
Muy chistoso! De donde eres?
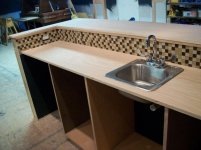
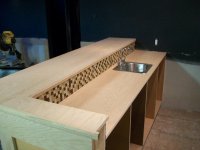
Another weekend
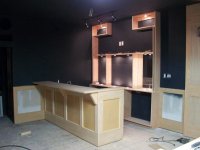
I had ideas about the back splash. To keep cost down I was considering applying 1/4 plywood oak but that would clash with the bar and counter top being all the same. I wanted to install mosaic tile but the stuffs expensive. Well on one of my regular visits to Lowes I found just what I was looking for on sale! It was marked down from $10 to $3 a sq sheet. As I was looking at them I realized why, even though all the sheets were the same, there was a big discoloration difference in all of them. Fortunately I only needed five sq ft. After going thru several boxes I found 5 identical sheets I could use. As soon as I got home I installed these in 15minutes. I still need to grout before I attach the counter top.
I had ideas about the back splash. To keep cost down I was considering applying 1/4 plywood oak but that would clash with the bar and counter top being all the same. I wanted to install mosaic tile but the stuffs expensive. Well on one of my regular visits to Lowes I found just what I was looking for on sale! It was marked down from $10 to $3 a sq sheet. As I was looking at them I realized why, even though all the sheets were the same, there was a big discoloration difference in all of them. Fortunately I only needed five sq ft. After going thru several boxes I found 5 identical sheets I could use. As soon as I got home I installed these in 15minutes. I still need to grout before I attach the counter top.
Attachments

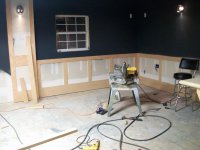
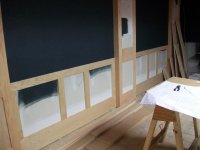
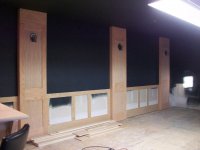
I continued wainscoting and I was able to complete the stile and rails on the east wall. I need very little to do on the front wall. After this phase is complete I'll begin installing the recess 1/4" panels.
Attachments
dsoriano...Again, thanks for sharing this with all of us. There is nobody here who cannot be impressed with your design and carpentry skills! I'm looking forward (as I'm sure are you) to seeing the finished room!
Scott Lee
www.poolknowledge.com
Scott Lee
www.poolknowledge.com