You are using an out of date browser. It may not display this or other websites correctly.
You should upgrade or use an alternative browser.
You should upgrade or use an alternative browser.
Custom Pool Room
- Thread starter dsoriano
- Start date
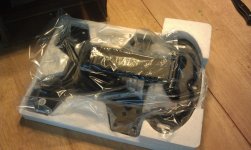

Table Break-down
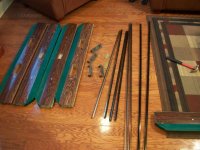
I began removing all of the trim pieces off of the tables to send to powder coating. Anything that was metal came off.
The name plates were a little dificult to remove but eventually they pried loose.

Here I removed the counters. These had more moving parts than I anticipated. I popped the rod out to remove the plastic counters from the casing. Notice how dirty they are. They were barely readable. I should have taken a picture of the clear plastic cover on the other side to show how bad they were.


I began removing all of the trim pieces off of the tables to send to powder coating. Anything that was metal came off.
The name plates were a little dificult to remove but eventually they pried loose.
Here I removed the counters. These had more moving parts than I anticipated. I popped the rod out to remove the plastic counters from the casing. Notice how dirty they are. They were barely readable. I should have taken a picture of the clear plastic cover on the other side to show how bad they were.
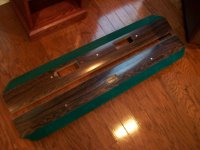
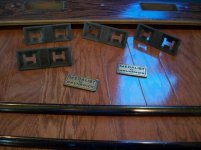
Here are pics of the trim pieces that came off of the rail edges. Notice how tarnished the counters and the name plates are. I'm realy excited to see how they turn out after powder coating.
Attachments
When I saw the first pics of the floor being set on piles, I had it in my mind that this was just going to be a place to house a pool table.
A few amenities possibly. I had no idea that he was going to be erecting a first class gentleman's club house. If he ever decides to move, the club house will have to come with him as I doubt he would ever want to take on a
second project such as that.
I can't wait to see the completed project with the table ready. This is definitely way beyond a labor of love.
I still think you should indulge the wife and take some dance lessons with her. If I was closer, the lessons would be free in trade for a few games in the room.
Last edited:
WTF?! Can't you do anything right?!!?Well
. I lost my camera USB cable and ordered a new one. Since posting the last pics I've lost the new cable!:
.:grin:
hahahahaha
Daniel, do they need help where you work?
WTF?! Can't you do anything right?!!?
I'm trying! I'm trying!
Daniel, do they need help where you work?
not at the moment.
Carpet
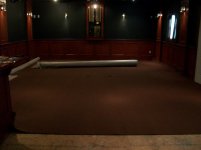
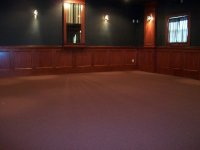
This past weekend was very productive. I was able to give the room a final coat of paint and it really made a big difference. The walls actually look new again.
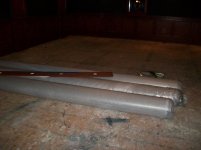
Thursday the carpet got delivered and I was able to get it glued down Friday.
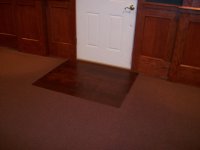
I decided to lay down wood flooring in the entry to help protect the carpet. I had just enough left over from the Bar flooring to put down which was great because I didn't want to put down a different type/color in the room.
Now I just need to pick up some quarter round, stain it and install it and the room will be complete!
This past weekend was very productive. I was able to give the room a final coat of paint and it really made a big difference. The walls actually look new again.
Thursday the carpet got delivered and I was able to get it glued down Friday.
I decided to lay down wood flooring in the entry to help protect the carpet. I had just enough left over from the Bar flooring to put down which was great because I didn't want to put down a different type/color in the room.
Now I just need to pick up some quarter round, stain it and install it and the room will be complete!
Attachments
this is just freaking awesome man ! Now i know what i want for christmas lol ! Can´t wait to see the finished project, just wonder how much all that cost you...? I did not read all that just looked at the pics....
heads off to you, fantastic job !:thumbup:
heads off to you, fantastic job !:thumbup:
Daniel, the room will never be done, you'll find something to add or tweak along the way. I know you will:grin:
BTW I forgot to add, nice choice of color for the carpet, it looks good and adding the wood flooring coming inside the room was a great idea also.
For some reason, I was thinking that you were a bit.....non-receptive to the word "mancave" at the beginning of this, but I clearly see a sign stating as such on the wall. What gives?
I'm bustin' yer balls, btw.
QUOTE]
It's official, all of the “MANCAVE” signs have been taken down. I had to many people pointing them out to me. I finally asked my wife if she would mind, since she bought them and she gave me this weird look and said, “why would I mind” so down they went.
")
Table refinishing
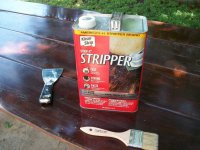
Here are the table skirts and the legs. You can't tell from the pics how bad they really are but some are dented and gouged and are in rough shape. Some panels are loose and I plan on wood glueing and brad nailing all of the loose pieces before I begin to stain. It's gonna take alot of elbow grease to get these down to bare wood. I purchased a stripper to help speed the process.
Here are the table skirts and the legs. You can't tell from the pics how bad they really are but some are dented and gouged and are in rough shape. Some panels are loose and I plan on wood glueing and brad nailing all of the loose pieces before I begin to stain. It's gonna take alot of elbow grease to get these down to bare wood. I purchased a stripper to help speed the process.
Attachments

Last edited:
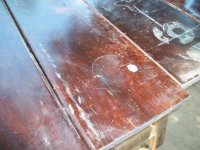
Here I began to strip the finish off of the legs and skirts. Its a lot of work and its a very slow process but I need to get these done. I dropped off the parts at the powder coating shop Monday (4th) and they should be ready in two weeks. I hope to have the refinshing done by then but I'm not sure if it's possible. There is alot of surface area that needs sanding and I can't rush the stripping process. I can't apply the stripper to more than one piece at a time or else it 'll dry by the time I get around to stripping.
This kind of work reminds me of the movie -Finding Nemo- when Dori sings "just keep swiming, just keep swiming" It may sound funny but I find myself repeating these words when I really feel beat down. It really helps.


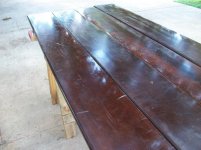
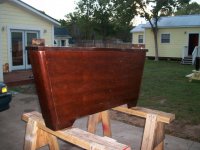
Here you can see the actuall true color of the Mohagany wood. This is after it's been stripped and sanded with 80 grit.

This kind of work reminds me of the movie -Finding Nemo- when Dori sings "just keep swiming, just keep swiming" It may sound funny but I find myself repeating these words when I really feel beat down. It really helps.
Here you can see the actuall true color of the Mohagany wood. This is after it's been stripped and sanded with 80 grit.
You're in the home stretch now, the room is done and is ready for the tables, so Keep Swimming, Keep Swimming.
I just recently went back thru the entire thread and I noticed that at the beginning some of the posts and photos that used to be on here are missing! There was originally some photos of you bringing the tables home in the back of your truck, and there was some photos of where you had dug the trenches for the plumbing (reposted later) and you commented that the ground was so hard that it was back breaking labor. Did you delete them for some reason?
Even with the missing photos there are now over 430 photos on the thread of the progress of the room!
I remember those pics, and no I don't think I deleted it. I barely have time to post pics much less go back review and delete some. I'll see if I can locate it. It may be in a different thread.
Thanks