My ring construction turned out good. All tight and sound. I tried finnishing and making it look good before I went further. I can't get the white scratches marks off the black linnen. I tried sanding, wet sanding, using air hose overhead while sanding. Do I need to turn slow while cutting. Also My whites dont appear all that attractive is there anything I can do to help it out.
You are using an out of date browser. It may not display this or other websites correctly.
You should upgrade or use an alternative browser.
You should upgrade or use an alternative browser.
Finnishing
- Thread starter bubsbug
- Start date

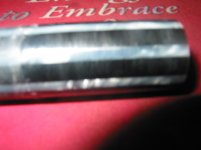

Uhhhhh, either you need a new camera or your indexing is off.bubsbug said:My ring construction turned out good. All tight and sound. I tried finnishing and making it look good before I went further. I can't get the white scratches marks off the black linnen. I tried sanding, wet sanding, using air hose overhead while sanding. Do I need to turn slow while cutting. Also My whites dont appear all that attractive is there anything I can do to help it out.
TellsItLikeItIs said:Uhhhhh, either you need a new camera or your indexing is off.
Yes, you need to stand back slightly to get your image into focus. Can't tell much of anything from your photo's. The white that you see could very well be the finish. If the can or gun is to close to the object being finished or there is moisture in your line then air will be trapped in the finish causing what is called blush. First off, are you sure that you are using L/B phenolic? Sure looks like delrin to me. You also must put centers on both ends of your base material and then make a pass so that the outer radius is the same all through the base material. In this way all of your inlays will be to the same depth when bored. If your base material is not delrin nor something else that cannot take a finish then the tube needs sanded a little better but use no finer grit than 320 or 400. When done sanding, use compressed air to remove as much sanding dust as possible and then clean with a prep. Some use Lacquer thinner, I, myself, use Prepsol wax wash and then let dry before applying a finish.
Dick
bubsbug said:My ring construction turned out good. All tight and sound. I tried finnishing and making it look good before I went further. I can't get the white scratches marks off the black linnen. I tried sanding, wet sanding, using air hose overhead while sanding. Do I need to turn slow while cutting. Also My whites dont appear all that attractive is there anything I can do to help it out.
I also have to agree with the other psoters, it appears that your indexing is off. In addition to that I would in the future make your inserts into the phenolic deep, to prevent bow out's of your rings.
Nice job though over all!!!!!!!
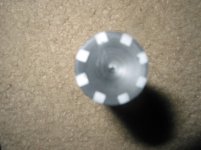
I think I see what it is. Bubs, check to be sure your cutter is centered on the material.
In your last image, the groove at the 7:00 oclock position is not lined up straight to the one at the 1:00 oclock position. Did you move or reposition the cutter in between cuts?
In your last image, the groove at the 7:00 oclock position is not lined up straight to the one at the 1:00 oclock position. Did you move or reposition the cutter in between cuts?
Last edited:
ring
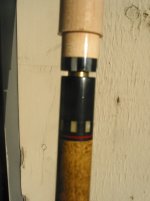
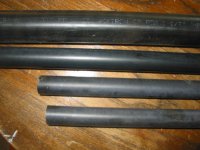
Dick I think you are right. I remembered that I borrowed a peice of black something from a friends shop. I called him just now and asked him if his remaining peices read anything on the side. It did, it read polypenca?????-Quadra?????-Acetron GP ??????????? I looked at a peice of 1-1/2 delrin at home and it read the same thing. Bingo. I recently purchased tubs and rods from atlas. The 1" rod dasn't have anything down the side but is slightly darker then the linnen tubes see pic. How do you tell the diference?
All Is not lost though because I learned something else. I made a ring and put it on scrap dowel see pic. Finnished the best I could. I notice that when I install the ring I first need to put the ring on lose without gluing, then twist the shaft on tight, then align shaft ring with butt ring, then make a pencil marke on ring and shaft for alignment when gluing together on lathe. What ya now! It's a hell'va ride!
Now I will have to wait until after vacation!!
Ps it's probably my cheep camera. The ring is very semetrical and even!
rhncue said:Yes, you need to stand back slightly to get your image into focus. Can't tell much of anything from your photo's. The white that you see could very well be the finish. If the can or gun is to close to the object being finished or there is moisture in your line then air will be trapped in the finish causing what is called blush. First off, are you sure that you are using L/B phenolic? Sure looks like delrin to me. You also must put centers on both ends of your base material and then make a pass so that the outer radius is the same all through the base material. In this way all of your inlays will be to the same depth when bored. If your base material is not delrin nor something else that cannot take a finish then the tube needs sanded a little better but use no finer grit than 320 or 400. When done sanding, use compressed air to remove as much sanding dust as possible and then clean with a prep. Some use Lacquer thinner, I, myself, use Prepsol wax wash and then let dry before applying a finish.
Dick
Dick I think you are right. I remembered that I borrowed a peice of black something from a friends shop. I called him just now and asked him if his remaining peices read anything on the side. It did, it read polypenca?????-Quadra?????-Acetron GP ??????????? I looked at a peice of 1-1/2 delrin at home and it read the same thing. Bingo. I recently purchased tubs and rods from atlas. The 1" rod dasn't have anything down the side but is slightly darker then the linnen tubes see pic. How do you tell the diference?
All Is not lost though because I learned something else. I made a ring and put it on scrap dowel see pic. Finnished the best I could. I notice that when I install the ring I first need to put the ring on lose without gluing, then twist the shaft on tight, then align shaft ring with butt ring, then make a pencil marke on ring and shaft for alignment when gluing together on lathe. What ya now! It's a hell'va ride!
Now I will have to wait until after vacation!!
Ps it's probably my cheep camera. The ring is very semetrical and even!
Attachments
manwon said:I also have to agree with the other psoters, it appears that your indexing is off. In addition to that I would in the future make your inserts into the phenolic deep, to prevent bow out's of your rings.
Nice job though over all!!!!!!!
On ring depth this is what I did. If I know my joint size is say .840 and my ring through hole is say .630 then I split the difference and make sure my in lay reaches .730 or so. How does most CM"s do it.
Yeah That's definatly delrin, I have some of the same stuff. supprised those wing cutters did such a nice job without melting It.
On lining the rings up- I usually just set them close, then after glueing I do slight face cuts until they line up. It can be alittle tricky though, because you almost have to account for the seating. If you line them up too perfect, when the faces seat well, they may not line up so perfect anymore, so I usually just face a hair short of perfect alignment to account for It, then after the faces seat well they line up perfect. Greg
On lining the rings up- I usually just set them close, then after glueing I do slight face cuts until they line up. It can be alittle tricky though, because you almost have to account for the seating. If you line them up too perfect, when the faces seat well, they may not line up so perfect anymore, so I usually just face a hair short of perfect alignment to account for It, then after the faces seat well they line up perfect. Greg
bubsbug said:On ring depth this is what I did. If I know my joint size is say .840 and my ring through hole is say .630 then I split the difference and make sure my in lay reaches .730 or so. How does most CM"s do it.
On my joints I use a .625 tenon. I take my inlays for the rings to a depth of .680. I usually start with a dowel a little over an inch turned between centers. I mike the dowel, take this diameter and subtract 680. I then take the remainder and divide by two and this is the depth that I make my pockets. For the butt deco rings I go to a depth of .900. This leaves the inlay at a depth which if the inlay hasn't fitted all the way to the bottom of the pocket when glued in from glue or what ever under it, it still won't wipe out. By making my tubes of joint rings, over an inch, and by taking my butt rings to a depth of .900, I have a choice of either using a .625 or .750 at the A-joint.
Dick
It's referred to as the "A" joint because it's the first joint of the cue to be assembled. It's the "A", #1 point at which everything is aligned to and pretty much where the cue begins, in most cases. Of course the parts are already made, but when putting the parts together that area is the first, which is why it's the "A" joint.
Qbilder,
I appreciate your efforts at an explanation but it doesn't do it for me.
After almost 20 yrs. of building I'm well aware of the order of construction and the importance of the alignment, but that's not my question. Specifically, the question is; why is it called the 'A' joint when discussing construction but then it's suddenly the 'C' joint when referring to ring placement ? A little confusing isn't it ? If it were referred to as the 'C' joint from the get-go, would anyone be more confused ? Listen, I'm not here to campaign for a broad reshuffle of cue terminology. I'd just honestly never heard it referred to as the 'A' joint until I landed in this tree. It's no biggie, I'm open enough that I can adjust. It's like one of those questions that I'd ask in school and drive my teachers nuts.
I think I'll ask this in a new thread as it's probably not fair to Bubs to cloud-up his quest for a solution to his problems.
Joint names (A,B,C,D,E) have been called different names depending on the cue maker. Here is what I do with the cues I build.
A= Above wrap
B= Below wrap
C= butt Cap
D= Disconnect, where shaft disconnects from butt
E= Extra joint for jump pin
I'm sure this is different than most cue makers, but it makes complete sense to me and to customer as I explain it to them.
Zim
A= Above wrap
B= Below wrap
C= butt Cap
D= Disconnect, where shaft disconnects from butt
E= Extra joint for jump pin
I'm sure this is different than most cue makers, but it makes complete sense to me and to customer as I explain it to them.
Zim
My customers could care less about an "A" or "Z" rings. Just tell them it's above the joint or where ever...JER
KJ Cues said:Qbilder,
I appreciate your efforts at an explanation but it doesn't do it for me.
After almost 20 yrs. of building I'm well aware of the order of construction and the importance of the alignment, but that's not my question. Specifically, the question is; why is it called the 'A' joint when discussing construction but then it's suddenly the 'C' joint when referring to ring placement ? A little confusing isn't it ? If it were referred to as the 'C' joint from the get-go, would anyone be more confused ? Listen, I'm not here to campaign for a broad reshuffle of cue terminology. I'd just honestly never heard it referred to as the 'A' joint until I landed in this tree. It's no biggie, I'm open enough that I can adjust. It's like one of those questions that I'd ask in school and drive my teachers nuts.
I think I'll ask this in a new thread as it's probably not fair to Bubs to cloud-up his quest for a solution to his problems.
redundant post removed...
Last edited:
KJ,
The cue's A joint is referred to as position C in the context of describing rings because the ring positions are usually enumerated from the tip of the assembled cue to the butt. For example:
Ring position A is shaft side of the joint collar.
Ring position B is the butt side of the joint collar.
Ring position C is above the wrap (A joint).
Ring position D is just below the wrap.
Ring position E is on the butt sleeve.
This terminology is known to many (but not all) cue users and buyers, but if you ask them if they have a buzz ring in their A joint, you'll almost always get a funny look.")
The cue's A joint is referred to as position C in the context of describing rings because the ring positions are usually enumerated from the tip of the assembled cue to the butt. For example:
Ring position A is shaft side of the joint collar.
Ring position B is the butt side of the joint collar.
Ring position C is above the wrap (A joint).
Ring position D is just below the wrap.
Ring position E is on the butt sleeve.
This terminology is known to many (but not all) cue users and buyers, but if you ask them if they have a buzz ring in their A joint, you'll almost always get a funny look.