Help on taking photos of cues............

greyghost

Coast to Coast
Silver Member
Hey guys gals the greyghost needs a little help taking photos.

My aunt has her own little studio in lafayette and takes great photos but I know that sometimes cues are much more trouble b/c of glare and such.

I know quite a few of our members do great photo work and was hoping I could maybe get a few pointers from these experienced in this arena.

Things like how to get the grain in Brazilian Rose wood to show in a photo.

What kind/type of flash/s ????

Bo knows baseball, the greyghost knows pool......when it comes to taking pictures ol' GG is just a fool lol

Any info that I could pass on to her would be great and very much appreciated.


thanks again and happy thanksgiving everyone,
Keebie
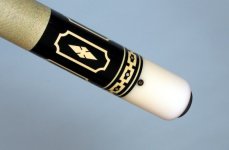
 
Also...besides the light box, see if the digital camera you are using has a Museum Mode...I know my old Nikon digi does. That mode is designed to minimize or eliminate glare off of glass display cases, and prevent washing out the colors in paintings. Off course, this will not help you when using a Macro Mode, but I do not experience much in the way of glare when using this mode anyways, as you are up so close.

Make sure you have a decent tripod...can make all the difference between a crystal clear photo and a fuzzy one. If your camera has a remote, even better. The less possibilities for movement on the camera the better.

I also do not like using a white under the cue, as it can skew the colors of the wood a bit....but you need to experiment to see what will suit your needs.

Lisa
 
A quick and dirty method I use is to take a sheet or two of white toilet paper and hang it in front of the flash with your free hand. Hold it as far from the flash as you can without it being in the picture. It makes a mini softbox and works pretty well. You can use larger sheets like typing paper also.Not as good as a light tent but it eliminates the worst glare. Just remember to close your eyes when you trip the shutter or it will blind you a bit.
 
Last edited:
IMPORTANTE!!! use a tripod of course, but also use the timer in the camera.
I use 10 seconds to make sure tripod has stopped moving from me messing
with the camera.
 
There are many tools and techniques. However, do not get bogged down in equipment. Your primary concerns are light quality and the light quality from different reflective surfaces. It does not cost a lot a money to set up a small studio. Clamp on lights can be purchased from Home Depot for a few dollars. Color corrected bulbs can be had from photo stores along with the better reflective papers.

Google "studio lighting" and then parse for the topics you want. There are thousands of sites and techniques.

Some of the best reading materials are from Kodak. This is definitely the place to start and Kodak will take you as far as you want to go. They are also relatively inexpensive. The larger libraries usually carry several kodak books on studio lighting.

Not much has changed in studio lighting over the years. Here too don't get bogged down beyond what is needed for digital photography. If anything it makes things easier.

In general light boxes and light tents have their place but you will do much better learning how to set up reflective surfaces and lighting ratios then play with these ideas to get exactly what you want. Learn how to set highlights with a flash light or similar type of snoot over a small studio light and you will be impressed with how creative you can be.

Some of the best examples that you will find of highly creative and professional lighting are in slick magazine ads. Try to figure out how the photographer lighted a scene for small high quality items such as alcohol products and similar types of things where high dollar photography was used.

Learn to use photoshop and how to isolate and recreate the background for your photos. This is one way to create some excellent photos.

Contrary to popular belief expensive equipment is not needed.

BTW some excellent work can be done using existing sun light and then filling shadows and highlights as needed.
 
Hey guys gals the greyghost needs a little help taking photos.

Something like this helps. You can do a homemade job with a white sheet and some creativity. It helps cut that reflection glare down.

Fred <~~~ so I've heard
 
Things like how to get the grain in Brazilian Rose wood to show in a photo.

What kind/type of flash/s ????
Keebie

To follow up JoeW's advice: you can cobble together just about any light you want, but you'll need to know in advance what sort of lighting effect you'd like to achieve. This can be a bit tough, because unless you've spent weeks (or months, or years) studying different lighting techniques it may not be immediately obvious how to create them using just a few light bulbs, an old white T-shirt, and a coat hanger.

I work in industrial imaging, and we use all sorts of oddball lighting techniques, including several that would be applicable to taking photos of cues, but that aren't commonly used in photo studios. Long story.

If you'd like, send me an email via FindSnooker.com or a PM and I can follow up in more detail. I'm interested to know what equipment you have (camera, lenses, etc.), how much time you'd like to spend on setup, etc.
 
Hey guys gals the greyghost needs a little help taking photos.

My aunt has her own little studio in lafayette and takes great photos but I know that sometimes cues are much more trouble b/c of glare and such.

I know quite a few of our members do great photo work and was hoping I could maybe get a few pointers from these experienced in this arena.

Things like how to get the grain in Brazilian Rose wood to show in a photo.

What kind/type of flash/s ????

Bo knows baseball, the greyghost knows pool......when it comes to taking pictures ol' GG is just a fool lol

Any info that I could pass on to her would be great and very much appreciated.


thanks again and happy thanksgiving everyone,
Keebie


Here are some tips for quickie decent photos (but not a professional set up, which takes longer and may be too much trouble).

1. For simple photos, the newer digital cameras handle macro and flash very well.

2. If you're using flash, background makes a huge difference. You can lay the cue on carpet or fake suede, anything that absorbs light helps. Neutral colors like gray and charcoal help.

3. With flash, photograph from at least a slight angle.

4. Hold the button down for a second or two to fully focus.

5. Look at the cue from many angles and select one that shows the least reflection, then shoot from that position.

6. Not too difficult is to photograph the forearm or the butt suspended. Take a pad or towel to protect the cue and a weight to hold one end down and suspend one end of the cue off a chair, with a carpet or suede as the background. Photograph the cue suspended with flash. The TAD picture below was photographed using this technique with an old 3 megapixel camera using blue paper on the ground under the cue.This is the raw photo just cropped, no touch-ups.

7. If your flash is drowning out details, try standing further away and using optical zoom, or if you plan on just using a computer, take the picture from a distance and zoom with software. Optical zoom doesn't lose details but if your camera isn't stabilized, a tripod is desirable.

Chris
 

Attachments

  • Tad_Butt.jpg
    Tad_Butt.jpg
    54.1 KB · Views: 275
Last edited:
Thanks everyone.....completely awesome quantity of info to get me to the goal line I'm sure.......so who do i send the check to lol.

thanks again,
-Grey Ghost-
 
I think somebody saw my sorry attempts at posting cue pictures and did this thread out of sympathy. Great skill to get pictures like the ones shown.
 
this is how the first ones came out..........not bad going to do some tweaking to the setup and see what happens

i like how she did the red background on the photo it highlights the reds in the cue nice.....
 

Attachments

  • Keebie Pool Cue # 1-(72)-1.jpg
    Keebie Pool Cue # 1-(72)-1.jpg
    96.6 KB · Views: 98
Back
Top