Question for the experienced makers

Dave38

theemperorhasnoclotheson
Silver Member
I am about to glue the points into an amboyna burl forearm. It has already been cored and plugged. After the points are dry, I want to then rebore the plug out and assemble the forearm onto a single core cue I am building. My question is, Is this wise to do? My concern is that the burl or the points may break/blowout as I do the core drilling. I plan on doing it a 5/16 thru hole, then .680 and then the final .750 to reduce stress and heat. Any advice?
Thanks in advance.
Dave
 
Hi Dave,

Now that you have what you have prepared I would advise to do your coring at 450 RPM or less, peck drill and goes slow and easy. In the future here is another way to skin the cat that I have developed in my shop that could be food for thought for you to consider.

I make full cored cues with points and was faced with this same problem. My solution was to cut my point groves in the forearm after the front was glued to the core and a sacrificial piece was installed behind the 12" A-Joint area to keep the stability of the unit intact.

I cut and groove and then fill the gap area with epoxy for stability before I cut the next point, leaving the unit in the indexing fixture. After all of the points are installed and the gaps have been filled, I just turn the cue to cut the points and cut off the sacrificial and make the face cut while turning the dowel back down while hold the tapered forearm with a tapered collet in my six jaw and fixing the end of the dowel on a live center on my tails stock.

This process works fine and I do not lose the center and my points stay straight.

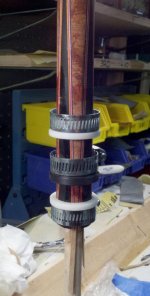
Here is some pics of a build that will illustrate what I described. I use a 5C Collet Indexer and the 3/4" dowel goes right through it while I am cutting the points.

Rick

It took me a few cues to get it right by there is nothing that hard about this process.

http://forums.azbilliards.com/showthread.php?t=273765
 
Last edited:
Because of the points getting knock off from being even I don't think I would recore it. I would attach it with normal A joint methods.
 
Well, right now, the nose is at 1.009, so I have some wiggle room to bring the points back in if they stray a bit. It's my daughter's cue that I'm building for a Christmas present and if the points were slightly off, she wouldn't care. Her big thing is that it has orange and pink veneers:grin:
My big concern is that the splices may come apart due to the re-coring process. I'm using West 205 so I know the glue is strong enough, and I may also use that to coat the outside before coring to strengthen the Burl a bit.
Thanks guys for the help.
Dave
 
core after points installed

I've done it many times and have not had any problems with points or veneers failing. If done carefully, your points will remain centered & will not need to be "adjusted". Nothing special about the technique...just use common sense & don't be in a rush.

FWIW, this forearm was at approximately .910" at the nose (1/16" oversize) when this was done.
 

Attachments

  • IMG_7392az.jpg
    IMG_7392az.jpg
    99.5 KB · Views: 675
First Bob, I gotta ask, Where you a photographer in a previous life? I always enjoy your pictures and your 'how to' videos on your site.
Now for the next question, Which end do you drill from, the 'A' joint side or the collar side? Or does it matter?
Dave
 
points

When I used to do my points your way (by boring the core hole after I install the points) I would wrap any exposed area of the forearm, not in the chuck or center rest, with surgical rubber. It really helps disasters from happening.
Been there, done that.
 
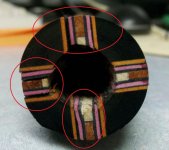
Well, sad to say, but had an accident while drilling the forearm. I was step drilling the starter hole for the gundrill, and was withdrawing the 1/2" drill bit and the chuck came out of the tailstock quill and spun and wobbled then took off and in the process split the splices apart. Was not happy.....
I will have to start over, hopefully with enough time to finish before christmas.
Thanks for all the advice guys, hopefully the second attempt will end better.
2012-11-07_19-11-29_295.jpg
 
Dave, hate it when something like that happens. I think you are going to need to cut that ring work out, face off and put on a new one.
 
I've done it many times and have not had any problems with points or veneers failing. If done carefully, your points will remain centered & will not need to be "adjusted". Nothing special about the technique...just use common sense & don't be in a rush.

FWIW, this forearm was at approximately .910" at the nose (1/16" oversize) when this was done.


Hey Bob,

What are the spec's on that core?


Thanks
Paul
<@>
 
Well, sad to say, but had an accident while drilling the forearm. I was step drilling the starter hole for the gundrill, and was withdrawing the 1/2" drill bit and the chuck came out of the tailstock quill and spun and wobbled then took off and in the process split the splices apart. Was not happy.....
I will have to start over, hopefully with enough time to finish before christmas.
Thanks for all the advice guys, hopefully the second attempt will end better.
View attachment 247475

Lesson learned. I never, ever withdraw a bit or tooling from an area without holding the chuck against the tailstock. Too much of a drag on the bit or the slightest vibration will break the Morse taper connection in the tailstock.

How far up the prong does the splits go? You can probably turn a dowel the size of the bored hole and use as a piston/plug. Take a piece of delrin and bore a hole that fit's the outside of the prong where the damage is. Split this delrin collet into two pieces lengthwise. Smear some good epoxy inside the bored hole, slowly push the plug into the hole which will force the epoxy into any crack or crevice. Once this is done you can take the delrin halves, incircle the damaged area and with the use of a hose clamp squeeze the prong tightly on the plug. When dry the prong will be as solid as if nothing had happened.

I've used this technique many times repairing Meucci sneaky petes that crack at the butt of the cue from not having a buttplate that hinders rapid moisture transfer.

Dick

That's a great tip,
Thanks for sharing Dick!
 
Lesson learned. I never, ever withdraw a bit or tooling from an area without holding the chuck against the tailstock. Too much of a drag on the bit or the slightest vibration will break the Morse taper connection in the tailstock.

How far up the prong does the splits go? You can probably turn a dowel the size of the bored hole and use as a piston/plug. Take a piece of delrin and bore a hole that fit's the outside of the prong where the damage is. Split this delrin collet into two pieces lengthwise. Smear some good epoxy inside the bored hole, slowly push the plug into the hole which will force the epoxy into any crack or crevice. Once this is done you can take the delrin halves, incircle the damaged area and with the use of a hose clamp squeeze the prong tightly on the plug. When dry the prong will be as solid as if nothing had happened.

I've used this technique many times repairing Meucci sneaky petes that crack at the butt of the cue from not having a buttplate that hinders rapid moisture transfer.

Dick

Dick, question. Would you keep the plug inside a little undersized and if so about how much?

You should be proud, you probably just saved a Christmas.
 
Lesson learned. I never, ever withdraw a bit or tooling from an area without holding the chuck against the tailstock. Too much of a drag on the bit or the slightest vibration will break the Morse taper connection in the tailstock.

Dick

Dick, I usually have my hand on the chuck for the very same reason, this time, I had a chip hit my nose and I let go and wiped across my nose to brush it off. That's when it all went to hell. It only took 2 seconds.
Thanks for sharing your method. I have followed it and it is now drying. I actually used some delrin collets from Chris's set. They work perfect. I had to insert some wedges to take up the spaces where the drill bit tore out chunks, but it seems like it went together fairly well.
BTW Tom, it wasn't a ring that split...it was the spliced forearm itself..I wish it had just been the ring :grin:
Repair in progress:
2012-11-08_21-25-09_635.jpg
 
nice work

Dave, sorry for your trouble but the fore arm looks sweet!!!!!!Great save.....Well done..............Ray Weeks
 
Thanks Ray, it is my first attempt at points with veneers, and it WAS going well until this. I haven't considered this a save yet, until it's on the cue and first coat of finish is on. I'm going to start another forearm this weekend as a back-up plan, just don't know if it will be done in time.
Dave
 
Wow. A lot's happened here in a day or two. Good tip from Mr. Neighbors!

First Bob, I gotta ask, Were you a photographer in a previous life?
Thanks, but no.
Which end do you drill from, the 'A' joint side or the collar side? Or does it matter?Dave
Doesn't really matter. It's more a matter of how good your setup is.
Hey Bob,What are the spec's on that core?
Thanks Paul<@>
11/16 and 13/16. This allows me to true up the core with the OD of the forearm & still use std size rings.
 
Thanks Ray, it is my first attempt at points with veneers, and it WAS going well until this. I haven't considered this a save yet, until it's on the cue and first coat of finish is on. I'm going to start another forearm this weekend as a back-up plan, just don't know if it will be done in time.
Dave

Dave,

If thats your first cue with veneers you did a bang up job. This is a very good and interesting thread. Sorry about your hic cup but thanks for sharing it and pictures of the progress on repair. Will we have to wait till Christmas to see the rest?
 
I am about to glue the points into an amboyna burl forearm. It has already been cored and plugged. After the points are dry, I want to then rebore the plug out and assemble the forearm onto a single core cue I am building. My question is, Is this wise to do? My concern is that the burl or the points may break/blowout as I do the core drilling. I plan on doing it a 5/16 thru hole, then .680 and then the final .750 to reduce stress and heat. Any advice?
Thanks in advance.
Dave

I put my forearm on a full length dowel before I cut the point grooves.(Just like Rick)

I do my butt sleeve points on a 10 inch dowel and bore it out and put it on the main dowel. I glue the dowel in with just 3 drops of CA on each end so I only have to bore the ends and the dowel pushes out. I use gorilla glue CA because it's a little thicker and doesn't wick in too far. I have to bore a little deeper on the end where the points cut into the dowel. The points line up just fine.

Kim
 
Back
Top