You are using an out of date browser. It may not display this or other websites correctly.
You should upgrade or use an alternative browser.
You should upgrade or use an alternative browser.
Before & after of a home style Delmo 9ft.
- Thread starter realkingcobra
- Start date
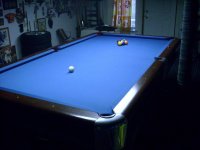
Heres my table don`t know who made it. It does say topline on a little emblem on it.?
Any Ideas RKC?
9ball
Not off the top of my head buddy, but I've never been one to work on a lot of different tables in my 27 years as a mechanic, spent most of my time working on bar tables....can tell you 27 different manufactures of them though

Beautiful work RKC!
9ball- here is a link that might help you.......http://forums.azbilliards.com/showthread.php?t=80648
9ball- here is a link that might help you.......http://forums.azbilliards.com/showthread.php?t=80648
Nice work... I'm sure you tried to convince him to trash the table and go with a used GC or Diamond instead of rebuilding this one. What was his reason for not doing that?
Nice work... I'm sure you tried to convince him to trash the table and go with a used GC or Diamond instead of rebuilding this one. What was his reason for not doing that?
He already bought a Diamond 7ft ProAm to go along with his 9ft Delmo so he'd have 2 tables, and I did agree to rebuild his 9ft, so there was really no point in trying to talk him into buying another table, and besides...it's a pretty good challenge to fix this one up. Working on trying to level the slates right now...what a job that is with a broken slate
")
Beautiful work RKC!
9ball- here is a link that might help you.......http://forums.azbilliards.com/showthread.php?t=80648
Thnks buddy! That link was just wht I needed.
9ball
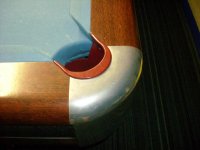
This is what the frame of the table looks likes. It's not a bad looking table for a home table...that plays as good as ANY GC..or... After taking the particle board backing off the slates which is junk on ANY table, I relined the frame of the table with clear fir seeings how it's only being used as a spacer between the slate and the frame of the table. As you can see in the last picture, the seams of the slates are going to sit on one solid piece of wood right down to the bare slate on the bottom side, which makes for a much flatter seam, instead of hoping the wood backing on both sides of the seam are the same thickness, because if they're not then right there you have to do extra shimming just to get the seams flat.

.JPG")
.JPG")
.JPG")
.JPG")
After taking the particle board backing off the slates which is junk on ANY table, I relined the frame of the table with clear fir seeings how it's only being used as a spacer between the slate and the frame of the table. As you can see in the last picture, the seams of the slates are going to sit on one solid piece of wood right down to the bare slate on the bottom side, which makes for a much flatter seam, instead of hoping the wood backing on both sides of the seam are the same thickness, because if they're not then right there you have to do extra shimming just to get the seams flat. This table has leather drop pockets, so there needs to be a way of attaching the pockets under the slate, so I added wood under each pocket while the slate was upside down that fits right in with the slate frame. You can see what they look like while upside down, and how they look when the slate is mounted. I also like a clean look when I do my RKC pocket folds, and how much cleaner can the pocket wood look than what you see in the last two pictures. I don't staple my cloth on the bed of the slate, I use my glueing system, so I don't need to waste wood to bring it out to the edge of the slate so the cloth can be stapled on.

.JPG")
.JPG")
.JPG")
.JPG")
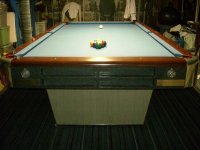
Here's the clean pocket look.
.JPG")
.JPG")
Unreal!!!
..
..
You truly love your craft and it shows! Great work! If you are ever in the Oklahoma city area I'd like to buy you a drink for you're posts alone.
Glenn, are you the clamp salesman's best customer.
I don't think Lowe's carries that many clamps.
I don't think Lowe's carries that many clamps.
I see why you saved the walnut tops Glen, they look awesome refinished, nice work.