I know this question probably has a elusive answer, and can vary quite a bit but maybe someone has a ballpark figure. I was wondering on the average about how many man hours would it take to make a complete cue, considering an experienced cuemaker with average ability using average equipment, to make a reasonably plain jane cue say with or without four points, and cored, but no other fancy inlays etc. Just the work involved in making the cue no tool making involved?? Surely someone keeps up with the man hours involved. I know it is a nebulous question with a nebulous answer... any ideas ?
You are using an out of date browser. It may not display this or other websites correctly.
You should upgrade or use an alternative browser.
You should upgrade or use an alternative browser.
Ball Park figure
- Thread starter Cgra2
- Start date
I know this question probably has a elusive answer, and can vary quite a bit but maybe someone has a ballpark figure. I was wondering on the average about how many man hours would it take to make a complete cue, considering an experienced cuemaker with average ability using average equipment, to make a reasonably plain jane cue say with or without four points, and cored, but no other fancy inlays etc. Just the work involved in making the cue no tool making involved?? Surely someone keeps up with the man hours involved. I know it is a nebulous question with a nebulous answer... any ideas ?
Hi,
On the contrary, it is not a nebulous question but a very astute one. If you are making cues, you better know this so you can set a price point for the time element you are paid for in the price scheduling. Without knowing this your just hacking and will rob your shop and your family in the long run. Time is Money!!! My take on it is if I don't get $ 80.00 per hour, you can't buy one of my cues. People who don't want to pay the price can go elsewhere. No lets make a deal because when you do you you give up your life's time for no good reason! Knowing and keeping track of your production time is fair for you as well as the customer
A "Plain Jane" Cored on a 30" dowel with one shaft is about 8 hours of shop time start to end including finishing and buffing. With a wrap about another hour. This time does not include any work on billets for decor rings.
Waiting for glue and finish curing or resting time between cuts on the shafts is not considered production time.
My shop is equipped with dedicated machines for most operations with a minimum amount of set up time during production and all of my time projections are based on actuals not estimates.
Rick
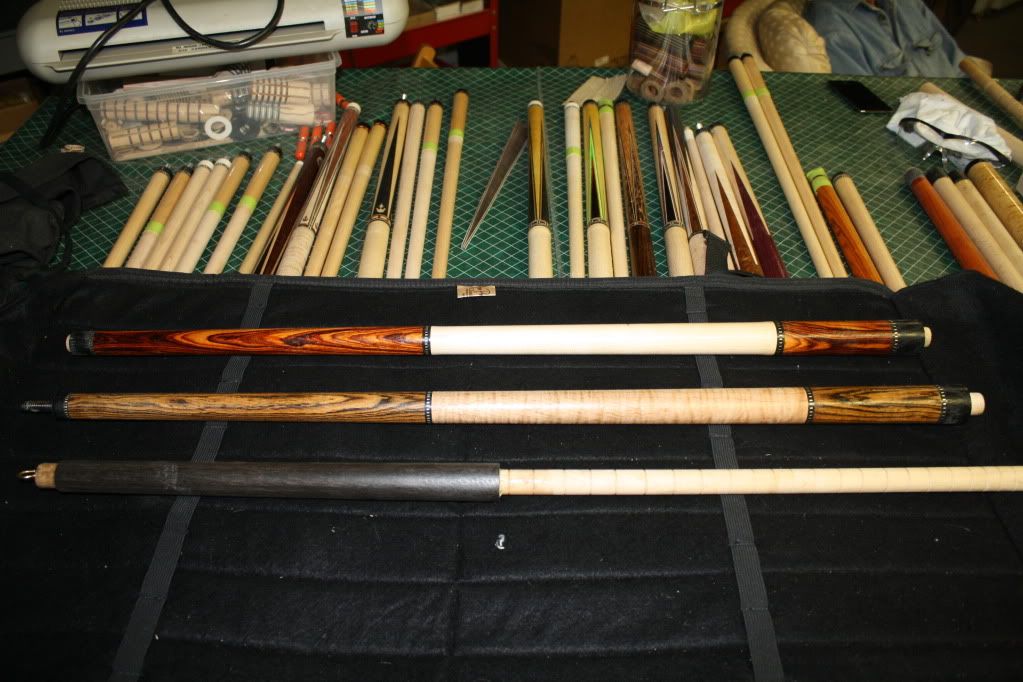
Examples of Plain Janes built on 30" cores in 8 to 9 hours. Ebony cue in foreground shows the forearm that was tapered on the dowel before assembly and glue up. A Plain Jane without points has 66.6 inches of total glue up surface area @ .840 dowel size using Expanding Polyurethane Glue to fill the gap annulus. Time spent for the 30 silver stitch ring billets is not included in this Gant Work Schedule Timeline.
Last edited:
Half hour to choose the woods from the shelf & center hole the ends. Half hour to knock the edges off, turning it from square to round. One hour.
About 15 minutes each component to drill core hole, with putting them in lathe & drilling pilot holes, etc. About an hour tied up in the coring dowels with center drilling, cutting them to size over a period of how many cuts?, etc. Another half hour to glue the cores into the components. 2 hrs.
Tapering components down over a series of cuts at about 15 minutes each, including taking them off the rack & putting them back up. Likely an hour spent on each overall. 2hrs.
Making rings for each location can vary with complexity of rings. My rings are pretty complex, but nothing even compared to Barrenbrugge's. My rings average between 5-11 individual rings per pack, with a slotted ring in the middle. They always match the woods in the cue. It takes me 2 hours to make a set of slotted billets, and half hour for solid billets. That's drilling holes & all. Slicing the individual rings off, including chucking up the billets, takes me around 30 minutes each billet for the whole cue. There can be three to five billets each ring, so if it's a five billet cue it's 2.5hrs. of ring cutting, plus 4.5hrs. of making the ring billets. Seven hrs. making rings in total. Gluing rings up to form a solid ring is around 30 minutes each, with 7 rings in a 2-shaft cue. 3.5 hrs. That's 10.5hrs. for ringwork that isn't even installed yet.
So far we are sitting at 14.5hrs. and only have components for assembly. Machine tenon & attach ring pack to forearm or handle, whichever you do. 30 minutes. Now machine the "A" joint, dry fit, test between centers, and glue together. With mixing the epoxy and all the work, it takes around 30 minutes considering everything goes smooth. Test between centers again then hang the cue for a couple days. Pull it off the rack & test between centers once more. If all is good, it took roughly an hour to assemble the "A" joint and test it repeatedly to ensure it'll be right. 16hrs.
Now make your butt sleeve. Measure the assembled cue and mark the location of the rings for a balanced aesthetic look and to achieve your butt length. Mark where your rings & butt cap will go, and use math to determine the length of your butt sleeve. This process takes about half hr. Now machine a butt sleeve. Cut it to just over length and bore the correct hole through it. Some guys thread it. Face off the ends to get you to exact length. Now machine your butt cap, also often times threaded. Now shave your sleeve tenon to size for installing rings, sleeve, & cap, and thread necessary areas. This will all take 1.5hrs. or so. Mix more adhesive & assemble everything, ensuring the rings are lined up with the "A" joint and the sleeve is lined up with the forearm. Another half hour. 2hrs in all. 18 hrs.
After adhesive dries, test between centers yet again. If good, then make a cut over the length of the cue to get it all smooth and even sized. 15 minutes. Now do your joint machining. Make your joint collars and cut appropriate tenon at the joint. Another area that's often threaded. This all will take about an hour. Mix up your adhesive and line everything up with other rings, threading or pressing on the collar with rings first. 45 minutes, which brings us to 19 hrs.
Make final cut on cue. Face off the joint and butt. Do the machining for weight bolt or weighting system if any, and machining for the bumper to fit. This takes me an hour. 20hrs.
Chuck up & indicate, and zero out the center line of the cue in the lathe. Machine your joint pin hole & threads. Mix up adhesive & install pin. Assure that it's centered exactly. This takes me 30 minutes to an hour, depending on how cooperative the cue is being with centering. We'll make it an easy 30 minutes. 20.5hrs.
Choose shafts by weight & tone to match the butt. Machine the joint tenon for rings & collar. Mix adhesive & install just like with the butt joint. Allow to cure then face & machine the joint system you use. There are two shafts, twice the time. Fit each shaft to the butt and face accordingly to get everything straight with rings all lined up. Now shave the joint area of the shaft to match the diameter of the butt joint. This all takes me a couple hrs., about an hour per shaft. 22.5hrs.
Tune weight & balance of assembled cue by adding or retracting weight however it is you do it. It takes me roughly an hour to tune. Machine the ferrule tenon and ferrule to mate to it. Glue it on. This takes me about 30 minutes to do two shafts. Ready for finish after 24hrs labor.
Finishing the cue only takes me about 1.5hrs., though some builders spend LOTS of time on it. 25.5hrs.
Face off tenons & ferrules and glue tips on. Even tips are chosen & matched. Shave tips & ferrules together down to final shaft size. Shape tips. Sand & polish shaft. Install bumper in cue. Hit a few balls to ensure cue is right. Check balance, weight, tip diameter, etc. to ensure target specs were met. This all takes about 2hrs. 27.5hrs.
Keeping up with buyer & emailing, phone, pictures etc. costs lots of time I haven't considered in the build process because it's different with every buyer. It's still hands on labor. Forgetting that, just packing the cue & boxing it, getting it shipped is another hour plus. 28.5hrs.
28.5hrs of actual hands on work to build one of my P/J's. Luckily most of the procedures can be done on multiple cues consecutively so to streamline the time & labor, making each individual cue seem like less of a job. Lots of time is spent on sitting between cuts and drying adhesives. That open time gets spent doing other tasks on the same or different cues. It's dynamic & complex when there are more than one cue going on and at various stages of completion. It's even more stressing dealing with all the individual buyers, and also having repairs to do. Enough to drive a guy crazy. That's why all cue makers are a bit eccentric. Who in their right mind would put this much work and devotion into a wooden toy that they profit a few hundred dollars on? I have $100 in materials & supplies in the cue, about 30hrs. of labor, a $400 utility bill per month, and if I get $1000 for the cue i'm a very, very happy dude because it covered my expenses & left some change to be used taking momma out to dinner & a movie. To hell if I was actually expected to pay any real life bills with cue making.
edit: forgot to include making shafts. I log & mill my own trees as well as cut shafts from bought lumber. I'd estimate with everything involved in my shafts, there's another 4-5 hrs. on top of the build, so roughly 33hrs. to build a P/J.
edit again: forgot to include the time it takes to make ferrules from raw stock, about 10 minutes each.
Last edited:
Thanks Guys for your answers, I have built only one cue and was trying to get a reasonable estimate of how much of ones life is tied up in a cue..
There was no way I could figure it as it, was about 8 months ago I decided I would give it a try, Watched DVD's read everything I could find on it and been working on one aspect or the other ever since, fairly steady but not all the time of course.
I found out it saves a lot of wasted motion to have several in the pipeline at once, which I am processing parts for about 5 more now.. It is a pretty involved subject and process, and I have a lot more respect for cuemakers now than before, and I have just scratched the surface..:smile:
The only way tro save time and speed things up is to do a bunch of pieces when you are set up for any step. Core 2 dozen fronts at a setting, taper dozens of fronts, mill at least a dozen fronts at a time, cut points for multiple cues when you are cutting for one, turn all your handles, turn all your shafts, make ferrules and joints in batches. a ssemble and miter veneers. I've been practicing this method for 20+ years and I can build a 4 point, 4 v4eneer rambow cue in 4 hours work over 2 weeks. f course, the components have been a working for6 or 7 years
Hi,
I am sure that there are some here that will think I am full of shit for saying 8 to 9 hours to build a Plain Jane. I should have said under 10 hours to be more accurate because as we all know things can happen during a build and I did not express that contingency factor which is always a reality. I also did not factor any time for pondering the wood combos and selections.
For the purpose of sharing and to delve into production issues, I have listed some points that have helped me to develop some shop procedures that has saved me boat loads of time while increasing quality.
I have found that coring the whole cue saves me a huge amount of time because I use kiln dried squares acclimated to my shop and turn them with a doweling machine in 20 seconds. Frankly I don't worry about my cues moving and I aggressively hog my initial fore arm taper on the core and assemble the handle, rings butt cap and sleeve at 1.375 leaving me fully assembled cue on centerline with a tapered forearm at .935 and the rest of the cue at a 1.375 rod. We call it the baseball bat.
After cure time I can get the cue to .040 over finish in about 10 minutes of my attention time on my butt saw machine taking .050 passes before taking light passes to final later after sealing with schelak. I agree with Paul that making batches also saves a huge amount of time.
4 of my production machines have fixed dial indicators and e stops. So after hogging my shaft dowels to .950 and resting for years, each of my 12 subsequent passes only takes about 6 minutes total of my attention time and I sequence them in batches so on days when I take passes, I leave the dial set for elevation to 0 and just keep putting the shafts in. I just processed 44 shafts to final in the last 2 months and I only had 1 rejected unit using my centering pin method.
I see my machines as free employees and I like to keep them going while I am doing my basic lathe work, sealing, sanding spraying, buffing and installing wraps. Installing ferules before turing the shafts also save me a lot of time and IMO is a better end product as I hold my shaft in the chuck, back chuck and live center while I cut my ferrule tenon. This enhances concentricity on the X because deflection is eliminated when you cut the tenon.
I have my spray booth in a clean room and I don't have to worry about waiting for dust to clear out. Other than a few shop vacs I have 2 large 4" dust collection system mounted in a trailer behind my shop and a very efficient downdraft sanding box on my wood lathe to keep dust from getting airborne during sanding. This also picks up productivity and quality.
I can cut my wrap groove to -.038 on my saw machine in about 5 minutes and another 10 minutes to cut the 2 steps with my router on the matching taper bar on my big lathe.
I also use a milling bit and chucking reamer mounted in my tail stock for machining my bumper and weight bolt features. I have that process down to about 12 minutes because I only use a boring bar to trim about .020 on the big ID for the rubber. It used to take me over 20 + minutes to bore and sneak up on a number.
Using a statistical process control system and a blueprint, i can install a pin using color coded step drills, 2 Drill Taps and a bottom tap, 5/8" center drill for the chamfer, and chucking reamer for my centering barrel dimension. This process used to take me over 30 minutes and at Rev. 5 of my Procedure it is now 15 minutes including grinding the glue relief and scratching my centering barrels with 80 grit and mixing the epoxy.
I like to install my pins very late at night and bump them to about a 1/2 a thou. or closer. Since I use the 36 hour HySol epoxy, I can check the pin get and it to about a 1/4 thou. or better first thing in the AM. By having multiple tapered collets, I can then take the cue out of the lathe and stand it in a rack for 2 days with the collet still on. When it cures rock hard, I can whack the collet with a piece of oak 1 by 2 and not worry about jarring the pin off dimension.
Not tying up equipment so you have to wait for something is a huge productivity enhancement. I am working very hard to get to the point where I use a gantt schedule planner to sequence my jobs planned for each day using job dependencies and Milestones as a guide for my planning.
From a business point of view, after figuring my labor and materials, I add 15% to each cue for shop overhead and 5% for tool cost and equipment maintenance to each cue with rings, points and inlays all at extra costs points.
Every time you can streamline your process with accurate and repeatable results verified by documented history and beta testing, your business model will continue to be more efficient and more effective concerning quality and production.
I worked in Nuclear Power plants for over thirty years in safety related critical path underwater systems and I learned and witnessed what developing and embracing procedures to a QA/QC program can achieve. Applying it to cue making was a no brainer for me because I was already brainwashed and totally accepted these type of detailed diaplines.
Once the road map is printed your don't deviate unless a problem is encountered. Never fly by the seat of your pants when doing anything. If a problem happens a Root Cause must be ascertained, Corrective Actions must be implemented and you must apply the Lessons Learned within the culture of the environment.
Making a plain jane cue in less than 10 hours just like my drill and tap shaft 1st and tapering with a pin centering tool, it's not going to work for most here but I like it. :duck:
Rick G
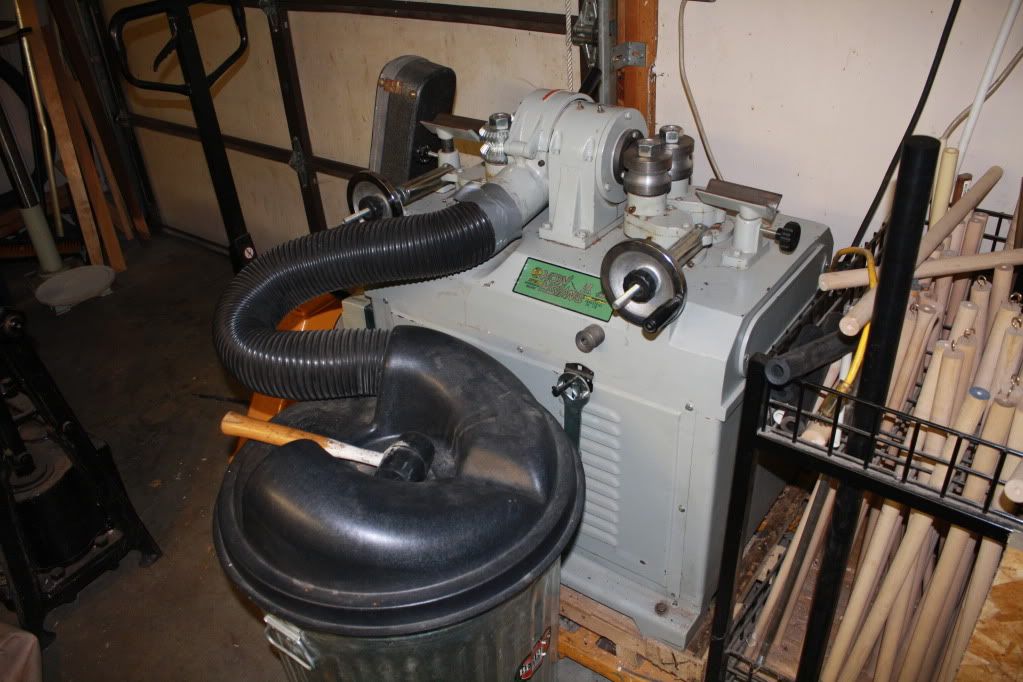
These 3 machine are free employees who have saved me huge amounts of my attention time. When a saw machine is working my productivity is doubled and sometimes I got both going while I am busy at another machine.

Cutting squares to rounds used to eat up a lot of time and put a lot of wear to my router bearings. Now the work is done in seconds. No more bandsaw time either.
I am sure that there are some here that will think I am full of shit for saying 8 to 9 hours to build a Plain Jane. I should have said under 10 hours to be more accurate because as we all know things can happen during a build and I did not express that contingency factor which is always a reality. I also did not factor any time for pondering the wood combos and selections.
For the purpose of sharing and to delve into production issues, I have listed some points that have helped me to develop some shop procedures that has saved me boat loads of time while increasing quality.
I have found that coring the whole cue saves me a huge amount of time because I use kiln dried squares acclimated to my shop and turn them with a doweling machine in 20 seconds. Frankly I don't worry about my cues moving and I aggressively hog my initial fore arm taper on the core and assemble the handle, rings butt cap and sleeve at 1.375 leaving me fully assembled cue on centerline with a tapered forearm at .935 and the rest of the cue at a 1.375 rod. We call it the baseball bat.
After cure time I can get the cue to .040 over finish in about 10 minutes of my attention time on my butt saw machine taking .050 passes before taking light passes to final later after sealing with schelak. I agree with Paul that making batches also saves a huge amount of time.
4 of my production machines have fixed dial indicators and e stops. So after hogging my shaft dowels to .950 and resting for years, each of my 12 subsequent passes only takes about 6 minutes total of my attention time and I sequence them in batches so on days when I take passes, I leave the dial set for elevation to 0 and just keep putting the shafts in. I just processed 44 shafts to final in the last 2 months and I only had 1 rejected unit using my centering pin method.
I see my machines as free employees and I like to keep them going while I am doing my basic lathe work, sealing, sanding spraying, buffing and installing wraps. Installing ferules before turing the shafts also save me a lot of time and IMO is a better end product as I hold my shaft in the chuck, back chuck and live center while I cut my ferrule tenon. This enhances concentricity on the X because deflection is eliminated when you cut the tenon.
I have my spray booth in a clean room and I don't have to worry about waiting for dust to clear out. Other than a few shop vacs I have 2 large 4" dust collection system mounted in a trailer behind my shop and a very efficient downdraft sanding box on my wood lathe to keep dust from getting airborne during sanding. This also picks up productivity and quality.
I can cut my wrap groove to -.038 on my saw machine in about 5 minutes and another 10 minutes to cut the 2 steps with my router on the matching taper bar on my big lathe.
I also use a milling bit and chucking reamer mounted in my tail stock for machining my bumper and weight bolt features. I have that process down to about 12 minutes because I only use a boring bar to trim about .020 on the big ID for the rubber. It used to take me over 20 + minutes to bore and sneak up on a number.
Using a statistical process control system and a blueprint, i can install a pin using color coded step drills, 2 Drill Taps and a bottom tap, 5/8" center drill for the chamfer, and chucking reamer for my centering barrel dimension. This process used to take me over 30 minutes and at Rev. 5 of my Procedure it is now 15 minutes including grinding the glue relief and scratching my centering barrels with 80 grit and mixing the epoxy.
I like to install my pins very late at night and bump them to about a 1/2 a thou. or closer. Since I use the 36 hour HySol epoxy, I can check the pin get and it to about a 1/4 thou. or better first thing in the AM. By having multiple tapered collets, I can then take the cue out of the lathe and stand it in a rack for 2 days with the collet still on. When it cures rock hard, I can whack the collet with a piece of oak 1 by 2 and not worry about jarring the pin off dimension.
Not tying up equipment so you have to wait for something is a huge productivity enhancement. I am working very hard to get to the point where I use a gantt schedule planner to sequence my jobs planned for each day using job dependencies and Milestones as a guide for my planning.
From a business point of view, after figuring my labor and materials, I add 15% to each cue for shop overhead and 5% for tool cost and equipment maintenance to each cue with rings, points and inlays all at extra costs points.
Every time you can streamline your process with accurate and repeatable results verified by documented history and beta testing, your business model will continue to be more efficient and more effective concerning quality and production.
I worked in Nuclear Power plants for over thirty years in safety related critical path underwater systems and I learned and witnessed what developing and embracing procedures to a QA/QC program can achieve. Applying it to cue making was a no brainer for me because I was already brainwashed and totally accepted these type of detailed diaplines.
Once the road map is printed your don't deviate unless a problem is encountered. Never fly by the seat of your pants when doing anything. If a problem happens a Root Cause must be ascertained, Corrective Actions must be implemented and you must apply the Lessons Learned within the culture of the environment.
Making a plain jane cue in less than 10 hours just like my drill and tap shaft 1st and tapering with a pin centering tool, it's not going to work for most here but I like it. :duck:
Rick G
These 3 machine are free employees who have saved me huge amounts of my attention time. When a saw machine is working my productivity is doubled and sometimes I got both going while I am busy at another machine.
Cutting squares to rounds used to eat up a lot of time and put a lot of wear to my router bearings. Now the work is done in seconds. No more bandsaw time either.
Last edited:
Rick, I like your posts most of the time because they offer abstract ways of seeing things, and often are somewhat humorous. Sometimes they even make sense if you don't think about it. But your last post makes my head hurt.
Installing ferrules before turning shafts is better because you have a rear chuck and live center to eliminate deflection when cutting the tenon? And it saves time? That makes as much sense as saying that you sleep less on full moon nights because gravity has less impact on your body during that period, thus eliminating the need for a full 8 hrs. of sleep.
Seriously, installing ferrules takes the same amount of time no matter when you do it. And if you are experiencing deflection when cutting tenons, that you need a live center to hold it on center, something is seriously wrong. Ironically, you mention having trouble with deflection cutting ferrule tenons, but in the same post boast how you hog cue butts down from 1.375" to .040" over finish size in ten minutes. You claim you build a P/J in ten hours, breaking down how fast you do everything, but make no mention of how long you spend making rings. Exactly how long does it take you to make those box veneer style rings to match a cue? Or is that not included in your 10 hr. cue?
I know you catch a lot of crap from folks on the forum here. I'm not here to pick on you. But posts like this make it easy to understand why people jerk your chain. Sometimes I wonder if you just make stuff up as you are writing it.
Rick, I like your posts most of the time because they offer abstract ways of seeing things, and often are somewhat humorous. Sometimes they even make sense if you don't think about it. But your last post makes my head hurt.
Installing ferrules before turning shafts is better because you have a rear chuck and live center to eliminate deflection when cutting the tenon? And it saves time? That makes as much sense as saying that you sleep less on full moon nights because gravity has less impact on your body during that period, thus eliminating the need for a full 8 hrs. of sleep.
Seriously, installing ferrules takes the same amount of time no matter when you do it. And if you are experiencing deflection when cutting tenons, that you need a live center to hold it on center, something is seriously wrong. Ironically, you mention having trouble with deflection cutting ferrule tenons, but in the same post boast how you hog cue butts down from 1.375" to .040" over finish size in ten minutes. You claim you build a P/J in ten hours, breaking down how fast you do everything, but make no mention of how long you spend making rings. Exactly how long does it take you to make those box veneer style rings to match a cue? Or is that not included in your 10 hr. cue?
I know you catch a lot of crap from folks on the forum here. I'm not here to pick on you. But posts like this make it easy to understand why people jerk your chain. Sometimes I wonder if you just make stuff up as you are writing it.
Hi Eric, fair enough questions,
I assure you, I don't make anything up in a pre concieved notion or on the fly. I am as serious as a heart attack about my cue making and see no reason not to raise the bar of expectation and reach for the highest apple on the tree.
On the ferrule issue, I cut my tenons at a 1.5" length so they clear the apex of my saw teeth after the pass while accomodating the correct spring pressure for the 30" length after I install my pin device. Over time I have learned that even with the 1" tenon there is a deflection factor on the tenon from tool pressure during single point cutting.
Tool pressure deflection increases very much as you increase the tenon's length and I found this out by noticing that when the saw got to cutting the pre installed ferrule the initial cuts where some times eccentric to the wood a little. By holding the shaft in three places with the live center on the end, the dimensional stability of the tenon is always perfect with the chuck when fitting the .308 ID to the wood for my standard glue gap interference and eccentricity disappeared, poof! Example of root cause analysis, corrective actions and lessons learned.
After learning this little ditty, I would never do a ferrule any other way. Not being and experienced machinist I have to learn by observing and knocking my head against the wall sometimes. But like my father used to say, " you throw enough crap against the wall, some of it is has to stick".
I don't thread or cap my ferrules, only file 7 v-groove keyways for the glue foundation. After discovering how much better the fit was with the live center I just thought I would share it with the other anal cuemakers out there like me. It does make a big difference IMHO. Maybe my explanation was a little vague so hence the long winded post.
By installing the ferrule first I eliminate all of the machining attention having to cut it and blend it. I have been doing a lot of cue repair for many years at my pool hall and saving that machining time adds up and now my automated saw machine cuts the ferrule on my new shafts and I only spend 20 seconds to lightly sand in the slightly over sized maple shaft at the interface.
Next time you put on a ferrule clock the time you cut the tenon and do the glue up, then clock the time you take to machine it and sand. IMO this is a critical job and is one of the first areas a new cue owner goes to with is fingers and brain to inspect your handy work. Because you have to sneak up on the face area I would think that most people would start taking their time and slow down to make that perfect transition and then sand carefully as the materials have different densities. Excessive heat build up for single pointing and sand blending is the primary reason you get wood shrinkage in that zone down the road even after final sanding and sealing. The less time spent with the less molecules moving around with heat, the better! Nature always wants to equalize things that have differential, if your don't stress or put them out of whack in the first place you are ahead of the game. Less is always more the way I see it.
After my glue cures I let the machine do the work and I get the added feature of a ferrule that follows the contour of my shaft taper with very little heat. Because the ferrule is harder and machines truer than the wood, the wood is slightly higher than the ferrule at the transition. Just sand the ferule to remove facets and blend very quickly. This was the way Omega DPK did it and I defiantly am a groupie of that discipline.
From those lessons learned, when I do ferrule replacement I also center drill the end of the faced ferrule with a tiny # 1 CD and use a live center and I found that the RMS finish to the ferrule is better and very tidy that way when single pointing. Less sanding and easier blending equals less time and a more uniform and repeatable job across the board no matter who's hands are sanding it. The TRO on my 6 jaw is a 1/4 thou so there is not a problem. I just like to pay close attention to detail and get excited at even the slightest incremental advantage attained.
I stated in both my posts that the time element did not include ring billet building or the parting of individual decor rings. You and I both know the time factor there for building, drilling and parting rings, making billets blanks, gluing, stacking, drilling, facing, parting and flat sanding. Its very time consuming. I did study the time element in this area but alas I have no records on file because it translated into standard fees of 250.00 for non ivory box veneer rings and 200.00 for 30 stitch silver in 5 positions including shafts. Having a dedicated set up for indexing and stitching rings does cut down on set up time.
BTW, thanks for not attacking me about hogging my baseball bats down real fast. You pointed out that disagreement in a very respectful manner and as always I appreciate the candor in your posts. I have only been building cues for about seven years before going full time and without boasting I think I can perform an A-Joint machining and joining as good as anyone with my tapered collets. Even with taking the time to do a lot of cuts over time and looking for movement and marking each piece to look for stability it still comes down to a crap shoot in the long run if the handle or fore arm will move down the road. This building technique of joining has what we called in the marine industry, a level of uncertainty. i don't like uncertainty in any shape or form and at 57 years of age I don't want to take umteen million passes on a piece of wood before I can do the deed. Life is too short for that IMO.
I am certainly not a pathfinder in "full coring" a cue as many other cue makers were doing it long before I came along. However, I do feel that the construction is more in tuned to natures way of building things. Most organic things have structure and that structure is intertwined on a skeleton or foundation most of the time. It makes a lot of sense to me that having a PH or Maple dowel serving in this function and using gap filling expanding Poly glue with a 2000 year chemical half life is the tits.
I have only built about 130 cues so far and for the last 80 or so I have been full cored and I know every person who owns them and not one has moved. By inspecting and tracking these cues I have learned that I can take .050 passes to .040 over finish and not create downstream movement problems what so ever. Experience has been my best teacher and process control observations have given me numbers that can't be denied. Sharing this info here is my pleasure. Those who don't read and process this info miss the free lunch as I have spent hundreds of hours in this endeavor contemplating my naval.
I have even gone so far as to mistreat wood by leaning squares up against outside walls in the winter for months and then built cues and sent them into the field like a weather balloon. Because I gave away a boat load of cues to my league players and friends for feedback and testing, I never put my brand at risk. Who is going to piss on your reputation when they are told in advance that they are being given a free cue to help me track field observations for quality control. They feel like test pilots who are helping me out.
I have not sold more than a few cues on a national level and don't advertise yet but when I do, I am absolutely sure the rework problems after the sale will not be a problem. I am not going to ship chipped or rusted sanding mandrels! LOL :deadhorse:
I don't mind getting crap and I don't like change for change sake. If one takes a questioning attitude and strives to raise the bar of expectations it always lies in the minutia of the details. Within the creative environment, very small incremental changes from the norm or conventional standards can produce progress in a positive direction. Experimental airplanes can crash also so you must verify everything and always keep a watchful eye even on things that seem to be iron clad. This is basic logic and a to argue with it makes Aristotle ( the father of logic in western civilization) of turn over in his grave.
Rick
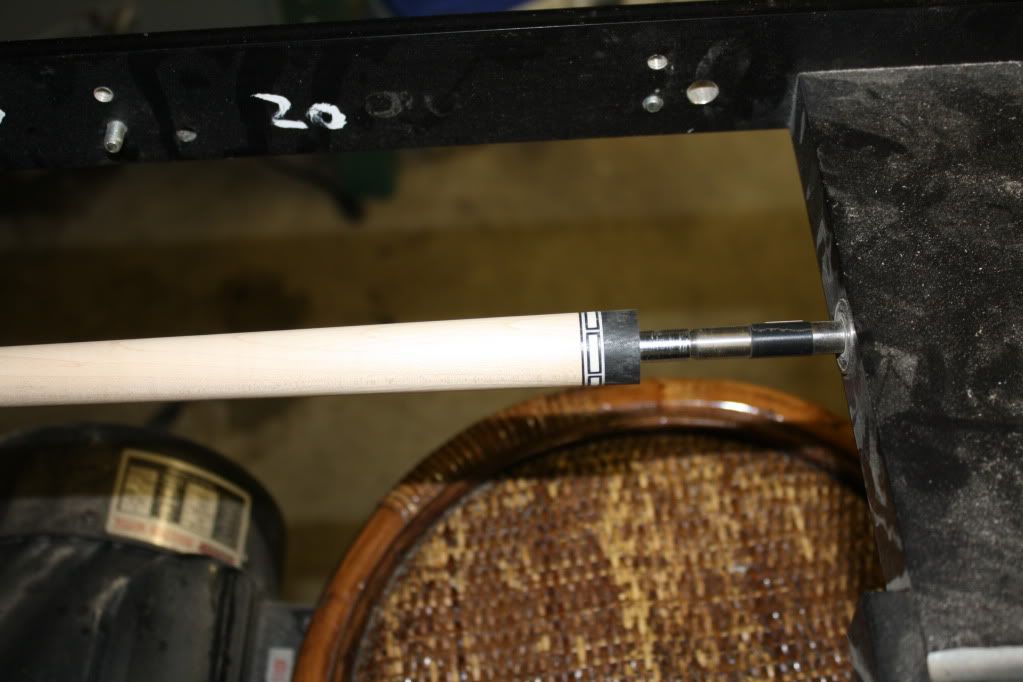
Pre installed ferrule on a 1.5 inch tenon to accomadate the preset spring pressure engineered into my machine and also cutter clearance. Also adding my pin concentricity tool driver requires this length adjustment, hence my discovery of the importance of end concentricity using a 3rd holding point, the live center during tenon cutting.

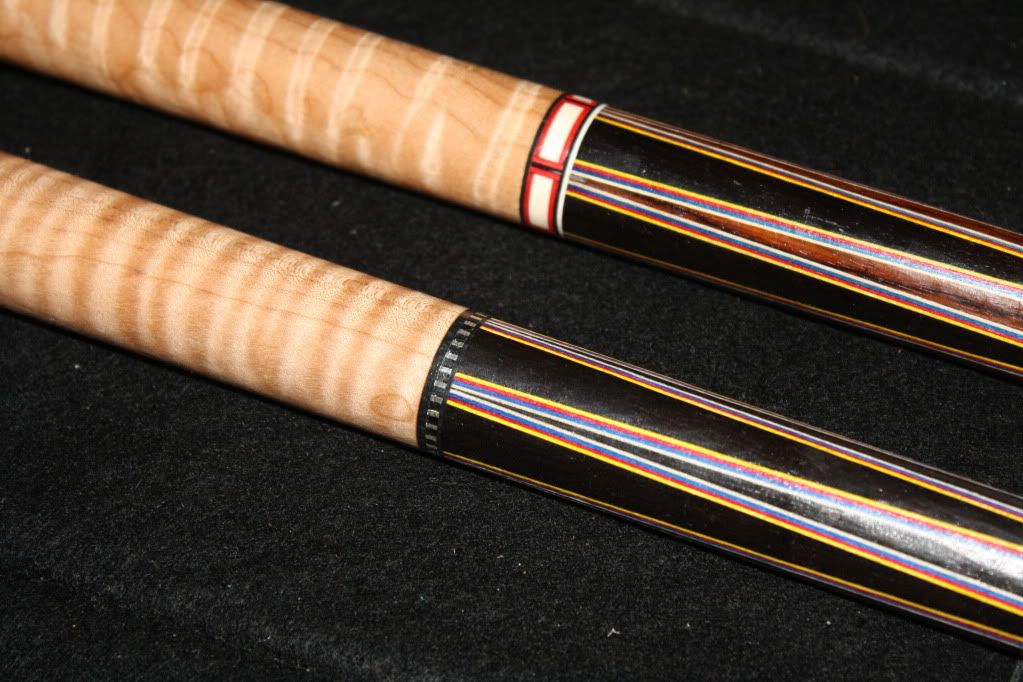
These 5 point cues with 4 veneers and rings in 5 positions are ready for sanding and are not 10 hour cues! ( they take at least another 20 minutes, LOL ) I did time studies of ring billet production but factored them down to cost point and can't see the hours at this time. I will have to do them again. The dog ate my homework.:help:
Last edited:
I use 1.5" tenons, too. I cut them to .372" and thread. The only time I experience deflection is when my single point is very dull, and that's just laziness because it takes about 20 seconds to sharpen it. With a sharp blade that has a good grind & relief shape, you should never see deflection.
And how do you get your ferrule slightly undersized if it's pre-installed and cut with the shaft? I install mine on 13.15mm shafts & shave it to 13.05mm, then when I polish the shaft I have a .1mm lip at the ferrule to sand down, which takes a few seconds & the wood is flush. The ferrule gets subsequent sanding with the higher grit polishing papers, but not enough to remove any measurable material. Whether installed early & shaved with the shaft, or installed later after the shaft is cut, it's the same work. The only thing that takes me more time is shaving it with a single point, manually. I don't care if it takes me more time to do that because I know it'll be perfect. Faster doesn't mean better, especially in cue work.
And how do you get your ferrule slightly undersized if it's pre-installed and cut with the shaft? I install mine on 13.15mm shafts & shave it to 13.05mm, then when I polish the shaft I have a .1mm lip at the ferrule to sand down, which takes a few seconds & the wood is flush. The ferrule gets subsequent sanding with the higher grit polishing papers, but not enough to remove any measurable material. Whether installed early & shaved with the shaft, or installed later after the shaft is cut, it's the same work. The only thing that takes me more time is shaving it with a single point, manually. I don't care if it takes me more time to do that because I know it'll be perfect. Faster doesn't mean better, especially in cue work.
Very interesting thread. Thank you all so much for your thorough input. I think it's inportant for us to see what goes into the cues not just as far as workmanship but also time, even if we never plan to build a cue.
OP- Thanks for asking this excellent question. When I read it I thought the response would not be great. Boy was I wrong.
:thumbup:
OP- Thanks for asking this excellent question. When I read it I thought the response would not be great. Boy was I wrong.
:thumbup:
I use 1.5" tenons, too. I cut them to .372" and thread. The only time I experience deflection is when my single point is very dull, and that's just laziness because it takes about 20 seconds to sharpen it. With a sharp blade that has a good grind & relief shape, you should never see deflection.
And how do you get your ferrule slightly undersized if it's pre-installed and cut with the shaft? I install mine on 13.15mm shafts & shave it to 13.05mm, then when I polish the shaft I have a .1mm lip at the ferrule to sand down, which takes a few seconds & the wood is flush. The ferrule gets subsequent sanding with the higher grit polishing papers, but not enough to remove any measurable material. Whether installed early & shaved with the shaft, or installed later after the shaft is cut, it's the same work. The only thing that takes me more time is shaving it with a single point, manually. I don't care if it takes me more time to do that because I know it'll be perfect. Faster doesn't mean better, especially in cue work.
Hi Eric,
Sounds like you got your program down to a science. However, there is a big difference between .308 and .375.
I have a green wheel and keep them sharp also. As I stated I only saw this on a few tenons but it perked my interest when I saw the wood a little eccentric to the ferrule when the saw was just touching off on the ferrule.
In the long run it does not make a difference because when the X is totally established everything is good. When viewed in cross section, I like to know that the tenon is concentric to the OD of the ferule. No big deal, just me being me.
Not all wood behaves the same so I take the extra few moments to put the live center in my tail stock and my cutting tools are ground on an angle on the back side as not to get in the way and avoid crashing.
Rick
Last edited:
I've never figured how many hours it takes me to build a cue. BUT.....I can tell you how many beers it takes...JER
I figure that.... if I get $10,000 for a cue .... I will make about 3 cents a hour.
Kim
Kim,
Look out, Obama wants 1.5 cents of that 3 cents so he can pay up to the big boss, corruption guised as social collectivism with hope. Campaign contributors must be rewarded for past favors by the Reverse Robin Hood. Steal from the middle class, give to the bosses and dribble a few pennies to the poor with another round of empty promises to usurp their freedom for the votes.
So in reality it is better to be wasteful and inefficient because if your are a producer, they want to punish you and attack you with class warfare.
Hell with procedures and efficiencies, lets all make warped cues so the government can subsidize and bail us out us with the next round of baseless paper money so we can feel good.
Now that I think of it, a plain jane is about 200 hours of my labor, "can I get a tax rebate or some kind of voucher for that from a program"?:scratchhead:
Rick
Last edited:
Rick; I'm with Eric on this one. I don't know why you have under estamated the hours in the process, but I am sure you are not counting all of the steps that Eric has eluded to. You have not counted all of the early steps that it takes to make squares round & then tapered & all of the steps you have forgotten. There is no way your figures are realistic...JER
Rick; I'm with Eric on this one. I don't know why you have under estamated the hours in the process, but I am sure you are not counting all of the steps that Eric has eluded to. You have not counted all of the early steps that it takes to make squares round & then tapered & all of the steps you have forgotten. There is no way your figures are realistic...JER
I think a lot of folks miss or forget about that stuff. With all components at hand, building a cue can go somewhat quickly. It's making components from raw stock that consumes the time. Once they're made, it's all down hill.
Rick; I'm with Eric on this one. I don't know why you have under estamated the hours in the process,h but I am sure you are not counting all of the steps that Eric has eluded to. You have not counted all of the early steps that it takes to make squares round & then tapered & all of the steps you have forgotten. There is no way your figures are realistic...JER
Hi Jer,
A lot of the steps I don't do.
In one of my posts I stated that squares to rounds in 20 seconds. I also pointed out that I taper the forarm on the core and then build the rest of the cue back to the butt at 1.375. Taking .050 passes down to .040 over finsh is then done in short order. I hog the he'll out of that thing because with the full dowel and the poly glue it is stable as hell.
I also made the point several times that times where my attention time as in 6 minutes to take 12 shaft passes due to the automated machines when in fact those 12 passes take an over an hour of machine time. Of coarse this process is done in one to two weeks of duration. If I am not on task doing the work, I don't accrue that time as my working time.
Rings, inlays and points were not included in the 10 hours it takes to do a simple plain jane. It was not an estimate as I noted the term actual accounting of the time element. The topic of this thread is like a hanging curve ball in my wheelhouse. I track everything as it was my training and practice for over 30 years as a marine professional.
I use a statistical process control system for all operations in my shop based on dedicated machines, automatic e stops, and productivity tracking of milestones and job dependencies to a QA/QC Program Procedure.
There are no estimates at this time, only revisions to the actuals.
I don't include wood selection time as I spend many non productive hours in my shop screwing off, watching tv, chatting here on AZ and messing with Bobcad drawings. Picking wood and laying out the cue gets done during meals or when Perry mason is on. We have one rule in our shop, no machines running during Perry Mason or Cash Cab.
Other than the work to create the silver stitch rings the two plain janes cues I posted pics of were built in less than 10 hours each.
Rick
Last edited: