New Tip Job....What Say Ye?

I have seen some really hideous women with wedding rings on. The guy was probably happy with his new tip before his parade was rained on. One can only imagine what his old tip must have looked like judging from the rest of the shaft. It's all relative.

JC
 
Me and Jaden always haven't seen eye to eye...........................................
But Jayden is a perfectionist when it comes down to repairing pool cues............

I have no problem with him working on one of my cues...................

Just because you or I seem to share our opinions allot or even to much creating personal problems between you and other members just like I do is no reason to think that person doesn't know cues and doesn't know how to repair them either.

Jaden knows how to repair cues and he stands behind his work.............

He is a perfectionist and i would expect nothing less then a picture perfect workman ship from him............

Regardless if i get along with him or not................

That is not my point. If i ask for something, that is what i expect to receive.
 
Thank You Mike...

Me and Jaden always haven't seen eye to eye...........................................
But Jayden is a perfectionist when it comes down to repairing pool cues............

I have no problem with him working on one of my cues...................

Just because you or I seem to share our opinions allot or even to much creating personal problems between you and other members just like I do is no reason to think that person doesn't know cues and doesn't know how to repair them either.

Jaden knows how to repair cues and he stands behind his work.............

He is a perfectionist and i would expect nothing less then a picture perfect workman ship from him............

Regardless if i get along with him or not................

I appreciate the kind words but let me add that in this case, the customer was one of the team members on my league team not just any old customer.

If it wasn't I would've never did what I did without clearing it with him first.

I may have replaced the ferrule anyways(because I wouldn't trust my tip to stay on a cracked ferrule) , but I certainly wouldn't have given him a different tip than he asked for. That was solely because I was trying to give my team mate what he was looking for while saving him money at the same time. That's also why I said if he doesn't like it, no problem go ahead and play with it and I'll put the kamui on whenever you ask me to.

As far as leaving the extra .25 mm on the shaft, he just wanted a thinner shaft and as I said, it's impossible to put more back on and I don't mind taking off a little more if he wants it even thinner. Again, I'm just looking out for the customer even if it costs me some extra time.

Jaden
 
Last edited:
football is over, might as well do a little monday morning quarterbacking here

First off, I agree with those that say the shaft and ferrule had been rode hard and put up wet many a time before the last repairman saw them. Might have clouded the issue had he cleaned them good, as it is he gets a pass on all of the scratches and gouges on the ferrule.

We look at things at 10x magnification or more on a computer, try shrinking the picture until the diameter of the tip measures a half inch or a bit less on your screen. Doesn't look great now but it is far from terrible looking too!

Very common for people to trim a tip on a lathe by laying the side of the razor blade or utility knife blade flat against the ferrule. There is a problem with that, the bevel cut on the blade to sharpen it. As the blade cuts into the tip it doesn't go straight forward in a line parallel to the ferrule as envisioned, it follows the angle of the bevel after starting slightly fat to begin with since the edge of the blade isn't flush with the ferrule, it is above it half the thickness of the blade. So the tip starts off a little fat and gets fatter as you cut towards the crown of the tip.

Most newcomers recognize that the tip got a little taper towards the crown while cutting it although many don't know why. They clean things up a little bit and then they get a finished product like we see here. If the right type of pad was used and everything glued up properly what we are looking at is not a great or terrible install, pretty typical in the old days for people that had been repairing cues for twenty or thirty years. Their customers didn't look at tips under 10-30x magnification and were usually pleased just fine.

I'm going to write a little about shaping a tip here, for those who think the post is already too long, please stop here. For those interested in shaping a tip, this will get them started in the right direction.

First the blade: I use one of the premium utility knife blades tightly held in a rigid handle. Not a standard blade and most particularly not a heavy duty blade which starts life extremely dull. The bi-metal and cobalt coated edges are sharper than standard bulk blades. Place the blade in a nonretractable handle. If there is any play in the blade, shim it, the blade can't be moving around on you. I snap off an old blade, makes a fine shim.

Choke up on the shaft so the ferrule and tip are spinning true and seems very stiff. Carefully bring the blade down on the ferrule so that the bevel is riding flush on the ferrule and angle the blade so that you get a slicing shearing action going into the leather. This will give a clean smooth cut all the way to the crown. Shape the crown with the same blade unless you sharpen a tip shaping tool every time you use it and prefer one of those.

I mark a blade each time before I use it and after using it to shape a tip three times, and nothing else, I take the blade out of my handle I only use for installing tips and use it for general work around the shop.

Shaping the crown of a tip is a scraping action so a slight negative rake or ninety degree angle of attack is best. A positive rake of more than the tiniest amount results in a destroyed tip, maybe worse. Holding the blade of the utility knife at ninety degrees will give a negative angle since the bevel has the negative angle built in. With practice you can approach a true ninety degree angle on the bevel but it isn't really needed.

A sharp blade firmly held, the ferrule and tip firmly held, and shaping a tip is a simple operation. Too much shaft sticking out of whatever is steadying it, a retractable utility knife, or a hand held blade without a good bit of experience are trainwrecks waiting to happen.

Tips according to Hu.

Hu

PS: The section dealing with how the original tip in this thread got that way is Monday morning quarterbacking and like all Monday morning quarterbacking could be completely wrong!
 
I have a different perspective; the tip was installed correctly.
The owner of the shaft needs to learn to chalk correctly.
The marks on the ferrule weren't done by the installer, they were done by the chalker.

As to replacing the shaft......what are you people smoking????
There are no guarantees, plain & simple.

LOL... oh wait, you're actually serious ?? Yep, the "hacks" really stick together. I've never installed a tip in my life, never even attempted it, never cared to learn because there are too many qualified folks around Chicago to do it for me, but I'll put up $10K that I could do a better job than what's in the photo. Any takers ?
 
Last edited:
my point

That is not my point. If i ask for something, that is what i expect to receive.


Sense when do you ask for anything.

Sorry but you have the same problem as me, you don't know how to politely talk to people

Jaden is a good cue repairman ...............................
And there is no reason to give the slightest hint that he is not.
 
Last edited:
What would Qbuilder do?

He would just keep the shaft and not reply to any phone calls, text messages or emails. Still would like a shaft or at least my ring work back so I could get a matching shaft from a cue-builder.
 
edit:

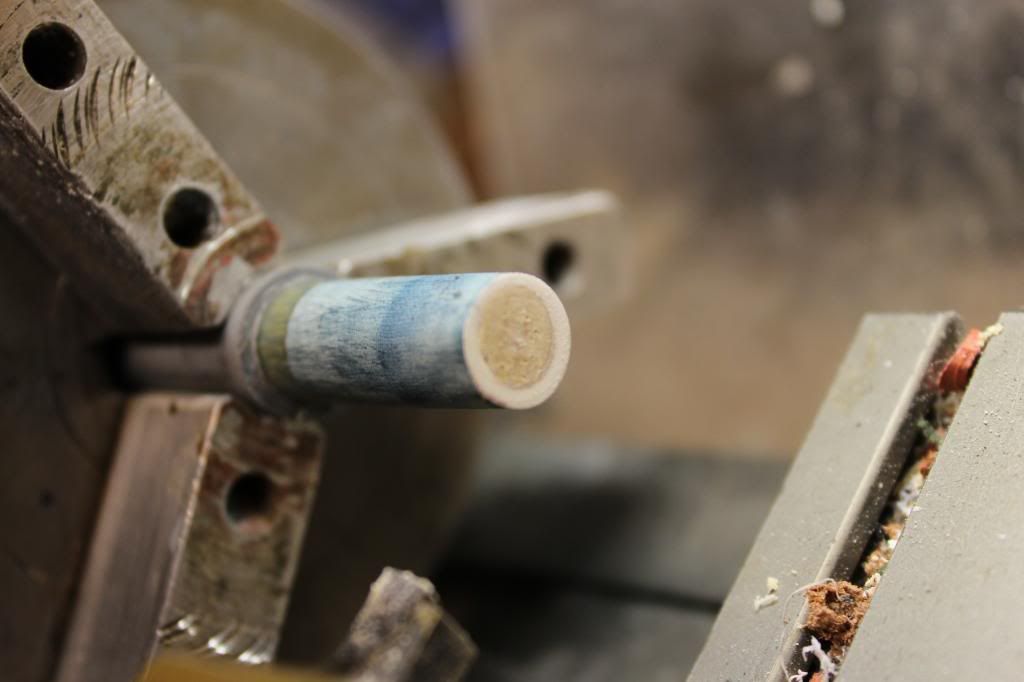
The ferule does look a little short, looks to me like someone at some point turned down a little bit of the ferule cleaning off the old tip treating it like a normal shaft and ferule.

You can't do that on most LD shafts, you have to be careful to only take off the tip, hell, if there isn't a pad already it's easy enough to leave a mm of the old tip as a pad, that won't affect anything.

Jaden

Interesting, I've also used that same "leave a little of the old tip" trick to avoid sanding a ferrule (or an OB carbon-fiber pad).

However, I only do this if the prior installation was also my own work. I don't want to stake my reputation on the integrity of someone else's glue job.

On non-OB equipment, my preferred method is to always add a pad on my first encounter with the shaft. Then I can remove all traces of old glue (and a microscopic amount of pad) for multiple re-tippings before the pad warrants replacement as well.
 
Last edited:
Just curious why he was able to see a hole in the end of the shaft, supposed to be a fiber pad on it. Did he remove that as well?

Most capped ferrules have a tiny hole in the top. The purpose of this hole is to allow excess glue to escape when the ferrule is installed on the shaft. Otherwise, the incompressible fluid would keep the ferrule from seating completely.

Sometimes the tiny hole in the top of a capped ferrule will appear "empty". This can either be due to manufacturing (not enough glue to completely fill the tenon headspace and be pushed out), or by shrinkage due to solvent loss (this sometimes occurs when CA or other solvent-containing glues are used to install ferrules).

Whenever I encounter an open relief hole in a capped ferrule, I generally fill it with a non-solvent-based glue such as epoxy. The purpose of this is neither strength nor adhesion, but to seal off the possible cavity underneath. Otherwise, if a tip or pad installation is performed using a solvent-based cyanoacrylate, it is possible to have a reservoir of "wet" CA trapped which can weaken the joint.

Not saying this was what happened in the example we're discussing, but I wanted to point out the possiblity for those who have not seen it before. I've seen "plug" ferrules on LD shafts which were completely solid, and I'm not sure how this particular OB model is constructed. And of course we have to allow the possibility that this ferrule is not original.
 
Last edited:
LOL... oh wait, you're actually serious ?? Yep, the "hacks" really stick together.

Actually RJ, KJ isn't a hack and I would trust his word on pretty much anything cue repair. Not the blind following a hero or anything. KJ and myself have had many conversations re repair work.

I ask, I receive. Nothing really wrong with that tip, other than the actual picture may not be the best. Ferrules don't receive scratches like that from a lathe.

I am not familiar with that material on an OB cue. Just the wood ferrule.

Once, I had a Pred break cue come in. The tip and pad came off. I could see that the material under had a small concave in it. Obviously with what is left of the tenon and ferrule material, not enuff to glue a pad and tip to.

From turning shafts, I keep a large jar of Maple saw dust handy. I took a small palm full, ground it to a powder. Mixed this in with epoxy resin and then hardener.

Filled the concave in, faced when hard, and put another pad and tip on.

I take it that the OB was an uncapped ferrule and the repairman did the same.

A capped ferrule, and the glue relief hole will get filled in with whatever glue used to put the ferrule on. If a ferrule ever comes loose and is used again, the glue relief hole would be drilled out again.

The scratches on the ferrule are filled with chalk dust. Most likely due to deep drilling a piece of chalk and obviously not chalking properly.

I know this post is a 180 degree turn from my first post.

Just felt that I wanted to mention that KJ isn't a Hack. If he is, so am I and many others.

KJ is the main Pred repairman for Seyberts. I imagine that he may get other repair work from them also.
 
Last edited:
Tip

It looks terrible for just coming out of a repair shop....................................
Who cares who fault it is anymore.
A new ferrule should be installed , because after some cleans that ferrule up it will not be flush with the shaft.....................................................
And I wouldn't suggest sanding on any customers ferrule or shaft without there ok first.

It is possible that cue repairman didn't cause the deep scratches in that ferrule, but the customer should of been asked what he wants done with the ferrule.

The tip not being flush with the ferrule just doesn't make any sense in less the repair man didn't use a lathe.

To me it looks like the tip was replaced by hand and the customer used the shaft after he got it back from the cue repairman.

Scratches in the ferrule is like a magnet to chalk, it is amassing how fast chalk gets into a scratched ferrule.

The tip doesn't look burnished either....... like I said it looks like it was done by hand to me........... but that is just a guess.

This also should be a learning lesson for anyone repairing cues.
If everything isn't done picture perfect, your fault or someone else's fault doesn't make any difference, the cue repair guy is going to get his reputation tarnished.
Never hurts to photograph the cue before the repairs are made.........


This is a standard example of what a ferrule looks like when the tip replaced by hand from someone who did not know what they were doing.

 
Actually RJ, KJ isn't a hack and I would trust his word on pretty much anything cue repair. Not the blind following a hero or anything. KJ and myself have had many conversations re repair work.

.


Then he should not defend inferior work. Usually, the "good" ones will stand up and say it's bad work, and not defend it. C'mon, the guy who installed that tip was a hack, c'mon, just say it, you know you want to ;)
 
ImageUploadedByTapatalk1423306511.254629.jpg

Fresh off the lathe, what one should look like
 
It looks terrible for just coming out of a repair shop....................................
Who cares who fault it is anymore.
A new ferrule should be installed , because after some cleans that ferrule up it will not be flush with the shaft.....................................................
And I wouldn't suggest sanding on any customers ferrule or shaft without there ok first.

It is possible that cue repairman didn't cause the deep scratches in that ferrule, but the customer should of been asked what he wants done with the ferrule.

The tip not being flush with the ferrule just doesn't make any sense in less the repair man didn't use a lathe.

To me it looks like the tip was replaced by hand and the customer used the shaft after he got it back from the cue repairman.

Scratches in the ferrule is like a magnet to chalk, it is amassing how fast chalk gets into a scratched ferrule.

The tip doesn't look burnished either....... like I said it looks like it was done by hand to me........... but that is just a guess.

This also should be a learning lesson for anyone repairing cues.
If everything isn't done picture perfect, your fault or someone else's fault doesn't make any difference, the cue repair guy is going to get his reputation tarnished.
Never hurts to photograph the cue before the repairs are made.........


This is a standard example of what a ferrule looks like when the tip replaced by hand from someone who did not know what they were doing.


Aside from the chalk on the ferrule, what is wrong with it?
 
Aside from the chalk on the ferrule, what is wrong with it?

Ahem...The ferrule is thinner on one side because of uneven hand sanding. I've always done my own tips, mostly by hand and my ferrules don't look like this and I get the tip flush as well. And all the scratches in the ferrule suggest that the person has been using worn out chalk and grinding the tip into the side of it, or using some kind of neanderthal tip tool.

Number one: Do not excessively sand your shaft. Buy the "cue papers" to smooth it out and use a towel to wipe off chalk regularly. Retapering should be done on a lather or some sort of shaft spinner jig.
Number two: Use fresh or properly used chalk without a huge hole in it.
Number three: Don't use those idiotic tip tools that scratch up your ferrule.
Failing any of these: Get used to playing with "Players" brand shafts. That way it's cheap to replace after you ruin it, which you will, and it comes with a free Kamui tip.
 
Last edited:
Then he should not defend inferior work. Usually, the "good" ones will stand up and say it's bad work, and not defend it. C'mon, the guy who installed that tip was a hack, c'mon, just say it, you know you want to ;)

Mr ChicagoRJ,

Let me introduce myself, I'm KJ though you may call me whatever you like including 'hack'.
I've been building 26 yrs now and have run the Seyberts Custom-Shop for 14 yrs.
I was one of the first C-Tecs authorized by Predator when the Repair-Station program was introduced.
To the best of my knowledge, Seyberts now does all of the Predator repair work in this country.
That became too much even for me so I've instructed some of Sey's people on the fine points of replacing ferrules, etc.
I no longer do Predator warranty work unless called upon. I wanted to make that correction to what Terry has stated.
I appreciate that Terry would speak on my behalf but when I have to defend my credentials I'm quite capable of speaking for myself.

Because I didn't respond with an opinion matching your own is of no concern to me. I've considered the source.
You're entitled to your opinion as am I. I have something on which to base that opinion. I've at least installed a tip.

"Usually, the "good" ones will stand up and say it's bad work, and not defend it." ??? Viva la difference.

The truth is that the good ones know what really went down and have chosen not to argue with those that don't.

"Then he should not defend inferior work."

I don't. I'm very critical of the work I see and the work I do. I didn't get to where I am by allowing crap.
What I will defend is the integrity of an installer who did his job as requested and is now being blamed for
pre-existing conditions of the shaft. The hash marks on the ferrule were obviously done during a previous tip install.
Apparently the owner of the shaft was OK with that because that wasn't his complaint. All he wanted was a tip-tool.
This thread is about one persons opinion of a tip install that was probably done weeks ago on a shaft that he doesn't even own.

People, if it's alright with you, I've got a life to live and this bash-session has gone on far too long.

KJ

You make huge claims about a shaft you've never held. First off, the problem didn't start with the scratches, the lack of the carbon fibre pad, or the void being filled. It started with the tip not being trimmed flush. Repeated many time in this thread was it said that the tip was sticking out fingernail thickness. You claimed it was trimmed flush. You made outright lies of statements. You don't want to be bashed? Sorry but don't make lies of statements to defend shoddy work.
 
Back
Top